Step-by-Step Instructions
Follow these detailed steps to address eight annoying household problems systematically. Take your time, inspect your work as you progress, and double-check fasteners for stability.
Fix 1: Eliminating Squeaky Door Hinges
Squeaking hinges result from metal-on-metal friction as factory lubricants wear away. To solve this permanently, tap out the hinge pin using a nail and a hammer while supporting the door frame. Clean the pin with a damp rag to remove old debris and rust. Apply a light layer of petroleum jelly, graphite lubricant, or paraffin wax directly along the length of the metal pin. Slide the pin back into the hinge knuckles and tap it firmly into position with a rubber mallet. Wipe away any excess lubricant immediately to protect painted trim.
Fix 2: Repairing Stripped Screw Holes in Cabinets and Doors
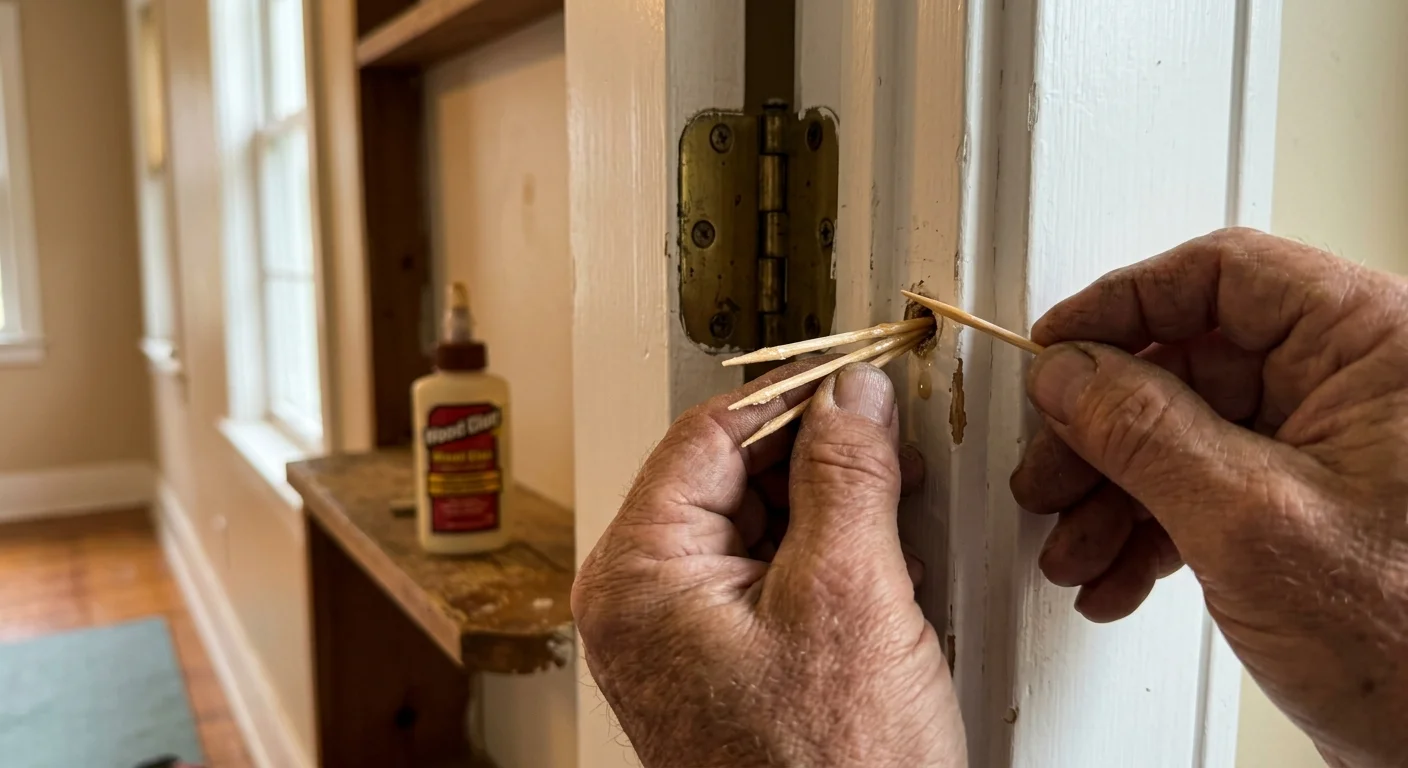
Cabinet hinges and door latches often sag when screws strip the surrounding wood grain. Remove the loose screw completely from the hinge leaf. Dip three to four wooden toothpicks or wooden matches into interior PVA wood glue. Insert the glue-coated toothpicks tightly into the enlarged screw hole until fully packed. Trim the protruding ends flush with the surface using wire cutters or a utility knife. Allow the glue to cure for 30 minutes, then reinsert your original screw directly into the center of the wooden filler; the screw threads will bite firmly into the fresh wood.
Fix 3: Dissolving Hard Water Buildup on Faucets and Showerheads
Low water pressure and erratic spray patterns usually stem from mineral deposits blocking tiny nozzle openings. Fill a durable plastic freezer bag half full with warm distilled white vinegar. Slip the bag over the showerhead or faucet spout until the mineral-encrusted nozzles submerge entirely in the liquid. Secure the bag tightly around the fixture neck using a sturdy rubber band or zip tie. Leave the bag in place for two to three hours—or overnight for stubborn lime buildup. Remove the bag, scrub the rubber nozzles gently with an old toothbrush, and run hot water for one minute to flush away residual scale.
Fix 4: Patching Minor Drywall Holes and Dings
Unwanted nail holes, screw pops, and door handle dings visually clutter your walls. Scoop a small pea-sized amount of lightweight spackling compound onto the tip of a 2-inch flexible putty knife. Press the spackle firmly into the hole, holding the knife at a 45-degree angle to scrape away excess material flush with the surrounding drywall. Allow the compound to dry for two hours until it turns bright white. Sand the repair lightly using a fine 220-grit sanding block in a smooth circular motion until seamless. Wipe away fine drywall dust with a microfiber cloth before applying matching touch-up paint.
Fix 5: Dampening Noise with Cabinet Door Bumpers
Loud cabinet doors and drawers create jarring noises every time family members close them. Clean the inner contact corners of your cabinet frames using rubbing alcohol and a clean cloth to eliminate oil and dust grease. Peel a clear silicone or felt bumper pad from its backing paper and press it firmly against the interior frame corner where the door makes contact. Hold pressure for five seconds to ensure a permanent bond. Repeat this step for both top and bottom corners of every cabinet door and drawer face across your kitchen and vanity cabinets.
Fix 6: Restoring Smooth Operation to Window and Drawer Tracks
Sticky window frames and stubborn wooden drawers bind up when dirt accumulates in track grooves. Vacuum out loose dust, dirt, and pet hair from the tracks using a crevice attachment tool. Wipe the tracks clean with a damp microfiber cloth and let them dry completely. Spray a dry silicone lubricant along vinyl window channels, or rub a bar of solid paraffin wax directly onto wooden drawer runners. Open and close the window or drawer five to six times to distribute the dry lubricant evenly; avoid oil-based sprays like standard motor oil, which attract heavy dust particles over time.
Fix 7: Fixing Continuous Toilet Tank Running
A running toilet wastes hundreds of gallons of water and creates an annoying continuous trickling sound. Turn off the water supply valve behind the toilet tank and flush to empty the reservoir. Inspect the rubber flapper valve at the bottom of the tank; if the rubber appears warped, cracked, or mineral-crusted, unhook it from the flush lever chain and side pegs. Install a universal flexible rubber flapper by snapping its side arms onto the overflow tube pegs. Connect the lift chain to the flush handle arm, leaving roughly one-half inch of slack so the flapper seals flat against the valve seat without binding.
Fix 8: Sealing Drafty Doors and Windows with Weatherstripping
Air drafts around window sashes and exterior door frames leak conditioned air out while letting cold drafts inside. Clean the target jamb surface with household cleaner to remove dust, grit, and peeling paint. Measure the height and width of the frame section with a tape measure, then cut self-adhesive foam weatherstripping tape to exact length using scissors. Peel off the paper backing gradually as you press the foam firmly along the inner frame stop where the sash or door rests when closed. Ensure the foam compresses slightly when closed to create an airtight seal against energy loss.