Brightening your front path prevents dangerous falls and creates an inviting entrance after sunset. A well-designed system transforms dark hazards into secure routes without blinding your guests.
Poor visibility turns simple steps, cracked concrete, and stray garden hoses into major tripping hazards. You can easily fix these trouble spots by using the right outdoor safety ideas and strategic fixtures.
Upgrading your landscape lighting protects your family and boosts nighttime curb appeal. With a few focused exterior projects, you will make every walkway safe, dependable, and visually stunning.
Project Overview & Why It Matters
Safe walkways at night protect your family and visiting guests from unexpected injuries. Navigating an unlit path in the dark creates genuine physical hazards around your home.
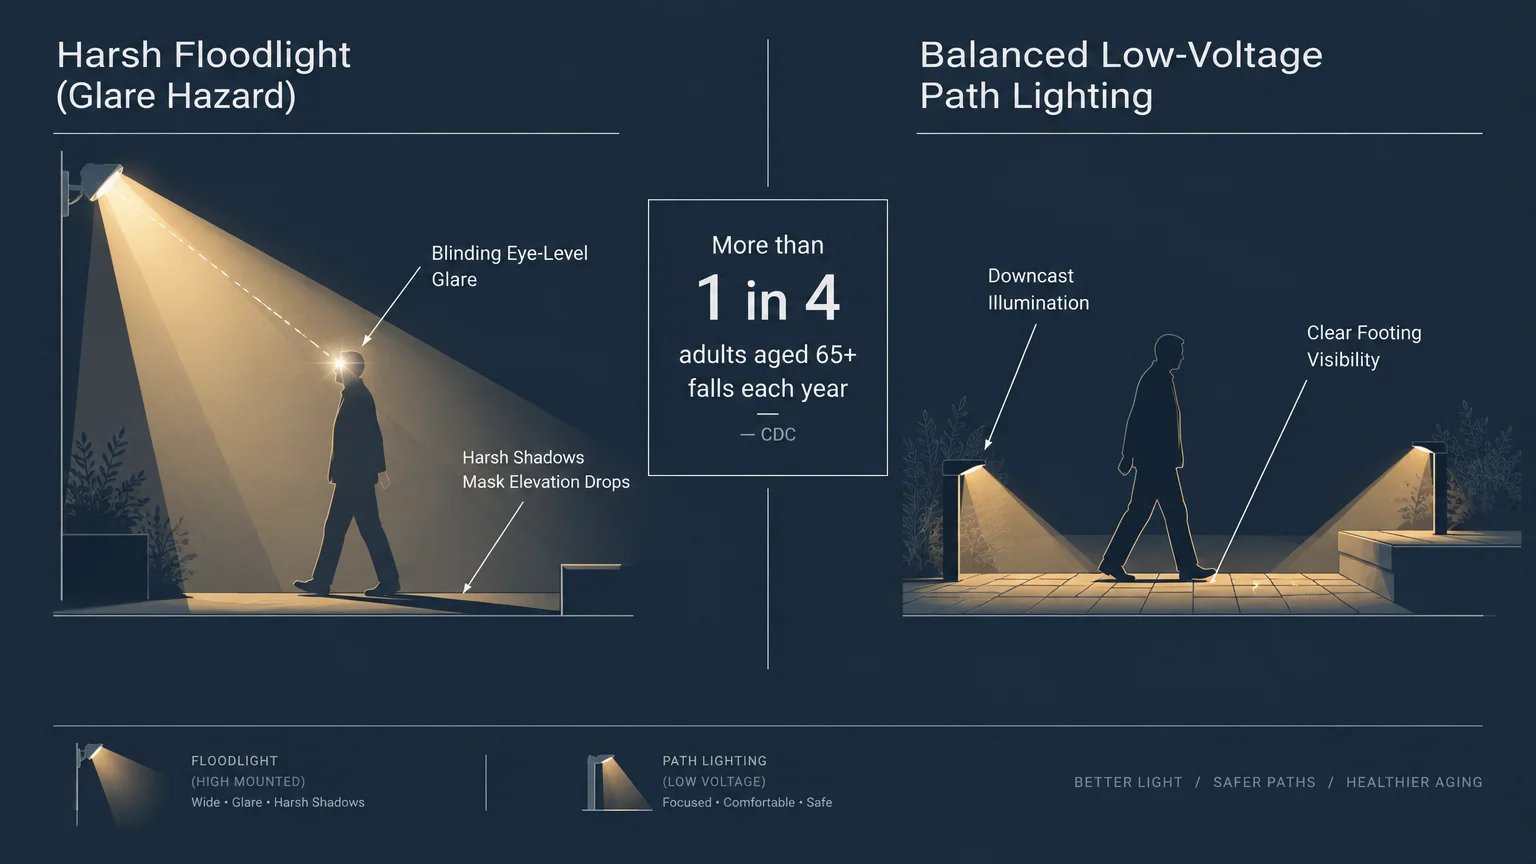
According to the Centers for Disease Control and Prevention, falls are the leading cause of injury among older Americans. More than one in four adults aged 65 and older falls each year.
Sudden elevation changes, loose pavers, and dim illumination represent the primary environmental culprits behind these outdoor accidents. Addressing these factors immediately lowers your household risk profile.
Many homeowners assume that preventing falls requires installing massive commercial floodlights. However, overwhelming brightness often creates harsh contrast and blinding glare that impairs your natural night vision.
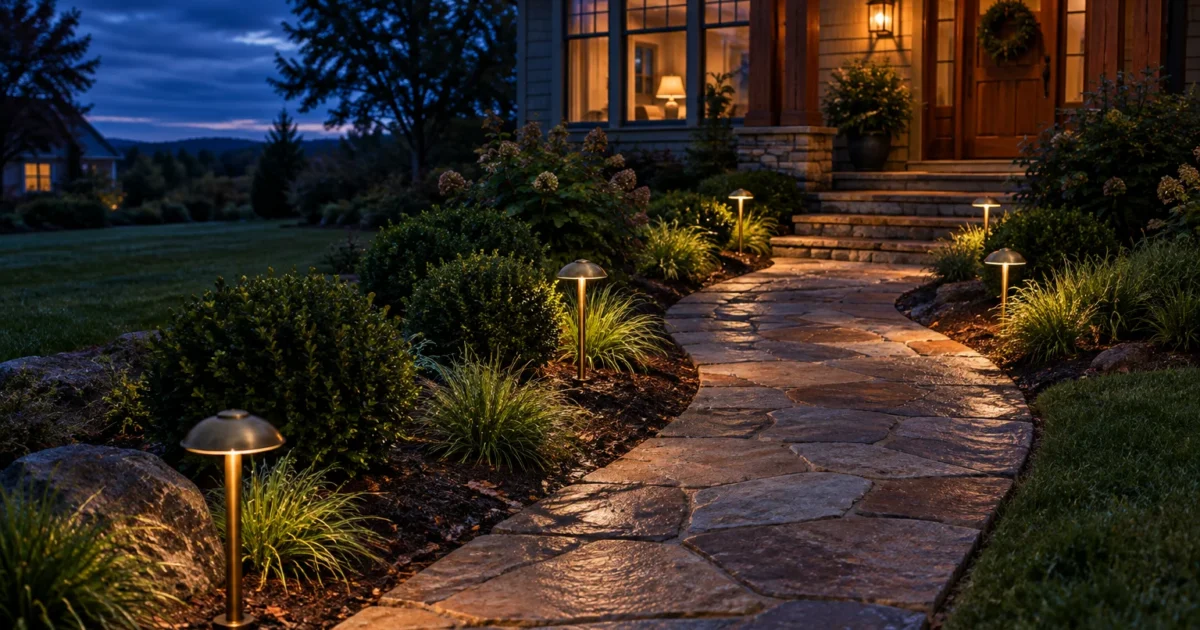
A balanced pathway lighting layout directs gentle illumination downward toward the walking surface. This careful approach reveals path boundaries without shining piercing light into pedestrians’ eyes.
Upgrading your pathways also increases your home’s exterior security and visual curb appeal. Intruders actively avoid illuminated grounds, while neighbors appreciate a welcoming front entryway.
Professional landscape lighting installations typically cost between $2,000 and $4,500. A standard project featuring eight to sixteen fixtures averages approximately $3,250 to $4,000.
Fortunately, you can achieve professional-grade results on a modest budget. Tackling the project yourself allows you to customize every light fixture while saving thousands on labor.

Tools, Materials, and Prep Checklist
Proper planning ensures that your outdoor safety ideas perform reliably through every season. Gathering your materials beforehand prevents repeated trips to the home improvement center.
Low-Voltage Transformer: Choose a multi-tap 120-volt to 12-volt or 15-volt transformer rated between 150 and 300 watts. Size your transformer to operate at roughly 80 percent of its maximum capacity.
Landscape Lighting Cable: Select 12-gauge or 14-gauge direct-burial low-voltage wire. Heavier 12-gauge wire minimizes voltage drop along runs longer than 50 feet.
Weatherproof Fixtures: High-grade solid brass or cast-aluminum fixtures cost $50 to $150 per unit and resist weather damage. If you prefer solar path lights, multi-packs generally cost $20 to $60.
GFCI Receptacle: Outdoor safety begins with a dedicated 120-volt exterior receptacle. National Electrical Code requirements mandate GFCI protection alongside an extra-duty weatherproof while-in-use cover.
Waterproof Wire Connectors: Purchase silicone-filled twist nuts or mechanical clamp connectors rated for direct burial. Standard indoor wire nuts quickly corrode and cause electrical shorts underground.
Essential Digging Tools: You need a square-point trenching spade, wire strippers, and a digital multimeter. A sturdy mallet helps you drive mounting stakes into compacted soil.
Ground Prep and Safety: Before digging any trenches, always dial 811 to locate buried public utilities. Marking gas, electric, and water lines prevents dangerous and expensive accidents.

Step-by-Step Instructions
Transforming your walkway into a secure path requires a structured installation process. Follow these nine proven ideas to build a dependable, glare-free outdoor layout.
Idea 1: Stagger Low-Voltage Path Lights at Controlled Lumens
Space your path fixtures 6 to 8 feet apart along the border. Staggering fixtures on alternating sides prevents a disorienting airport runway look while distributing light evenly.
Select LED bulbs producing 100 to 200 lumens per fixture. Exceeding 300 lumens creates harsh shadows and blinds pedestrians walking down the path.
Set each fixture about 6 inches off the walkway surface edge. This setback prevents lawnmowers and foot traffic from damaging the light housing.
Angle the fixture heads slightly downward to keep the focal beam squarely on the paving stones. Keeping light below eye level preserves nighttime peripheral vision for visitors.
Idea 2: Illuminate Elevation Changes with Hardscape Step Lights
Exterior steps represent the single most dangerous feature on any nighttime walkway. Installing flush-mounted or under-cap step lights eliminates hazardous dark patches on stone or timber stairs.
Mount fixtures beneath the overhang of each stair tread to project light downward. This placement casts a soft shadow directly beneath the step nosing, defining the drop clearly.
For existing concrete steps, surface-mount side sconces onto adjacent retaining walls. Aim the light beam across each tread to illuminate the walking surface without glaring upward.
Connect all step lights to a shared low-voltage circuit to ensure consistent brightness. Consistent step lighting prevents sudden shifts in contrast that lead to missed footings.
Idea 3: Install Motion-Activated Floodlights with Precision Cutoffs
Strategic floodlighting adds instant visibility when unexpected movement occurs along your property boundaries. Position dual-head motion sensors near dark side yards, gates, and garage approaches.
Adjust the sensor range and timer settings so passing street traffic does not trigger the light. Set the illumination duration to two or three minutes per activation.
Choose floodlights with built-in downward shields to prevent light spill into neighboring bedrooms. A focused beam directs maximum lumens onto critical pathways without polluting the night sky.
Pair high-mounted motion sensors with low-voltage path systems so dark walkways do not startle guests. The layered response provides welcoming base lighting with added emergency brightness when needed.
Idea 4: Cast Ambient Moonlight Using Overhead Downlighting
Mounting downward-angled spotlights high in mature tree branches creates a gentle moonlighting effect. This technique bathes large expanses of winding paths in soft, filtered illumination.
Secure fixtures at least 15 to 25 feet above the ground using tree-friendly stainless steel hanger brackets. Never choke tree trunks with tightly wrapped wires or standard screws.
Use wide 60-degree flood lenses and warm color temperatures. The falling light filters through leaves and branches, producing natural shadows that clarify the ground below.
Downlighting eliminates the visual clutter of multiple ground stakes along natural woodland trails. It provides broad, even coverage over irregular flagstone or gravel walkways.
Idea 5: Define Edges with High-Contrast Stone and Plant Borders
Effective walkway safety relies on physical contrast as well as electric lighting. Installing light-colored river rock or crushed limestone borders along dark pavers establishes clear visual margins.
Dig a shallow 4-inch trench alongside the walkway and lay commercial landscape fabric. Fill the trench with pale decorative aggregate to outline the walkway boundaries at night.
Incorporate low-growing, drought-tolerant plants like creeping thyme or dwarf mondo grass behind the stone border. These low plants visually anchor the path without spilling over and creating tripping hazards.
The contrasting colors reflect ambient moonlight and fixture beams back toward your eyes. This visual cue guides pedestrians safely along the center of the walkway.
Idea 6: Apply Non-Slip Surface Treatments and Level Sunken Pavers
Unlit cracks and uneven pavers trigger serious falls long before darkness settles in. Lift settled stones and fill low spots with crushed paver base and compacted leveling sand.
Check your walk with a 4-foot level to ensure transitions remain under a quarter-inch height difference. Even small vertical offsets can catch shoe heels and cause severe stumbling.
Coat slick concrete, bluestone, or brick surfaces with a penetrating sealer mixed with polypropylene slip-resistant aggregate. The microscopic grit creates essential traction during wet or freezing weather.
Pressure wash the surface thoroughly before sealing to remove slick algae and moss. Clean, textured pavers give shoes reliable grip during rainy autumn evenings.
Idea 7: Integrate Low-Profile Deck and Post Cap Illumination
Elevated wooden or composite boardwalks need integrated perimeter lighting to mark drop-offs. Install downward-directed post cap lights on railing posts to cast soft perimeter glows.
Drill recessed channel holes to run low-voltage wiring discreetly along structural joists under the boards. Protect all wires from rodents and foot traffic using protective conduit sleeves.
Add miniature flush-mounted deck dot LEDs directly into the surface perimeter. These tiny fixtures produce subtle marker lights that keep pedestrians oriented away from open edges.
Recessed deck lighting prevents protruding trip hazards on tight boardwalk pathways. It keeps structural pathways navigable without requiring elevated stakes.
Idea 8: Direct Shielded Bollard Fixtures for Long Driveway Paths
Extended walkways connecting driveways to detached garages require substantial commercial-grade fixtures. Heavy-duty architectural bollards provide rugged durability and wide ground coverage.
Choose bollards featuring internal louvers or solid tops that cast light strictly downward. Unshielded glass bollards produce severe glare that temporarily blinds drivers and pedestrians alike.
Space bollards 10 to 15 feet apart along broad pathways or driveway shoulders. Anchor their bases into small concrete footings to keep them plum and stable against lawn equipment.
Bollards withstand winter snowblowers and stray bicycle tires much better than standard stake lights. Their structural height also pushes illumination above low snowdrifts.
Idea 9: Upgrade to Smart Lighting Timers and Daylight Sensors
Automating your outdoor walkway lighting guarantees that lights switch on exactly when dusk falls. Replace outdated mechanical pins with an astronomical digital timer or smart transformer controller.
Astronomical timers automatically adjust for shifting daylight hours throughout the year. You will never arrive home to an unlit front walk after daylight saving time changes.
Connect smart controllers to your home Wi-Fi network to automate schedules or dim fixtures after midnight. Dimming fixtures to 50 percent overnight saves energy while maintaining safety margins.
Smart systems also alert you via smartphone when a breaker trips or an outlet loses power. Rapid notification prevents you from discovering dark hazards unexpectedly.
Trenching and Wiring Low-Voltage Pathways
After finalizing your fixture positions, bury your landscape lighting cable securely in the ground. Consistent burial depth prevents accidental severed lines during routine gardening.
According to the National Electrical Code Table 300.5, direct-burial low-voltage cable operating at 30 volts or less requires a minimum burial depth of 6 inches.
Use a flat spade to cut a clean 6-inch vertical slit through your turf. Tuck the low-voltage wire deep into the trench bottom before tamping the sod closed.
Connect your lights to the main feed line using silicone-filled waterproof wire nuts. Test each connection with a digital multimeter before burying the junctions beneath the soil.
Leave a small 6-inch slack loop of cable at each light fixture location. Extra wire allows you to adjust fixture positions as landscape plants mature over time.

Style & Finishing Touches
Blending safety features with exterior design principles ensures your walkway looks appealing day and night. Choose fixture finishes that complement your home’s exterior hardware and siding palette.
Matte black and oil-rubbed bronze finishes blend seamlessly with modern, craftsman, and colonial architecture. Natural copper develops a rich verdigris patina over time, which looks wonderful in lush cottage gardens.
Always respect night-sky preservation principles when designing your layout. The international organization DarkSky International recommends using correlated color temperatures of 3,000 Kelvin or lower.
Warm white lighting between 2,200K and 2,700K produces an inviting glow reminiscent of candlelight. These warmer tones minimize blue-light scattering and preserve the natural sleep cycles of local wildlife.
Select fully shielded fixtures that emit zero uplight above a 90-degree horizontal cutoff plane. Shielding directs all usable lumens onto your walkways, where you actually need them.
Layer your pathway lights with subtle background illumination on garden beds and structural walls. Balanced lighting layers eliminate eerie black voids behind your illuminated path.
Consider cross-lighting wide walkways from opposing angles rather than overpowering a single side. Cross-lighting softens harsh silhouettes and highlights natural ground textures evenly.

Maintenance & Long-Term Care
Routine outdoor safety ideas require consistent seasonal maintenance to maintain optimal performance. Neglected fixtures accumulate grime, lose alignment, and suffer from moisture intrusion.
Clean fixture lenses twice a year using warm water, mild dish soap, and a microfiber cloth. Removing baked-on mud, lawn debris, and hard-water deposits restores full lumen output.
Inspect fixtures each spring after winter frost heaves and heavy snowfalls. Straighten leaning stakes and press loosened fixtures firmly back into the ground.
Trim encroaching shrubs, perennials, and groundcovers every two months during the growing season. Overgrown foliage blocks light distribution and casts deceptive shadows across walking surfaces.
Test system operating voltage periodically using a digital multimeter at your furthest light fixture. If voltage drops below 10.5 volts, upgrade your wire gauge or reposition fixtures onto separate runs.
Inspect the transformer cabinet and GFCI outlet box every fall for insect nests or moisture damage. Clear any spider webs and verify that the weatherproof cover seals securely.
Reapply non-slip masonry sealers every two to three years on high-traffic stairs and stone walkways. Fresh sealer maintains surface grit and stops water infiltration from splitting frozen pavers.
FAQ
How many lumens do I need for safe outdoor walkway lighting?
Dedicated pathway lights require between 100 and 200 lumens per fixture for ideal visibility. Never exceed 300 lumens, as intense brightness creates blinding glare that reduces night vision.
How far apart should I space pathway lights along a garden path?
Space walkway fixtures 6 to 8 feet apart, staggering them on alternating sides of the path. Staggered spacing prevents dark blind spots while avoiding a rigid runway appearance.
Can I install low-voltage landscape lighting myself, or do I need an electrician?
Most homeowners can safely install 12-volt landscape lighting without an electrician. However, you should hire a licensed electrician to install the dedicated GFCI-protected 120-volt outdoor receptacle.
What color temperature is best for nighttime exterior safety?
Select warm white bulbs between 2,200K and 2,700K, and never exceed 3,000K. Warm color temperatures reduce harsh glare, preserve peripheral night vision, and minimize environmental light pollution.
How deep should I bury outdoor landscape lighting wire?
Under National Electrical Code Table 300.5, bury low-voltage cable at least 6 inches deep. This depth shields the wire from lawnmower blades, garden spades, and surface erosion.
Takeaway & Next Steps
Creating safe walkways at night transforms your property into a welcoming, accident-free sanctuary. Combining proper lumen levels, shielded fixtures, and level surfaces delivers lasting peace of mind.
You do not need a massive budget to achieve outstanding exterior safety and curb appeal. Strategic DIY improvements yield immediate functional benefits while elevating your home’s nighttime architecture.
Ready to start upgrading your pathways this weekend? Take these three immediate actions to get your project moving in the right direction:
1. Walk your property in total darkness. Turn off exterior lights and note dangerous tripping spots, dark steps, and uneven surface transitions.
2. Inspect your exterior electrical outlet. Verify that your source has functional GFCI protection and an approved extra-duty weatherproof cover.
3. Sketch a scaled lighting layout. Map fixture locations 6 to 8 feet apart and calculate total wattage to select your transformer.
Have you recently completed an outdoor walkway lighting upgrade around your home? Share your project photos with our community, or subscribe to our newsletter for weekly renovation guides.