The American House
  • Home
  • DIY
  • Garden
  • Tips & Tricks
  • Expert Tips
Home / Expert Tips

The Kitchen Countertop Materials That Hold Up Best Over Time

June 24, 2026 · 11 min read
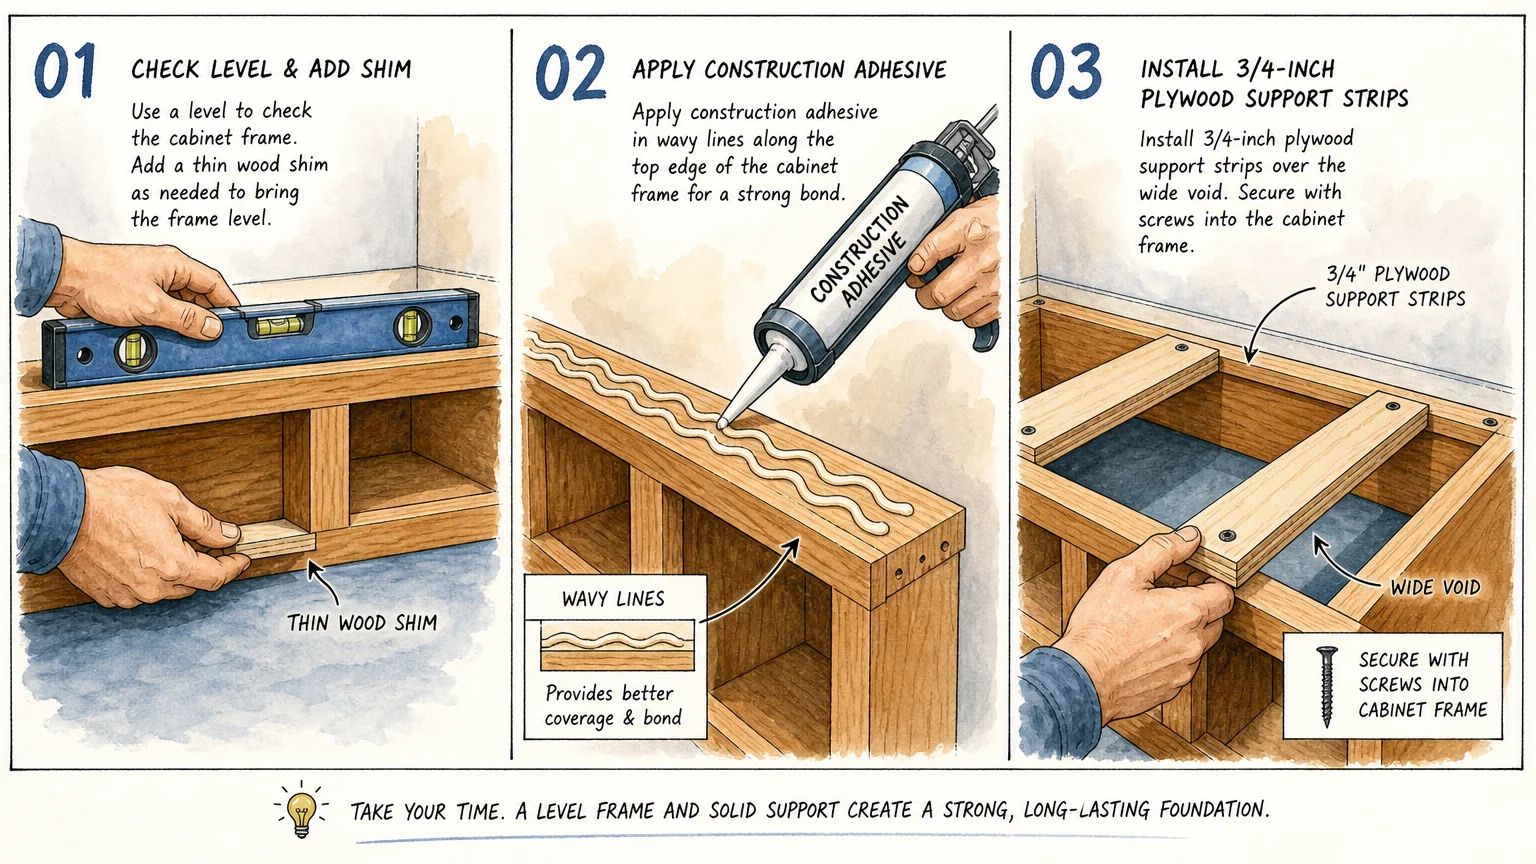
A step-by-step diagram showing cabinet leveling, adhesive application, and plywood support installation.
Follow these three illustrated steps to level, glue, and support cabinet frames for a lasting countertop.

Step-by-Step Instructions

Installing premium countertop materials requires precision. Engineered quartz, sintered stone, and granite demand professional fabrication. However, you can entirely handle the demolition, prep work, and installation of butcher block slabs yourself. Follow these phases to manage your project safely.

Phase 1: Shut Off Utilities and Disconnect Plumbing

Start by clearing out the cabinet underneath your sink. Locate the shut-off valves for your hot and cold water supply and turn them clockwise until they stop. Turn on the faucet to bleed out remaining water pressure. Use an adjustable wrench to disconnect the supply lines. Unplug your garbage disposal and disconnect the dishwasher drain hose. Loosen the plastic slip nuts on the P-trap to separate the sink drain from your plumbing branch. Slice the silicone bead around your drop-in sink with a utility knife, push the sink upward, and lift it out.

Phase 2: Safely Demolish the Old Surface

Check inside your base cabinets for hidden fasteners. Builders often drive wood screws upward through the corner blocks directly into the countertop substrate. Use your cordless drill to remove every visible screw. Next, deeply score the caulk line where the countertop meets the backsplash. This step prevents you from tearing the delicate drywall paper. Wedge your putty knife into the seam between the cabinet box and the countertop, tapping it gently to break the adhesive bond. Slide your pry bar into the gap and lever the countertop upward. Enlist a helper to lift the surface off the cabinets and carry it outside.

Phase 3: Level and Prepare the Base Cabinets

Heavy countertop materials will crack if installed on an uneven surface. Place your 4-foot level across the tops of your base cabinets, checking side-to-side and front-to-back orientations. If you discover dips, tap wooden shims under the base cabinets at the floor line to bring the entire run into perfect alignment. Once the cabinets sit perfectly level, secure them to the wall studs using cabinet screws. Sweep the top edges clean to ensure no debris interferes with the new countertop.

Phase 4: Manage the Installation Process

If you purchased butcher block, cut your material to the exact dimensions using a circular saw with a carbide blade. Apply construction adhesive to the top edges of your base cabinets, position the wood, and drive screws up through the corner braces to lock it down. If you hired professionals to install heavy stone, clear a wide path from your driveway to your kitchen. Installers carry slabs weighing upwards of 800 pounds. Keep children and pets out of the work zone entirely. Once installers dry-fit the stone, they will apply color-matched epoxy to the seams, polish the joints flat, and run a protective bead of silicone along the wall.

Pages: 1 2 3 4 5 6 7

Share this article

Facebook Twitter Pinterest LinkedIn Email

Leave a Comment Cancel reply

You must be logged in to post a comment.

Search

Latest Posts

  • Bright living room featuring a beige sofa, wooden coffee table with eucalyptus, fireplace, and hardwood floors. Don't Get Rid of These 10 Things If You Want to Sell Your Home Faster, Realtors Say
  • A plastic bin holding chemicals, batteries, motor oil, and a fluorescent bulb sits on a garage workbench. Before You Throw That Away: 12 Items That Need a Different Kind of Disposal
  • A woman sits at a wooden counter working on a laptop surrounded by paperwork and blueprints in a home under renovation. SALT Deduction Gets an Update for 2026 Taxes - Find More Here!
  • Close-up of hands placing a digital radon detector on a wooden shelf in a sun-drenched, cozy living room. 9 Signs Your Home Needs a Radon Test
  • A close-up photo of a hand touching a fogged-up window with condensation, inside a cozy warmly-lit room. 7 Signs Your Windows Are Losing Energy Efficiency
  • A warm gouache illustration of a backyard wooden deck in late spring with a small bucket of tools, evoking home prep before summer. 8 Signs Your Deck Needs Repairs Before Summer
  • A homeowner using a digital moisture meter to inspect a faint water stain on a living room baseboard. 9 Signs Your Plumbing Has a Hidden Leak
  • A close-up photograph of a deep diagonal crack in a concrete basement wall, illuminated by a harsh low-angle flashlight. 7 Signs Your Foundation Needs a Professional Look
  • A woman wrapped in a blanket on a sofa looks towards a drafty winter window, holding a warm mug in a cozy home. 8 Signs Your Home's Insulation Needs an Upgrade
  • A homeowner shines a flashlight on the rusted base of an old basement water heater, searching for leaks. 9 Signs Your Water Heater Is Nearing the End of Its Life

Newsletter

Get the latest posts delivered to your inbox.

Related Articles

bed bugs

Hidden Bed Bugs! 5 Places You Didn’t Know They Lived In

Yeah, you read that right! Bed bugs don’t just love to make a home out…

Read More →
A close-up photo of a hand touching a fogged-up window with condensation, inside a cozy warmly-lit room.

7 Signs Your Windows Are Losing Energy Efficiency

Easily apply adhesive foam weather stripping to seal window gaps and improve your home’s energy…

Read More →
Bathroom Cleaning Mistake

11 Bathroom Cleaning Mistakes You Don’t Even Know You’re Making

Avoid these bathroom cleaning mistakes if you want your space to shine! Most folks think…

Read More →
front door plant

11 Front Door Plants for a Jaw-Dropping Entrance

Do you want to have a jaw-dropping entrance? Then these are the front door plants…

Read More →
The Kitchen Cabinet Organization Hacks Professional Organizers Use

The Kitchen Cabinet Organization Hacks Professional Organizers Use

A father and daughter build a wooden birdhouse by following clear, step-by-step instructions. Step-by-Step Instructions…

Read More →
pet-friendly products, keep mice at bay

These 9 Helpful Pet-Friendly Products that Keep Mice at Bay

Are you afraid of mice, but do you have a pet? These pet-friendly products keep…

Read More →
A sunlit living room corner featuring a dual-tone accent wall painted in sage green and terracotta peach behind a mid-century modern chair.

20 Color Combination That Works in North-Facing, East-Facing, and South-Facing Rooms

Roll out paint swatches on paper to easily visualize how different color combinations react to…

Read More →
home renovation

10 Home Renovations That Will Instantly Sell Your House

10 Home Renovations Worth Your Time and Money: Home renovations are very important when it…

Read More →
small rooms

Small Rooms? Make Them POP With These Rug Ideas

Do you have small rooms, and your space looks a tad crowded? These rugs will…

Read More →
The American House

Inedit Agency S.R.L.
Bucharest, Romania

contact@theamericanhouse.com

Explore

  • Contact
  • Editorial Policy
  • Advertiser Disclosure
  • FAQ
  • Subscribe
  • Unsubscribe
  • Privacy Policy
  • Terms and Conditions
  • Disclaimer
  • Do not sell my personal information
  • Request to Know
  • Request to Delete
  • CA Private Policy

Categories

  • DIY
  • Expert Tips
  • Garden
  • Home
  • Tips & Tricks

© 2026 The American House. All rights reserved.