Surging residential construction in ten high-growth states is reshaping property values and giving you unprecedented leverage. If you live in these booming markets, understanding how fresh housing supply influences local pricing helps you decide whether to renovate or sell.
Rather than triggering a sudden real estate collapse, this influx of new construction creates fierce competition for older properties. You can capitalize on this shift by modernizing your home layout and core mechanical systems.
Upgrading your existing space allows you to preserve your low mortgage rate while matching modern builder standards. Here is how expanding supply alters the market and what you can do to enhance your property today.
Project Overview & Why It Matters
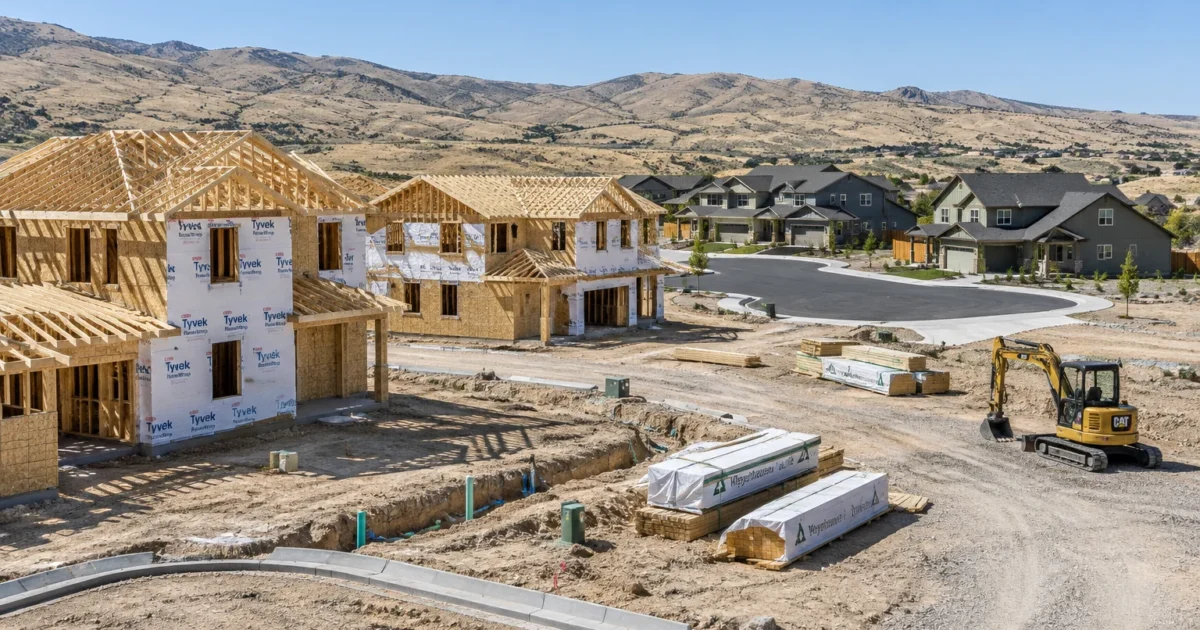
A massive pipeline of residential construction is reshaping neighborhoods across the country. Understanding these construction numbers gives you a strategic blueprint for upgrading your home to stay competitive against brand-new developments.
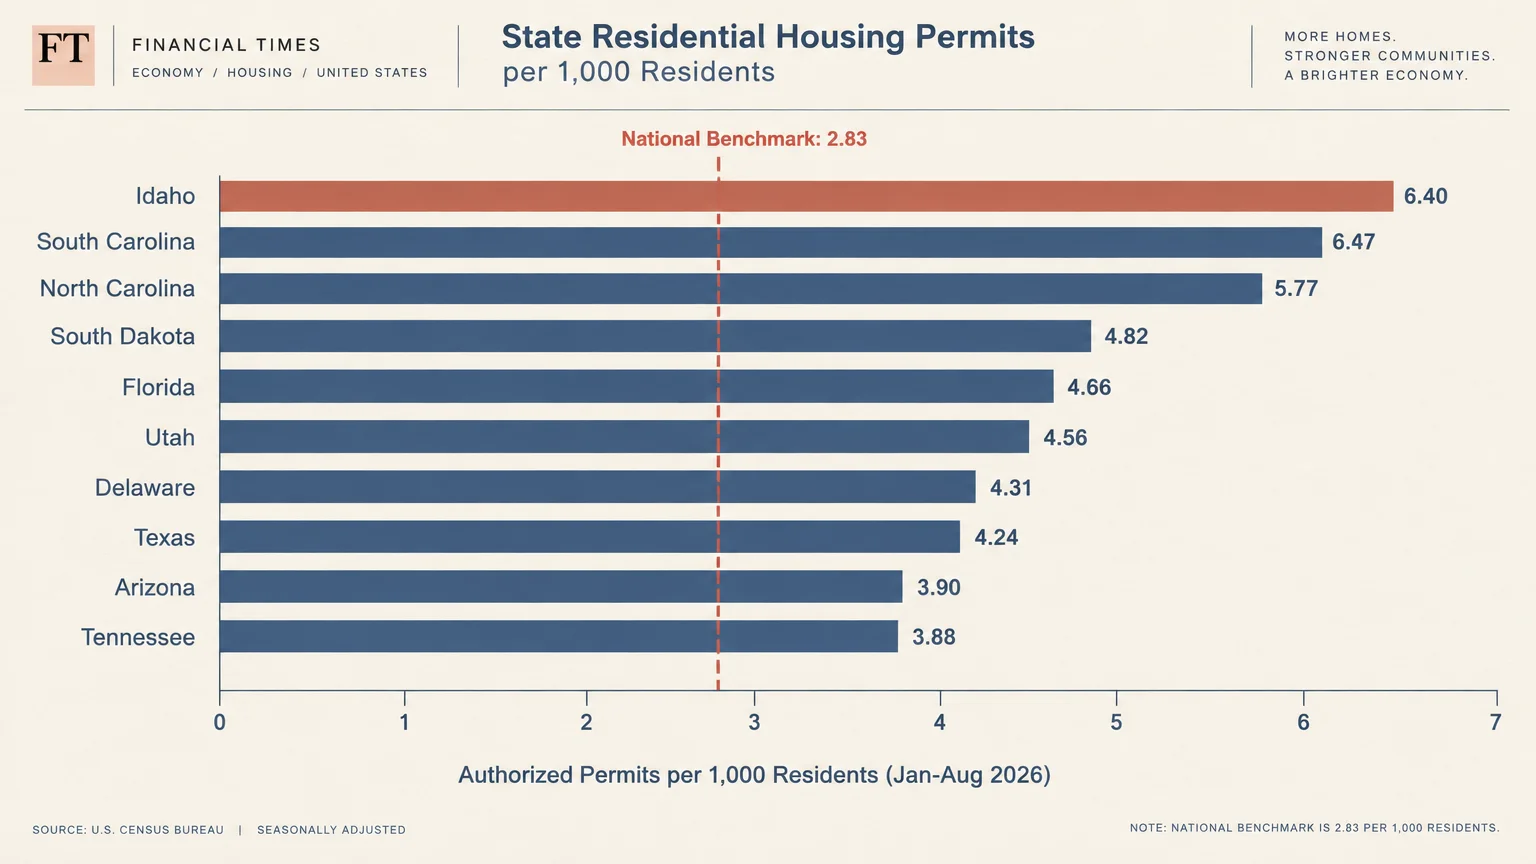
According to the University of Nevada, Las Vegas (UNLV) Lied Center for Real Estate, ten states lead the nation in housing permits per capita. Between January and August 2026, national builders pulled 968,187 permits, averaging 2.83 units per 1,000 residents.
Idaho leads the country with 6.40 permits per 1,000 residents, approving 12,994 units. That rate sits 126 percent above the national benchmark, placing significant supply pressure on local subdivisions.
South Carolina ranks second with 6.07 permits per 1,000 residents, totaling 33,822 approved homes. That volume represents a 5 percent increase over 2025 and a 15 percent rise since 2023.
North Carolina follows closely at 5.77 permits per 1,000 residents, while South Dakota posts 4.82 units. Florida rounds out the top five with 4.66 permits per 1,000 residents.
Utah authorizes 4.56 units per 1,000 residents, followed by Delaware at 4.31. Texas maintains a rapid pace at 4.24, Arizona records 3.90, and Tennessee posts 3.88 permits per 1,000 residents.
Raw construction volume reveals an equally dramatic surge in sheer housing numbers. Data from the U.S. Census Bureau shows builders authorized 1,431,616 units nationwide in 2025, with single-family permits pacing at an annualized rate of 845,000.
Texas dominated total construction volume with 210,217 authorized units, including 140,579 single-family homes. Florida secured the second spot with 178,297 total units, authorizing 111,173 single-family builds.
California added 103,856 homes, while North Carolina permitted 86,167 units. Georgia authorized 61,196 homes, Arizona approved 51,532, South Carolina logged 45,862, and Tennessee permitted 43,374 units.
New York permitted 38,667 homes, largely concentrated in multifamily developments, while Washington state authorized 34,913 units. These regional construction hubs directly influence local property valuations.
Despite this massive construction boom, home prices are not experiencing an immediate freefall. The national housing shortage still stands at roughly 4 million homes, which cushions existing home equity from steep nationwide drops.
Wall Street analysts at J.P. Morgan project national home prices to remain flat at 0 percent in 2026 before rising 3 percent in 2027. Zillow forecasts modest national growth of 1.2 percent, with selective price softening in heavy-supply metros.
Active national listings reached 1,183,520 homes for sale in late 2026. Sun Belt and Mountain West markets have now returned to pre-pandemic inventory levels, sparking price wars between builders and resale sellers.
In high-volume markets like Austin, Texas, the median sale price of a newly built home is roughly $72,000 less than an existing resale home. Production builders slash prices and buy down interest rates to offload inventory quickly.
Furthermore, the 21st Century ROAD to Housing Act, signed into law on July 11, 2026, reduces zoning hurdles to accelerate suburban infill construction. This regulatory shift ensures that new subdivisions will continue entering the market steadily.
Trading up to a newly constructed house carries a heavy financial penalty. According to Freddie Mac, 30-year fixed mortgage rates sit around 7.18 percent.
Swapping an existing 4 percent mortgage for a new loan adds an average of $1,100 to your monthly payment. That financial reality raises a homeowner’s typical principal and interest commitment from $1,332 to $2,468 per month.
South Carolina homebuyers need roughly 35 percent more household income today to match 2018 affordability metrics, with Idaho showing similar strain. Building new inventory helps balance supply, but it does not produce bargain-basement purchase prices overnight.
The strategic solution is simple: modernize your current home instead of moving. By reconfiguring floor plans and upgrading building systems, you match new home quality while keeping your existing low-rate mortgage.
Tools, Materials, and Prep Checklist
A comprehensive whole-home modernization requires commercial-grade tools and quality materials. Assembling these supplies beforehand keeps your layout changes on schedule and within budget.
Reciprocating Saw: Purchase a heavy-duty 12-amp corded or 18-volt brushless model with bi-metal demolition blades. Approximate cost: $120 to $180.
Laser Level and Stud Finder: Use a self-leveling cross-line laser and a deep-scanning digital wall sensor to map framing accurately. Approximate cost: $90 to $150.
Framing Nailer and Air Compressor: Rent or purchase a 21-degree pneumatic framing gun with a pancake compressor. Approximate cost: $250 to $350.
Drywall Lift and Finishing Trowels: Secure a mechanical sheet lifter and professional stainless-steel drywall knives ranging from 6 to 12 inches. Approximate cost: $180 to $260.
PEX Crimp Tool and Tube Cutter: Use ASTM-compliant crimp rings and calibrated manual crimp pliers for plumbing rough-ins. Approximate cost: $60 to $110.
Safety Gear and Dust Protection: Equip yourself with NIOSH-rated N95 or P100 respirators, impact-resistant ANSI safety glasses, and heavy leather work gloves. Approximate cost: $50 to $80.
Kiln-Dried Framing Lumber: Stock number-two grade 2×4 and 2×6 studs for partition walls and structural blocking. Budget $4.50 to $8.00 per eight-foot stud.
Drywall Panels: Select 1/2-inch lightweight gypsum for interior walls and 5/8-inch Type X fire-rated drywall for garage walls and mechanical rooms. Budget $15 to $22 per four-by-eight panel.
Mineral Wool Thermal Insulation: Install R-15 batts for 2×4 interior sound dampening and R-21 to R-38 batts for attic thermal boundaries. Budget $1.10 to $1.85 per square foot.
PEX-A Tubing and Fittings: Choose 1/2-inch and 3/4-inch cross-linked polyethylene tubing paired with lead-free brass fittings. Budget $0.40 to $0.75 per linear foot.
Electrical Rough-In Supplies: Acquire 12/2 and 14/2 NM-B copper wire, UL-listed metal junction boxes, and tamper-resistant 20-amp receptacles. Budget $120 to $160 per 250-foot wire coil.
Begin your prep work by establishing airtight containment zones using 6-mil polyethylene plastic sheeting and zipper barriers. Tape every seam securely along the ceiling and floor to isolate drywall dust from living spaces.
Cover finished flooring with heavy-duty corrugated cardboard floor runners or 1/4-inch hardboard sheets. Tape the perimeter seams with low-tack painter tape to prevent grit from scratching underlying surfaces.
Rent a 20-yard roll-off construction dumpster before tearing down walls. Place it close to an exterior access point to streamline debris disposal and maintain a clean jobsite.
Step-by-Step Instructions
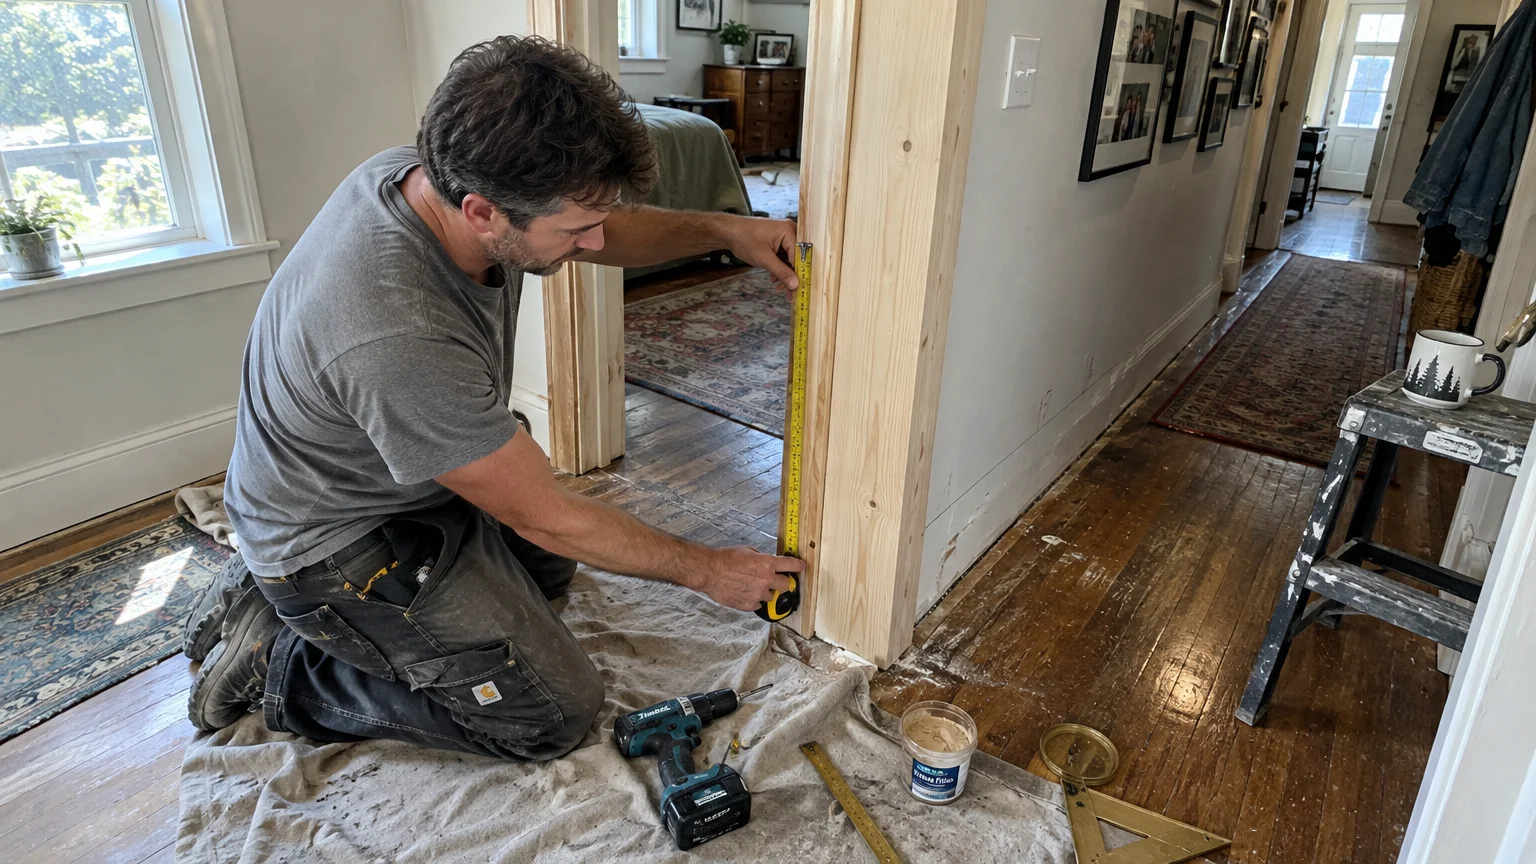
Modernizing an existing home to rival newly constructed floor plans requires a systematic approach. Follow these structured phases to rework layouts, improve efficiency, and maintain strict structural safety.
Phase 1: Assessing Load Paths and Securing Permits
Never demolish an interior wall without verifying load paths. Head into the attic or basement to inspect joist direction and roof support points before cutting framing.
Walls running perpendicular to ceiling joists or supporting roof purlin braces almost always carry structural loads. Walls running parallel to floor joists typically function as non-bearing partition walls.
Hire a licensed structural engineer if you plan to remove a load-bearing partition. An engineer calculates the required dimensions for a laminated veneer lumber (LVL) beam to carry ceiling loads across open spans.
Submit your engineered plans to your local municipal building department to secure framing, electrical, and plumbing permits. Adhering to municipal building codes protects your insurance coverage and guarantees clean property title transfers later.
Phase 2: Safe Demolition and Mechanical Isolation
Shut off main electrical breakers and water supply valves feeding the renovation zone before striking any surface. Verify dead circuits using a calibrated non-contact voltage tester directly against exposed wires.
Score all drywall joints with a sharp utility knife along adjacent walls and ceilings. Scoring prevents tears across drywall paper in rooms you intend to leave undisturbed.
Pry drywall sheets away from studs using a heavy pry bar rather than smashing through with sledgehammers. Controlled removal limits dust production and keeps hidden plumbing stacks, electrical lines, and HVAC ductwork intact.
Pull nails and screws out of remaining framing using a dedicated fastener puller. Sweep subfloors thoroughly and vacuum fine particulate using a HEPA-filtered shop vacuum.
Phase 3: Structural Framing and Space Optimization
If removing a load-bearing wall, build temporary shoring walls on both sides of the partition. Construct these support walls using 2×4 studs spaced 16 inches on center, wedged tightly between top and bottom plates.
Cut out the existing bearing studs to create your opening. Hoist the engineered LVL beam into position directly beneath the ceiling joists, resting each beam end on doubled or tripled jack studs.
Fasten the beam assembly securely using structural framing screws specified by your engineering plan. Secure the ceiling joists to the side of the beam with heavy-duty metal joist hangers.
Frame new partition walls using straight 2×4 studs spaced 16 inches on center. Fasten the bottom plate into the subfloor using 3-inch framing nails, verifying square alignment with your laser level.
Phase 4: Mechanical, Electrical, and Thermal Retrofits
Modern spec homes prioritize energy performance and dedicated power circuits. Upgrade your home systems now while wall cavities remain open and accessible.
Run home-run PEX plumbing lines from a centralized manifold directly to each fixture. This layout eliminates hidden tee-fittings inside walls and dramatically reduces pressure drops during fixture use.
Pull dedicated 20-amp circuits using 12/2 NM-B wire to kitchen counter zones, utility rooms, and home offices. Install metal stud guards over all framing holes drilled within 1.25 inches of stud faces to protect wiring from drywall screws.
Seal all exterior wall penetrations, top plate wire holes, and plumbing chases using expanding polyurethane fire-block foam. Air sealing prevents conditioned indoor air from leaking into unconditioned attic spaces.
Friction-fit mineral wool batt insulation inside interior partition walls surrounding bedrooms, bathrooms, and laundry rooms. Mineral wool provides superior fire resistance and acoustic isolation compared to traditional fiberglass batts.
Phase 5: Drywall, Surface Finishing, and System Commissioning
Fasten 1/2-inch drywall sheets horizontally across studs using 1-1/4-inch Type W drywall screws spaced 12 inches apart. Stagger vertical butt joints by at least four feet to prevent noticeable surface cracks.
Embed paper joint tape into a thin bed of all-purpose joint compound across every seam. Allow the compound to dry for 24 hours before applying subsequent finishing coats.
Apply two successive thin coats of lightweight topping compound using an 8-inch and then a 12-inch taping knife. Feather the outer edges out at least six inches past the tape line to create flat transitions.
Sand the dried compound smoothly using 150-grit sanding sponges under bright halogen work lights. Wipe away all drywall dust with a damp microfiber cloth before applying high-solids PVA drywall primer.
Call your municipal building inspectors for final rough-in and structural approvals before applying decorative paint. Once approved, pressurize plumbing lines to check for leaks and energize breaker panels to test every circuit.
Style & Finishing Touches
New construction often looks crisp, but production builders frequently cut corners on interior trim and finish quality. You can easily outshine builder-grade aesthetics by incorporating intentional architectural millwork and durable finishes.
Replace generic, narrow baseboards with modern five-inch flat-stock trim paired with crisp three-inch door casings. These substantial trim profiles ground your rooms and deliver the visual weight found in luxury custom homes.
Swap hollow-core interior doors for solid-core panel units. Solid-core doors block airborne noise between living spaces and swing with a solid feel that immediately conveys quality construction.
Install recessed LED ultra-thin wafer lights throughout your newly configured open-concept living zones. Select fixtures with selectable color temperatures, setting them to a warm 3000K to create an inviting atmosphere.
Complement open floor plans with durable luxury vinyl plank (LVP) flooring or engineered white oak hardwood. Running continuous hard-surface flooring throughout main living spaces makes rooms appear larger and eliminates awkward transition strips.
Modernize your color palette using warm neutrals, earthy taupes, and soft whites. Avoid stark, sterile gray tones that dominated spec builds over the past decade.
Pair light wall colors with matte black or satin brass door hardware and plumbing fixtures. This controlled contrast delivers an upscale architectural appearance on a manageable budget.
In the kitchen, install quartz countertops with eased edges rather than standard laminate or entry-level granite. Quartz offers exceptional stain resistance and requires zero annual sealing, making it ideal for busy households.
Maintenance & Long-Term Care
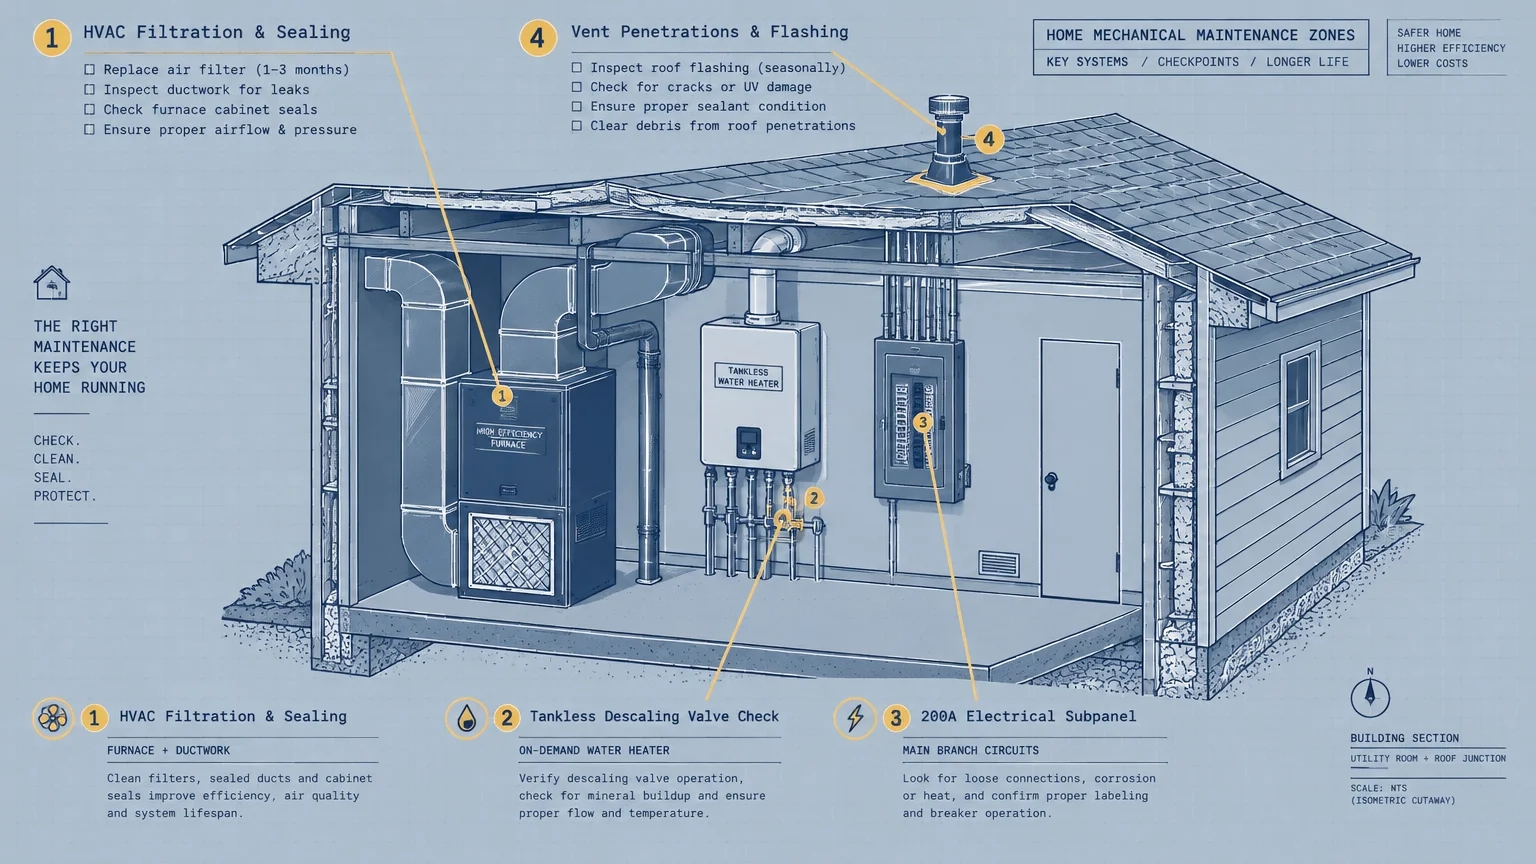
Maintaining whole-home renovations protects your investment and prevents minor issues from turning into expensive structural repairs. Establish a seasonal inspection routine to keep all framing, finishes, and mechanical components performing smoothly.
Inspect your HVAC air filters every 30 days during peak heating and cooling seasons. Replace filters promptly with MERV 11 or MERV 13 units to protect evaporator coils and preserve indoor air quality.
Vacuum dust and pet hair from return air grilles to prevent blower motors from overheating. Clear the exterior HVAC condensate drain line twice each year by flushing it with eight ounces of distilled white vinegar.
Monitor your newly installed drywall seams during seasonal humidity shifts. Wood framing naturally expands during humid summers and contracts during dry winters, which can produce fine hairline cracks above door headers.
Repair minor hairline cracks using flexible acrylic latex caulk or elastomeric joint compound rather than rigid spackle. Flexible compounds move with framing lumber and eliminate recurring surface fractures.
Inspect silicone caulking around kitchen sinks, backsplashes, and bathroom vanities annually. Remove peeling or discolored caulk completely before applying fresh mold-resistant 100 percent silicone sealant.
Exercise whole-home water shut-off valves and fixture isolation valves twice a year. Turning valve handles prevents mineral scale from freezing ball valves in the open position during emergencies.
Inspect attic spaces every autumn to confirm that insulation batts remain undisturbed and evenly distributed. Ensure soffit intake vents remain clear of blown insulation to allow continuous attic cross-ventilation.
FAQ
Will home prices crash in states building the most homes?
A broad real estate price crash remains unlikely in heavy-building states like Texas, Florida, and Idaho. While raw inventory has rebounded, national supply remains roughly 4 million homes short, keeping overall pricing stable.
Economists at J.P. Morgan project flat national price growth of 0 percent in 2026, while Zillow expects 1.2 percent growth. Expect moderate localized price softening in outer-ring suburban subdivisions where builders compete aggressively against resale listings.
How does the 21st Century ROAD to Housing Act impact existing homeowners?
Signed into law on July 11, 2026, the act streamlines residential permitting and reduces zoning barriers nationwide. This legislation encourages higher-density infill development and speeds up the delivery of entry-level housing units.
For existing homeowners, this federal initiative introduces more nearby housing options over time. Maintaining and upgrading your home layout ensures your established property commands top dollar against these incoming residential communities.
Should I sell my house or renovate given current mortgage rates?
Renovating your current home is generally far more cost-effective than moving in today’s interest rate environment. With 30-year mortgage rates averaging 7.18 percent, trading houses adds roughly $1,100 per month to an average mortgage payment.
Upgrading your current space allows you to keep an existing 3 to 4 percent interest rate. You can fund modern layout upgrades using cash savings or focused home improvement loans while preserving your existing equity.
Which upgrades compete best against new spec houses?
Open-concept kitchen and living room reconfigurations yield the highest perceived value among modern buyers. Removing non-load-bearing walls creates sightlines and functional space that match modern architectural standards.
Pair open floor plans with dedicated home office spaces, updated electrical service panels, and quartz kitchen counters. Upgrading mechanical insulation also delivers superior acoustic privacy that cheap spec homes cannot match.
Do I need a building permit to remove interior walls?
You always need a building permit if you alter load-bearing walls, relocate plumbing stacks, or modify electrical circuits. Even non-bearing partition removals often require municipal notification to verify fire-blocking and smoke detector compliance.
Always consult your city building department before picking up a sledgehammer. Permitted renovations guarantee code compliance, maintain homeowners insurance validity, and prevent legal complications during future property sales.
Takeaway & Next Steps
A building surge in high-growth states is expanding buyer choices, but high mortgage rates mean moving remains expensive. Modernizing your existing layout gives you the look and feel of new construction while preserving your low mortgage payment.
By removing obsolete partition walls, modernizing rough-in systems, and installing substantial architectural trim, you transform your house into a high-performance home. You protect your property value and enjoy an open, functional living environment every day.
Step 1: Map your home floor plan. Walk your living areas with a tape measure to identify non-load-bearing partitions that interrupt kitchen, dining, and family room traffic flow.
Step 2: Consult an engineer and verify permits. Schedule an on-site structural evaluation if your plan involves wide wall openings, and file your plans with the local building department.
Step 3: Source framing and insulation materials. Purchase your dimensional lumber, fasteners, and mineral wool batts to begin framing your open-concept layout with confidence.
Have you completed a whole-home renovation or opened up a tight floor plan in your house? Share your renovation photos and join our active community by subscribing for weekly hands-on project guides at The American House.