You can transform a dull, stained tub into a gleaming centerpiece without spending thousands of dollars on a full replacement. Simple restoration techniques give your bathroom an immediate high-end upgrade over a single weekend.
Whether you face persistent mineral scale, chipped porcelain, or peeling paint, targeted DIY methods restore that original factory shine. You will save money while avoiding the chaotic demolition of a standard remodel.
Tackle your fixture with proven prep steps and professional-grade refinishing strategies. Here is how you can make your old bathtub look new on a realistic homeowner budget.
Project Overview & Why It Matters
A dingy bathtub drags down the appearance of your entire bathroom. Over decades of daily use, hard water minerals, soap scum, and aggressive scouring powders etch deep micro-scratches into the original enamel.
These worn surfaces trap grime and resist everyday cleaning products. Restoring your existing tub eliminates microscopic pores, revives the high-gloss sheen, and creates a sanitary barrier against recurring mildew.
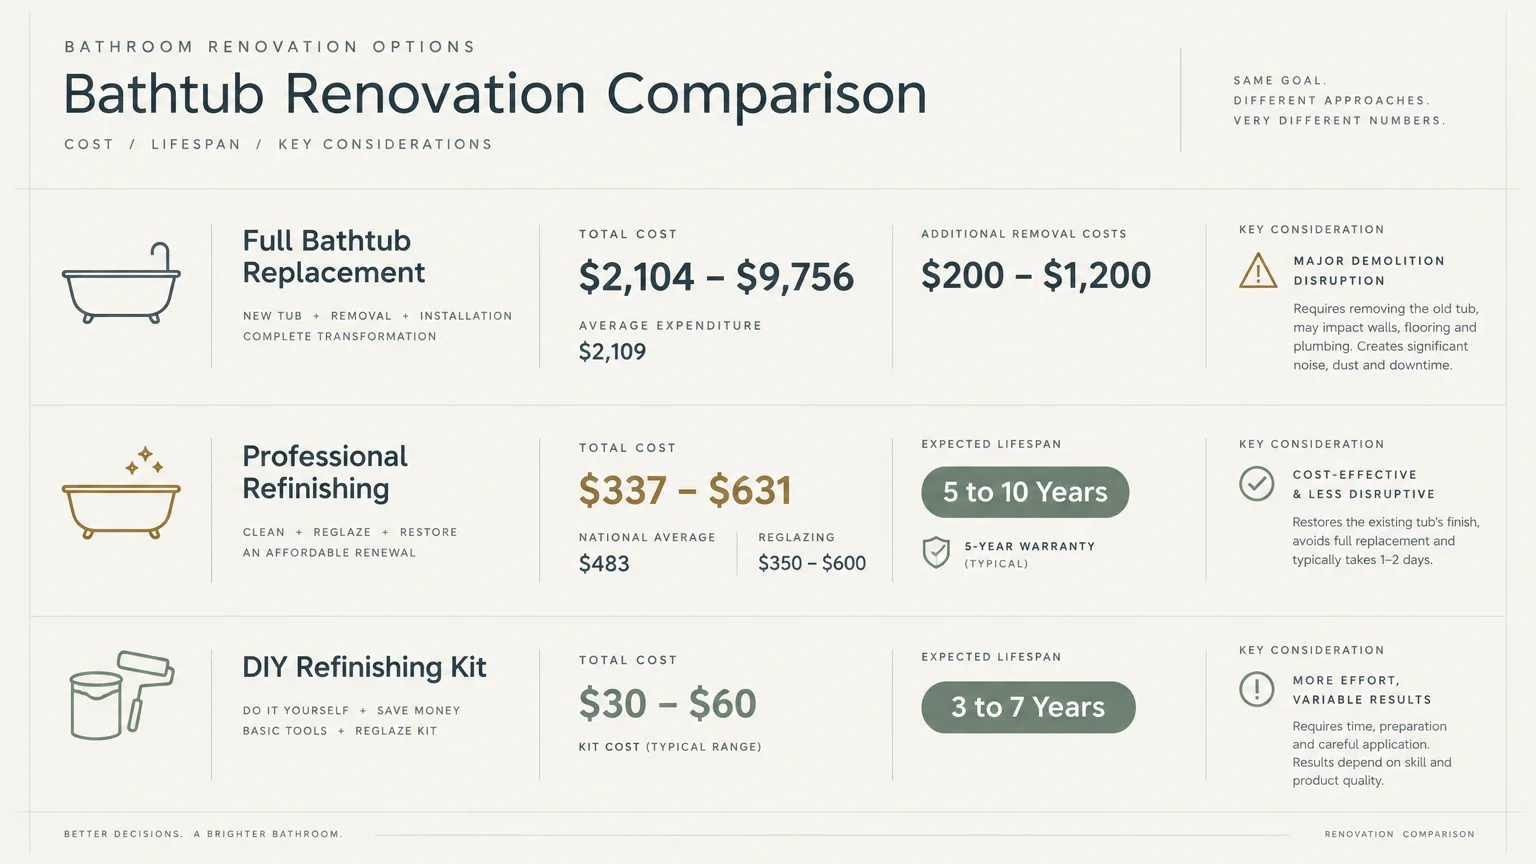
Tearing out a tub causes major structural disruption. According to Angi, a full bathtub replacement typically costs between $2,104 and $9,756 once you factor in demolition, plumbing changes, and surrounding tile repairs.
For a standard swap in a 100-square-foot bathroom, industry estimates from Homewyse and This Old House range from $1,666 to $2,781, with an average expenditure of $2,109. Simply hauling away and disposing of your old cast-iron or steel basin adds $200 to $1,200 to your invoice.
In contrast, bathtub restoration preserves your existing footprint and keeps durable materials out of local landfills. Preserving an original heavy cast-iron basin maintains superior heat retention that lightweight modern acrylic units simply cannot match.
Refinishing your fixture yourself yields staggering financial savings. Store-bought DIY tub and tile refinishing kits cost only $30 to $60 for basic materials.
If you prefer hiring a specialist, the national average cost to professionally refinish a tub is $483, with most homeowners spending between $337 and $631. Thumbtack reports a similar pro average of $392, with typical bids spanning $245 to $626.
Material types influence contractor pricing. Reglazing a classic porcelain-enameled steel or iron tub runs from $350 to $600, whereas flexible fiberglass units require specialized compounding and run from $300 to $1,000.
A professionally applied two-part coating lasts between 5 and 10 years, and can reach 15 to 20 years under careful, non-abrasive maintenance routines. Professional refinishers back this durability with a standard 5-year warranty.
A meticulous DIY application provides 3 to 7 years of resilient beauty before needing a minor touch-up. Executing the job properly requires methodical surface preparation rather than expensive artistic talent.
Tools, Materials, and Prep Checklist
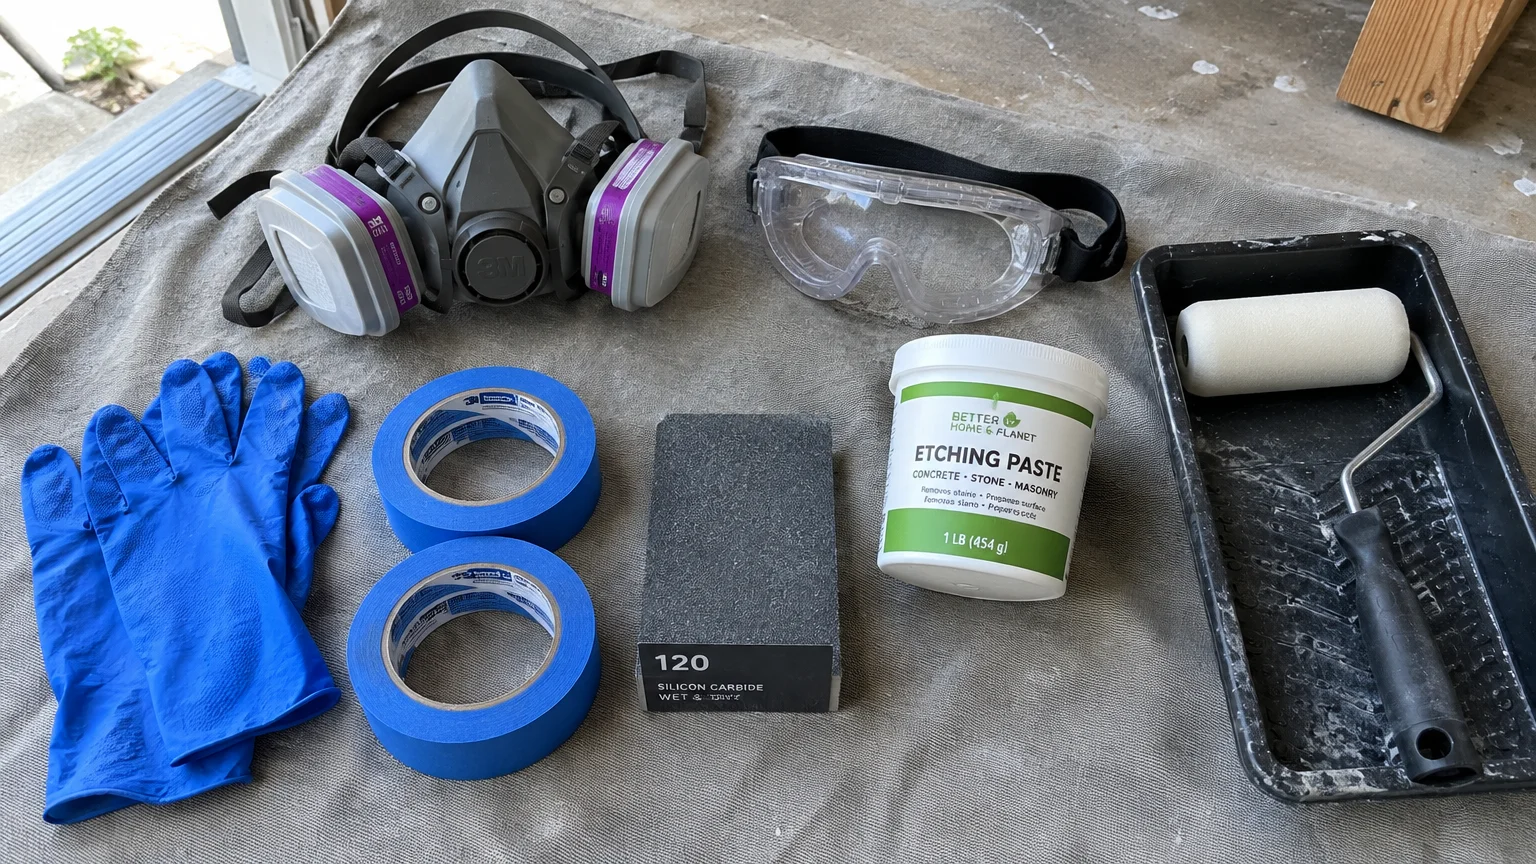
Thorough preparation determines ninety percent of your coating’s bonding success. Skipping safety gear or rushing chemical prep inevitably causes premature peeling, bubbling, and blistering.
Safety Equipment: Chemical fumes demand strict respiratory protection. You must wear a NIOSH-approved respirator equipped with organic vapor cartridges, tight-fitting splash goggles, and chemical-resistant nitrile gloves.
Chemical Stripper Precautions: Never use paint strippers containing methylene chloride or N-methylpyrrolidone (NMP). The Environmental Protection Agency banned methylene chloride for all consumer paint removers in 2019, followed by a total ban on all consumer uses in May 2025.
The chemical has been linked to at least 88 workplace and consumer deaths since 1980, primarily striking technicians working in confined, poorly ventilated bathrooms. While a federal appeals court vacated the commercial-use ban in September 2026, homeowners should still insist on safer alternatives like benzyl alcohol.
Abrasives and Tools: Gather a heavy-duty razor scraper, a utility knife, and waterproof wet-dry sandpaper in 400-grit and 600-grit selections. You also need medium-grit abrasive scuff pads and an orbital palm sander for stubborn areas.
Cleaning Supplies: Buy a concentrated acid-based cleaner designed for calcium, lime, and rust removal. Stock up on heavy-duty trisodium phosphate (TSP), industrial isopropyl alcohol, and lint-free microfiber towels.
Patching and Coating: Purchase a two-part polyester or epoxy chip repair putty. For the finish, select a two-part epoxy or acrylic polyurethane tub and tile kit from brands like Ekopel, Rust-Oleum, or Homax.
Masking Materials: Pick up several rolls of two-inch professional painter’s tape, water-resistant masking paper, and dynamic plastic drop cloths. You also require an exhaust fan and flexible ductwork to vent vapors outdoors.
Sealing Supplies: Buy a tube of 100-percent silicone bathroom caulk formulated with advanced mildew resistance. Pair this with a dripless caulk gun and a specialized silicone profiling tool.
Step-by-Step Instructions
Step 1: Deep Clean and Strip Mineral Scale
Start your project by clearing every toiletry, curtain, and mat completely out of the workspace. Open your bathroom windows and position an exhaust fan pointing outward to establish positive ventilation.
Thoroughly wet the tub basin and scrub the entire surface using an acidic cleaner formulated to dissolve hard water scale. Focus heavily around the drain and beneath the faucet spout where mineral crusts solidify.
Rinse the tub with scalding water, then wash it down using dissolved trisodium phosphate. This powerful alkaline wash cuts through body oils, soap scum, and invisible residue that defeat bonding agents.
Dry the tub completely using fresh microfiber cloths. Inspect the drain perimeter closely; if white mineral deposits remain, repeat the acidic scrub until the surface feels glass-smooth.
Step 2: Scrape Away Deteriorated Caulk
Never apply refinishing compounds over flexible caulking. Tub glaze hardens into a rigid shell; applying it over flexible silicone causes cracking, water intrusion, and complete edge failure.
Slide a razor scraper flat against the wall tile to slice through the upper edge of the caulk bead. Run the blade along the tub rim to free the bottom edge.
Pry out the loosened silicone strips using a blunt putty knife or specialized caulk removal tool. Work slowly around corners to avoid gouging adjacent porcelain or scratching surrounding ceramic tile.
Soak stubborn caulk remnants with mineral spirits or a dedicated silicone remover paste. Scrape the joint down to bare tile and metal, then wipe the perimeter with isopropyl alcohol to remove oily residues.
Step 3: Strip Old Peeling Paint Safely
If previous owners painted your tub, inspect the coating for widespread adhesion failure. Painting directly over failing glaze creates an unstable foundation that will peel away under hot bathwater.
Apply a thick layer of a benzyl-alcohol-based stripper across all peeling areas using a disposable natural-bristle brush. Avoid aggressive solvents containing prohibited methylene chloride or volatile aromatic hydrocarbons.
Cover the chemical stripper with thin plastic drop cloth sheeting to slow evaporation and accelerate lifting action. Let the compound react according to the manufacturer instructions, typically between 30 and 60 minutes.
Peel back the plastic and scrape away the liquefied paint sludge using a stiff plastic putty knife. Collect the residue in a metal container for responsible disposal according to local hazardous waste guidelines.
Step 4: Repair Structural Chips and Cracks
Examine the bare tub basin under bright portable LED work lights to identify micro-fractures, rust blooms, and impact chips. Small surface chips cost between $150 and $250 when repaired professionally, but DIY paste handles them effortlessly.
Sand down rusted spots using 120-grit dry sandpaper until you reveal bright, unblemished bare metal. Wipe away metal shavings and apply an anti-corrosive metal bonding primer over exposed iron or steel.
Mix equal parts of your two-part epoxy paste on a disposable cardboard palette until the color becomes uniform. Press the mixed putty firmly into deep divots using a flexible plastic spreader.
Slightly overfill each gouge by one millimeter to allow for compound shrinkage during curing. Let the epoxy cure rock-hard for 2 to 3 hours based on room temperature.
Sand the cured epoxy patch flush with the surrounding surface using 400-grit wet sandpaper. Run your bare fingers across the repair; if you feel an edge, feather it further until it feels seamless.
Step 5: Etch and Abrade the Tub Surface
Glossy factory porcelain is impervious to paint adhesion without aggressive mechanical or chemical profiling. Etching alters the molecular profile of the finish, creating physical tooth for the new resin.
Put on your respirator, heavy rubber gloves, and eye protection before handling etching compounds. Apply a liquid porcelain etching solution across the basin and walls using an acid-resistant scouring pad.
Scrub the wet etcher across every square inch in tight, overlapping circular patterns. The glossy reflection will diminish into a dull, matte frosted appearance as the acid bites into the porcelain.
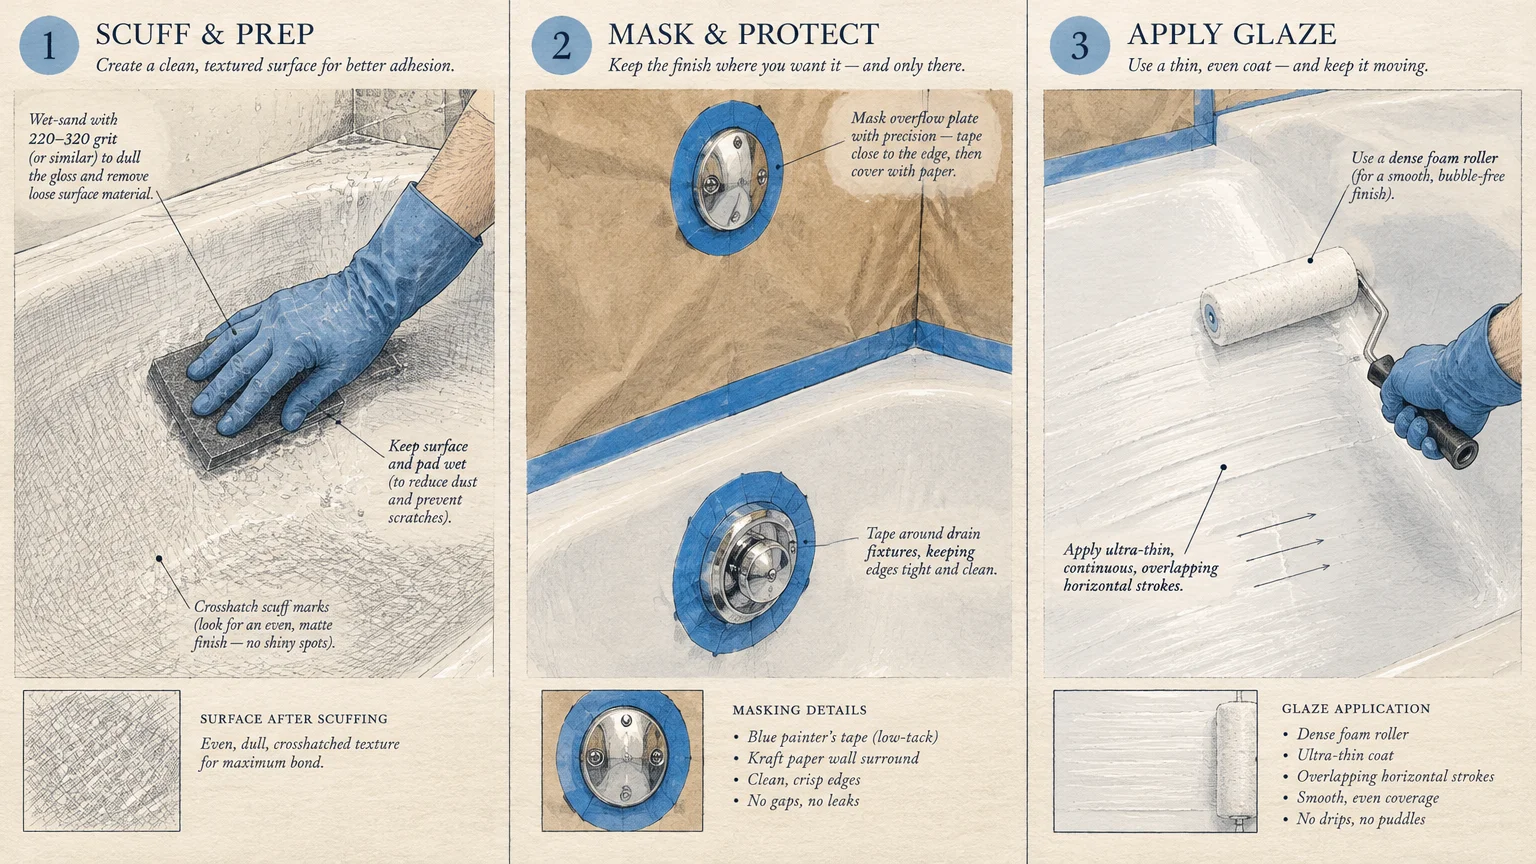
If you prefer a mechanical profile, sand the entire basin thoroughly with 400-grit wet-dry paper wrapped around a sanding block. Keep the surface misted with water to lubricate the paper and eliminate airborne dust.
Flush the basin thoroughly with several gallons of cold water to neutralize etching acids. Wipe the entire tub down with isopropyl alcohol, then dry it completely with a clean heat gun or hair dryer.
Step 6: Mask Surrounding Fixtures and Surfaces
Protecting adjoining surfaces saves hours of tedious cleanup once you begin brushing, rolling, or spraying coating resins. Refinishing coatings create tough overspray that permanently bonds to chrome, glass, and grouted tile.
Remove the overflow drain cover plate and unscrew the tub drain stopper if your plumbing allows simple disassembly. If the drain hardware is seized, seal it completely under tight layers of circular painter’s tape.
Wrap the tub spout and shower diverter in heavy plastic bags, sealing them tightly against the wall with tape. Wrap a paper towel around the spout nozzle to absorb unexpected water drips while you work.
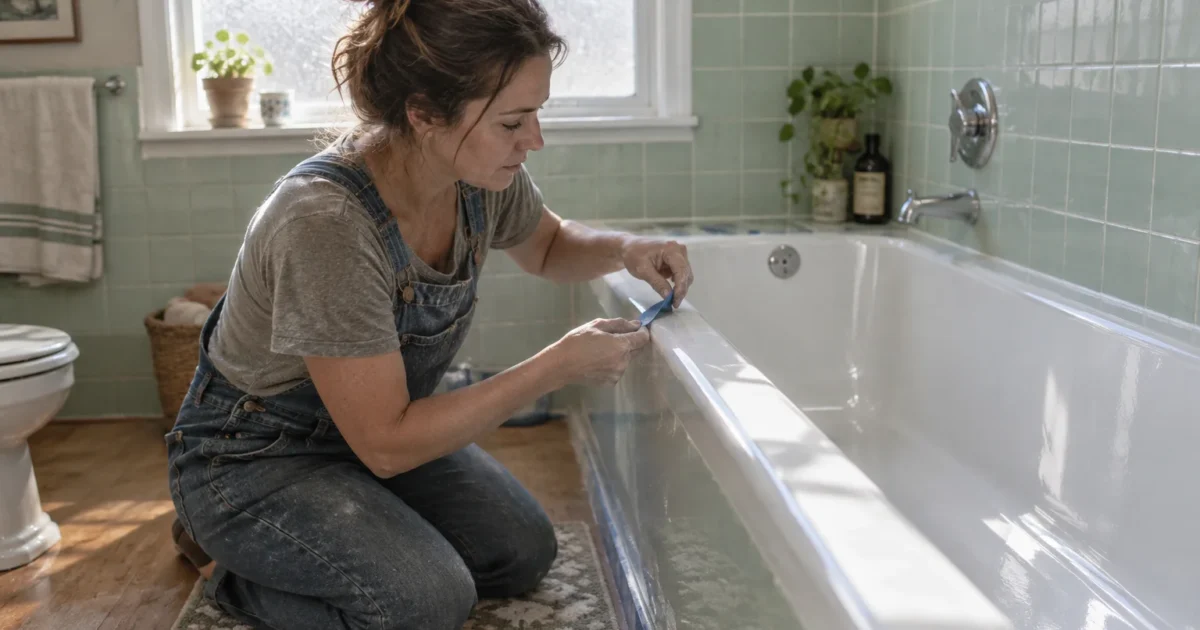
Apply painter’s tape along the exact seam where the tub rim meets the tile wall. Burnish the tape edge down with a plastic scraper to prevent coating chemicals from bleeding underneath.
Hang masking paper three feet up the walls from the tub rim and tape drop cloths across the entire bathroom floor. Secure your ventilation duct securely out the window to exhaust fumes continuously during application.
Step 7: Apply the Specialized Bonding Agent
High-end tub refinishing kits include a liquid chemical bonding agent that chemically links the old substrate with the new coating. This liquid acts as a molecular bridge, drastically minimizing the risk of future delamination.
Moisten a clean, lint-free wipe with the bonding agent compound. Wipe the solution across the entire tub surface in smooth, horizontal strokes, ensuring total liquid coverage.
Allow the bonding agent to haze or flash off according to the timing specified on the packaging. The surface will develop a slightly tacky touch that aggressively grabs hold of your basecoat.
Step 8: Apply the Bathtub Refinishing Coating
Open your two-part refinishing kit and stir the resin base thoroughly before adding the liquid hardener. Mix the two components together for two full minutes using a clean wooden stir stick.
Allow the mixed material to rest undisturbed for 15 minutes to initiate induction and release trapped blending air. Keep in mind that mixed epoxy kits feature a working pot life of roughly four to six hours.
If rolling, pour a modest puddle of mixed resin into a paint tray and use a four-inch high-density foam roller. Roll the topcoat onto the tub walls in light, vertical passes, working steadily from top to bottom.
Tip off the freshly rolled coating using a clean, dry high-density foam brush to level orange peel texture and pop micro-bubbles. Never overwork the coating once it begins to tack up, or you will create visible brush marks.
Pour-on coatings like Ekopel require pouring mixed resin directly onto tub ledges and directing flow downward with a foam trowel. Allow self-leveling dynamics to smooth the film into an ultra-thick, factory-like surface.
Apply a second light coat if using rolling kits, waiting roughly one hour between coats for proper tacking. Step back, inspect the surface with angled light, and use a needle to lift out stray airborne dust specks.
Step 9: Allow Proper Curing Time and Re-Caulk
Chemical curing differs from basic moisture evaporation. Refinished bathtubs typically require 24 to 48 hours of curing time before they can be exposed to running water.
Maintain your bathroom temperature at roughly 70 degrees Fahrenheit during curing to encourage optimal cross-linking of the polymer chains. Keep pets and family members out of the bathroom to keep the curing resin dust-free.
Once 24 hours pass, carefully peel away the painter’s tape by pulling it at a sharp 45-degree angle away from the coating. Use a fresh razor blade to score any sections where the glaze bridged over the tape edge.
Reinstall your clean drain trim and screw the overflow cover back onto the tub wall. Tighten screws evenly by hand to avoid cracking the fresh, curing enamel.
Lay down a continuous bead of 100-percent silicone caulk along the perimeter joint where the tub meets your tile wall. Smooth the bead with a silicone finishing tool or a gloved finger dipped in denatured alcohol.
Let your fresh silicone cure for a full 24 hours before filling the tub. This two-stage curing timeline protects your investment and ensures a completely watertight installation.
Style & Finishing Touches
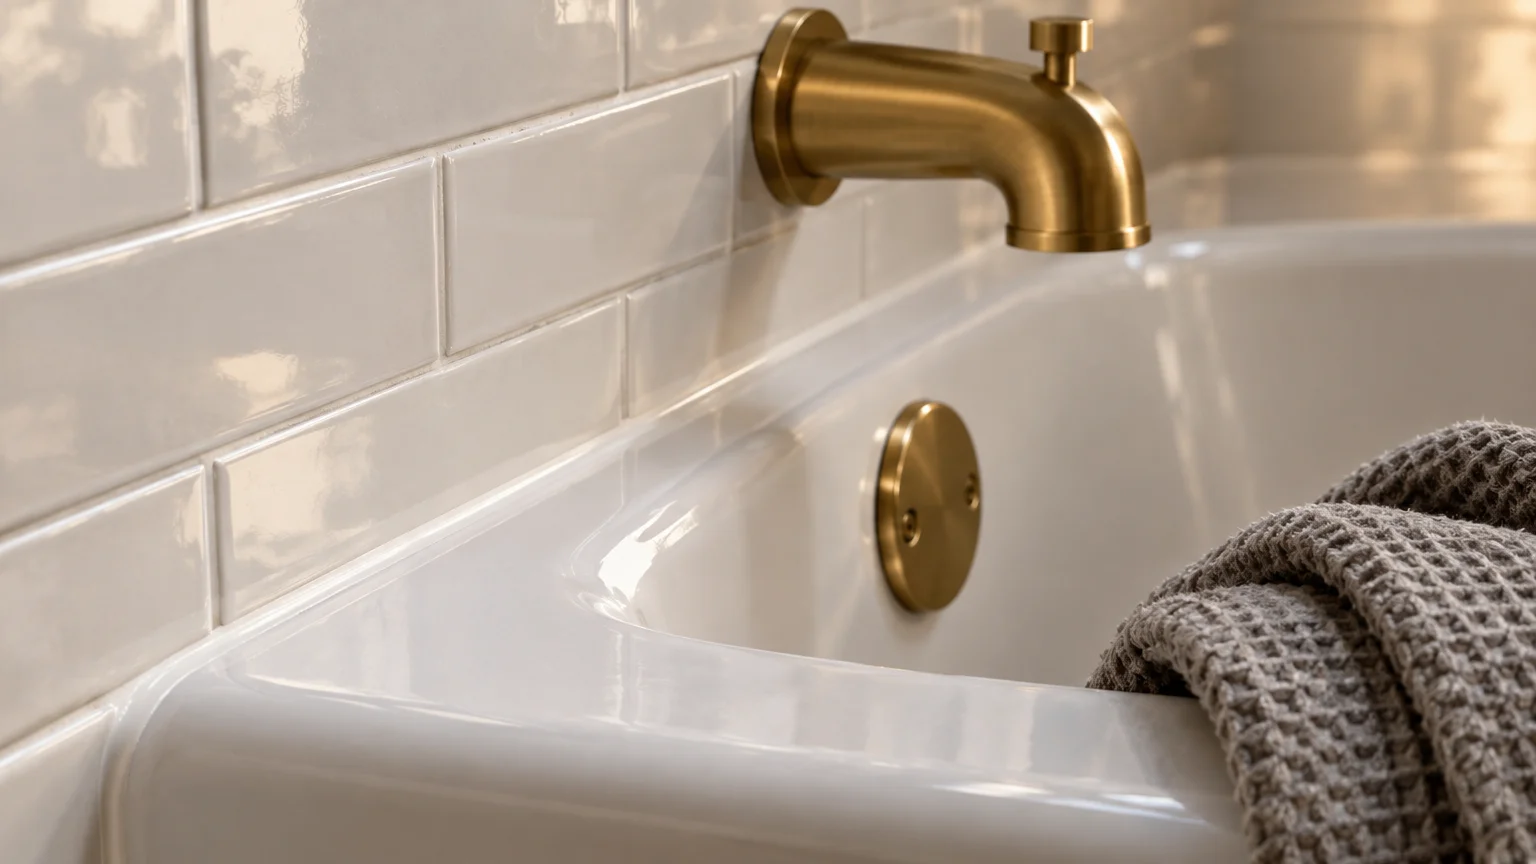
A pristine, gleaming white tub offers the perfect foundation for a broader bathroom refresh. Once your basin shines, surrounding vintage fixtures might appear dated or tarnished by comparison.
Swap out pitted chrome handles and corroded spouts for contemporary matte black or brushed brass hardware. Modern trim kits install over existing valve stems without requiring behind-the-wall plumbing modifications.
If you refinish a classic clawfoot tub, consider contrasting color schemes. Paint the exterior basin in deep charcoal, slate blue, or forest green while maintaining a brilliant white interior glaze.
Deep-clean surrounding wall grout lines using an oxygenated bleaching powder and a stiff grout brush. Seal clean grout joints with an impregnating sealer to complement the bright look of your restored bathtub.
Hang an elegant curved shower rod to expand your interior shower space by several comfortable inches. Pair the rod with a bright waffle-weave shower curtain to diffuse soft, welcoming light into the tub basin.
Maintenance & Long-Term Care
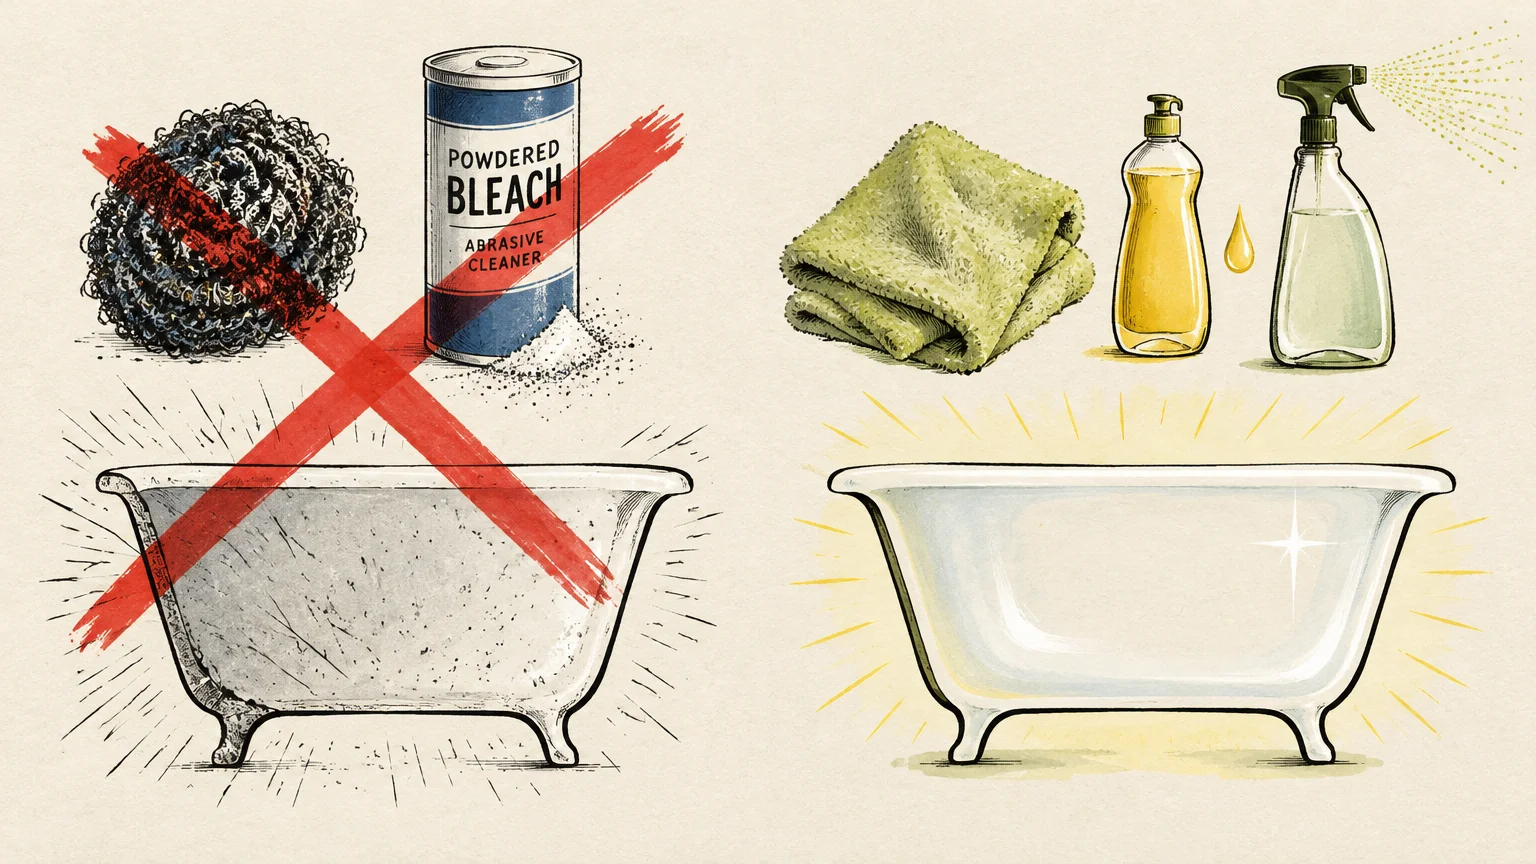
Treat your refinished tub surface like high-end automotive paint rather than durable cast stone. Abrasive powders, acidic scale removers, and scouring pads will destroy the glossy topcoat within months.
Clean your tub weekly using a soft microfiber cloth and pH-neutral cleaners like gentle dish soap or diluted castile soap. Spraying foaming bathroom cleaners labeled safe for acrylic fixtures preserves the shine effortlessly.
Never use suction-cup rubber bath mats inside a reglazed bathtub. The intense mechanical suction pulls upward against the resin, causing moisture blisters and catastrophic coating delamination.
Place a silicone-free, waffle-pattern woven mat inside the basin only while bathing, removing it immediately after use. Hang the mat to dry over the curtain rod to prevent water from pooling against the tub floor.
Fix dripping faucets immediately to preserve your coating. A continuous trickle of hot water slowly dissolves polymer binders, carving a permanent dull streak directly into your fresh finish.
FAQ
Can you refinish fiberglass and acrylic bathtubs?
Yes, you can successfully refinish fiberglass and acrylic tubs using specialized DIY kits or pro services. Fiberglass flexes during use, requiring flexible polyurethane-acrylic formulas to prevent stress cracking.
Pro contractors charge between $300 and $1,000 for fiberglass refinishing due to the required structural reinforcement and flexible resins. Sand fiberglass surfaces carefully to avoid burning through the thin gelcoat layer.
How long does a refinished bathtub actually last?
A professionally refinished tub lasts 5 to 10 years, reaching 15 to 20 years with meticulous non-abrasive care. Industry professionals typically back their work with a 5-year warranty against peeling.
DIY kits generally last between 3 and 7 years before showing wear around the drain. Longevity hinges entirely on proper chemical etching and avoiding abrasive scouring powders.
Is DIY bathtub refinishing worth it compared to hiring a pro?
DIY refinishing is well worth the effort for budget-conscious homeowners willing to spend considerable time on prep work. A $30 to $60 kit saves hundreds compared to professional reglazing bills averaging $483.
However, hire a licensed professional if your tub features deep structural cracks or severe rust holes. Specialists possess professional spray gear and fume extraction systems that deliver flawless, mirror-like factory surfaces.
Why is methylene chloride banned in bathtub paint strippers?
Methylene chloride converts into carbon monoxide in the bloodstream, triggering rapid asphyxiation and heart failure in poorly ventilated spaces. It has caused at least 88 reported deaths since 1980, primarily among tub refinishers.
The EPA banned the chemical for consumer paint strippers in 2019 and prohibited all remaining consumer products in May 2025. Always choose safer strippers containing benzyl alcohol instead of hazardous chlorinated solvents.
How soon can you safely use your bathtub after restoration?
You must allow the coating to cure for 24 to 48 hours before exposing it to water. Rushing this window weakens resin cross-linking, causing premature dulling, bubbling, and water blisters.
In addition, fresh silicone caulking requires 24 hours of drying time to ensure a watertight bond. Plan on using an alternate shower for two full days following your project.
Takeaway & Next Steps
Restoring an old bathtub delivers dramatic aesthetic rewards while saving you thousands of dollars in contractor costs. With methodical cleaning, thorough sanding, and careful coating application, you can easily renew your fixture over one weekend.
Here are three immediate actions you can take right now to begin your tub transformation:
Assess Tub Material and Damage: Check whether you have porcelain, enameled steel, or fiberglass, and inspect the basin for rust or chips. Order an epoxy repair compound to patch structural gouges beforehand.
Gather Approved Safety Gear: Purchase a NIOSH-rated organic vapor respirator, nitrile gloves, and an exhaust fan setup. Never begin chemical etching or stripping without certified respiratory protection.
Order Your Refinishing System: Select a proven DIY kit or contact local contractors for estimates using Angi or Thumbtack averages as your baseline. Schedule a full weekend to take your time through every prep step.
Have you tackled a bathtub restoration in your own home? Share your before-and-after project photos in the comments below, or subscribe to our newsletter for weekly step-by-step renovation guides.