The American House
  • Home
  • DIY
  • Garden
  • Tips & Tricks
  • Expert Tips
Home / Home

The Most Popular Bathroom Tile Trends of 2027

June 24, 2026 · 13 min read
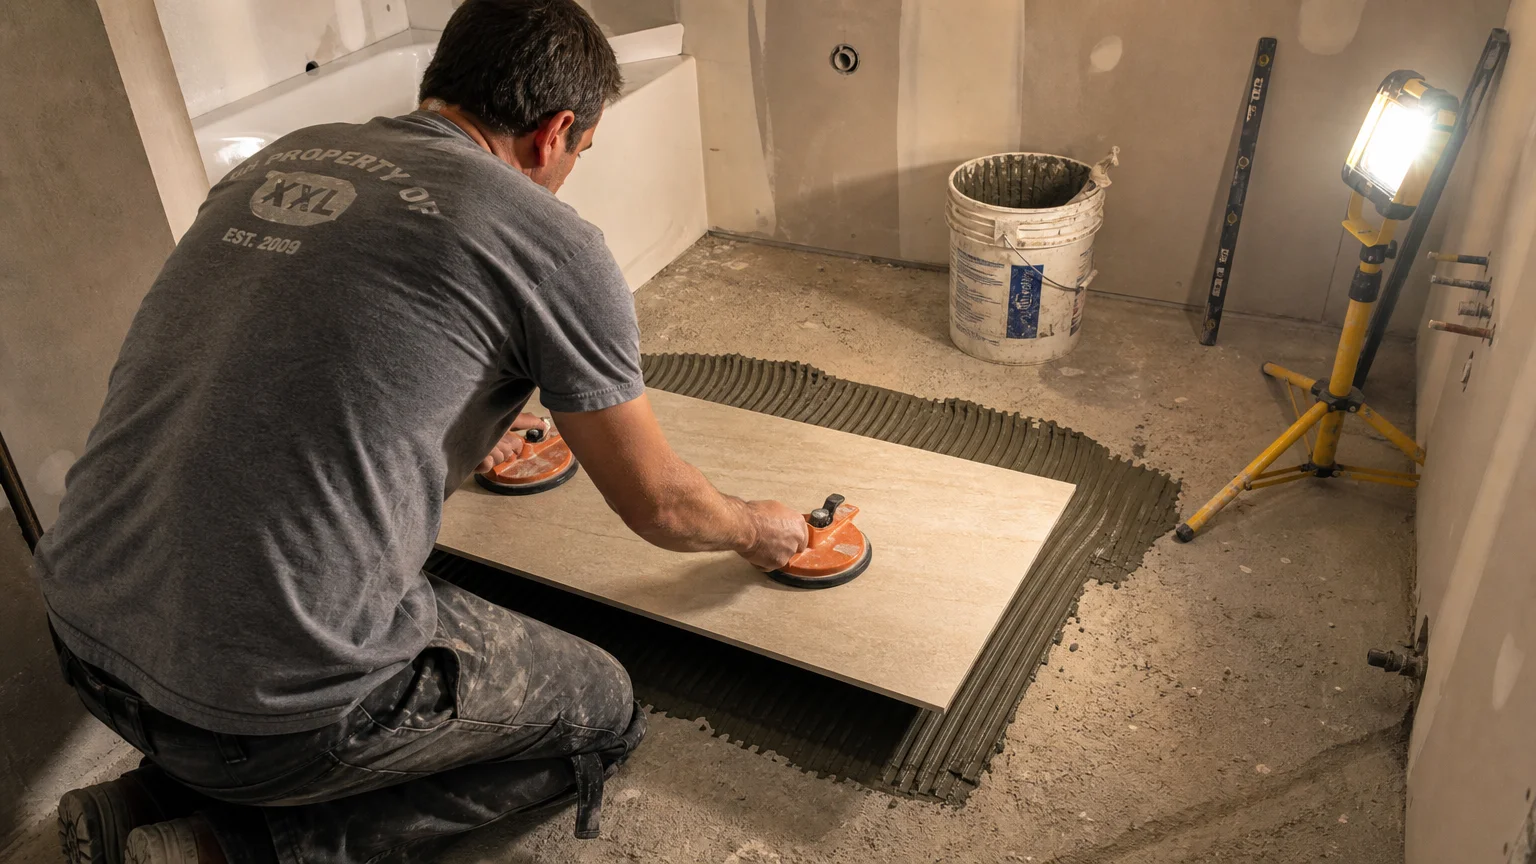
A person kneeling on a bathroom floor uses vacuum suction cups to position a large porcelain tile onto a fresh bed of mortar.
An installer carefully positions a large floor tile onto wet mortar using orange suction cups.

Step-by-Step Instructions

Executing your bathroom remodel demands a systematic approach. Rushing through the waterproofing or layout phases ruins the final aesthetic and jeopardizes your home’s structural integrity. Follow these chronological steps to achieve a flawless, professional-grade finish.

Phase One: Demolition and Substrate Repair. Remove the old drywall, tile, and flooring down to the framing and subfloor. Inspect the exposed wood for signs of water damage; replace any soft or darkened joists and studs immediately. Install your solid cement board or structural foam panels directly to the studs using specialized alkaline-resistant screws spaced exactly eight inches apart. Tape every seam with fiberglass mesh tape and bed the tape with a thin layer of mortar to create a continuous, unified surface. Sweep and vacuum the entire workspace to remove all debris and dust.

Phase Two: Comprehensive Waterproofing. Apply a liquid rubber waterproofing membrane or embed a sheet membrane system over every inch of the shower surround and the bathroom floor. If using a liquid membrane like RedGard, paint on two thick, contrasting coats, allowing the first coat to dry completely before applying the second in a perpendicular direction. Pay special attention to the corners, the shower pan seam, and the plumbing penetrations. Water always finds the weakest link; your waterproofing layer must form a continuous, impermeable envelope to protect your framing.

Phase Three: Layout and Dry Fitting. Never start setting tile against a crooked wall or without a master plan. Find the center point of your floor or main shower wall and snap clear chalk lines vertically and horizontally. Dry-lay a row of tiles along these lines to see where your cuts will fall at the edges of the room. Adjust your center lines to ensure you do not end up with tiny, awkward slivers of tile at the ceiling or floor joints. For large-format tile trends, plan for a one-third offset pattern rather than a standard fifty-percent brick lay to minimize the risk of noticeable bowing.

Phase Four: Mixing Mortar and Setting Tile. Mix your polymer-modified thin-set mortar with cold water until it reaches the consistency of thick peanut butter. Let the mixture slake—rest undisturbed—for exactly ten minutes to activate the chemical polymers, then remix it briefly. Use a 1/2-inch by 1/2-inch square-notched trowel to spread the mortar over a small section of the substrate. Back-butter the rear of each large tile with a flat layer of mortar to achieve 100 percent coverage. Press the tile firmly into the wall mortar, sliding it slightly perpendicular to the trowel ridges to collapse the air pockets. Insert your leveling clips and wedges at the corners, tightening them to pull adjacent tiles perfectly flush.

Phase Five: Grouting and Curing. Wait at least 24 to 48 hours for the thin-set to cure fully before removing the leveling wedges. Break the clips off cleanly by striking them parallel to the grout joint with a rubber mallet. Mix your high-performance grout according to the manufacturer’s exact specifications. Force the grout deep into the joints using a hard rubber float held at a 45-degree angle. Wait 15 to 30 minutes until the grout slightly hazes over, then wipe the tile faces clean using a barely damp sponge. Avoid using excess water, which weakens the grout structure and dilutes the color pigment.


Pages: 1 2 3 4 5 6 7

Share this article

Facebook Twitter Pinterest LinkedIn Email

Leave a Comment Cancel reply

You must be logged in to post a comment.

Search

Latest Posts

  • A close-up photograph of a gardener's gloved hands working in a lush summer garden with fresh mulch under soft morning light. 8 Summer Gardening Tasks Experts Never Skip
  • 6 Most Common Lawn-Watering Mistakes That Could Be Ruining Your Grass 6 Most Common Lawn-Watering Mistakes That Could Be Ruining Your Grass
  • A conceptual gouache and ink illustration of an open microwave on a kitchen counter, with stylized gold sparks radiating from its dark inter Never Use Your Microwave for These 6 Things
  • An ink and watercolor illustration of a house protected from crumbling stone legal documents by a giant county recorder seal. HOAs That Don’t File Properly Lose Their Right To Collect Attorney’s Fees or Interest on Delinquent Accounts
  • A modern living room with neutral walls and a dramatic forest green painted ceiling, captured in warm afternoon light. How to Use Color on Just the Ceiling to Completely Transform a Room Without Painting Walls
  • A warm gouache illustration of a serene, sunlit living room with a linen armchair, potted plant, and neat oak bookshelf. 9 Designer Secrets That Make a Home Feel Calm and Relaxing
  • A clear glass bottle of vinegar stands next to a stack of soft, folded cotton towels on a wooden shelf in a sunlit laundry room. 11 Surprising Ways Vinegar Makes Your Laundry Cleaner and Fresher
  • A stylized screenprint illustration of a cozy craftsman bungalow house nestled safely inside a giant pair of protective hands. The State-by-State Guide to Senior Property Tax Relief Programs Updated for 2026
  • A cozy living room corner featuring a rich sage green accent wall behind a cognac leather armchair and wooden side table. 10 Accent Colors That Will Still Look Right in a Decade
  • A sunlit living room corner featuring a dual-tone accent wall painted in sage green and terracotta peach behind a mid-century modern chair. 20 Color Combination That Works in North-Facing, East-Facing, and South-Facing Rooms

Newsletter

Get the latest posts delivered to your inbox.

Related Articles

Half-Bath

12 Half-Bath Ideas That Will Change the Game for You

A half-bath, also known as a powder room or guest bathroom, might be one of…

Read More →
stainless steel

8 Cleaning Products You Shouldn’t Use on Stainless Steel

We’ve got sinks, stoves, refrigerators, and dishwashers. All of these have two things in common:…

Read More →

7 Big House Sounds That Could Cost You Dearly

#2 Whistling windows? This may happen when the weather stripping is worn out or when…

Read More →
kitchen

9 Awful Kitchen Decorating Trends Designers Can’t Wait to Leave Behind in 2022

2. Kitchen hoods in stainless steel The stainless steel kitchen hood is prevalent in many…

Read More →
house guests, never do as a houseguest

7 Rude Things You Should Never Do as a Houseguest

If you want to have a pleasant stay with your friends and family, there are…

Read More →
A vibrant teal front door on a grey house at sunset, surrounded by potted plants and a welcome mat.

10 Front Door Paint Colors That Make Homes Stand Out

Follow these four essential steps to prep, sand, prime, and paint your front door for…

Read More →
Mold

5 Frightening Signs That Mold Lives Inside Your Home

Musty Smell We all know it! Mold has a musty smell, easily compared with wet…

Read More →
things you don't clean enough

Attention: These Are 7 Important Things You Don’t Clean Enough at Home

2. Silverware tray I’m guilty of this. Is your silverware tray part of the things…

Read More →
plant-destroying habit

6 Plant-Destroying Habits You Should Stop Repeating

2. Underwatering Well, if you don’t give a lot of water to your plant, you…

Read More →
The American House

Inedit Agency S.R.L.
Bucharest, Romania

contact@theamericanhouse.com

Explore

  • Privacy Policy
  • Terms and Conditions
  • Do not sell my personal information
  • Subscribe
  • Unsubscribe
  • Contact
  • Request to Know
  • Request to Delete
  • CA Private Policy

Categories

  • DIY
  • Expert Tips
  • Garden
  • Home
  • Tips & Tricks

© 2026 The American House. All rights reserved.