The American House
  • Home
  • DIY
  • Garden
  • Tips & Tricks
  • Expert Tips
Home / Home

Bathroom Tiles in Deep Emerald and Midnight Blue: The Bathroom Trend of 2027

July 3, 2026 · 14 min read
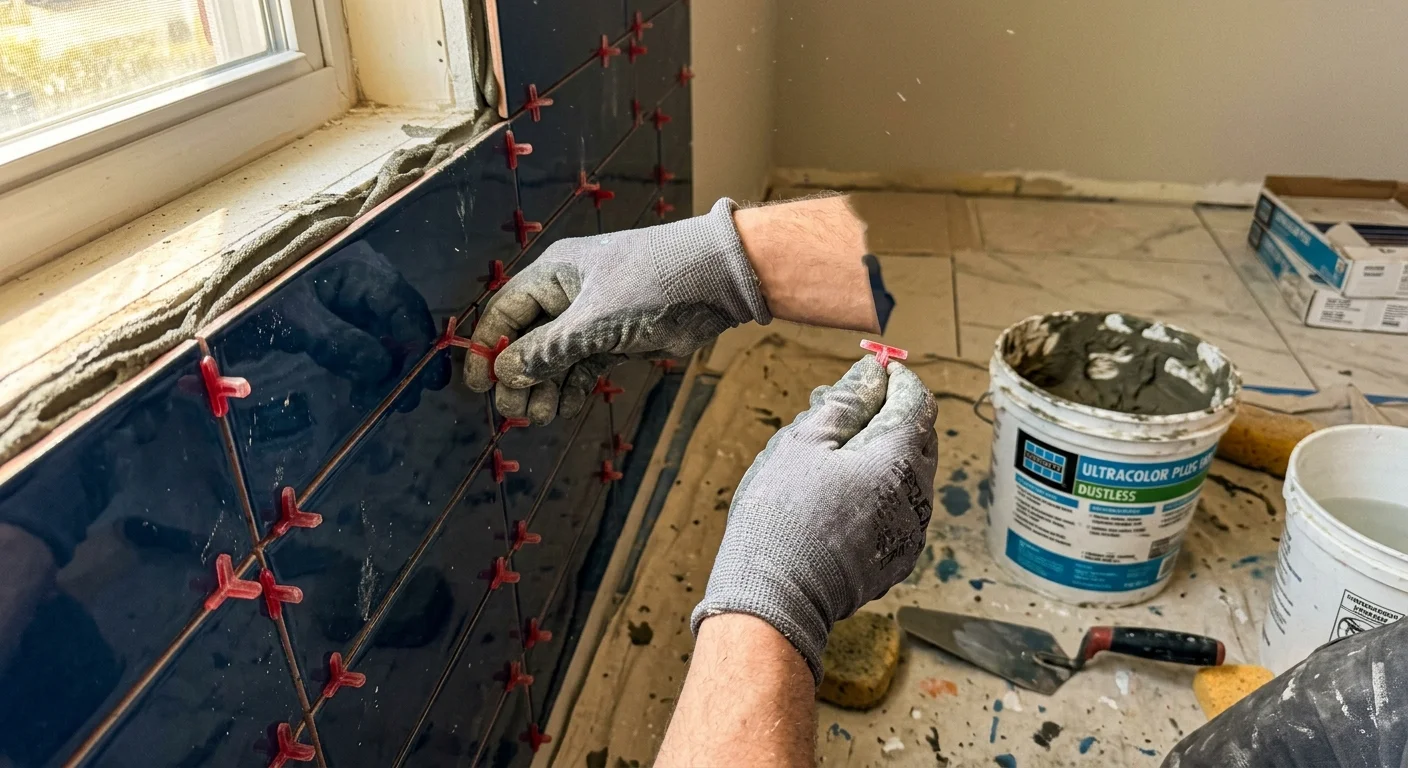
A close-up photograph of a DIYer placing a plastic spacer between glossy midnight blue tiles during installation.
Gloved hands carefully place spacers between glossy midnight blue tiles for a flawless, professional bathroom finish.

Step-by-Step Instructions

Transforming your space into an emerald or midnight blue masterpiece requires patience and adherence to strict construction protocols. Rushing through the structural phases will compromise your finish.

Phase 1: Waterproofing the Canvas

Your beautiful new tiles are only a decorative wear layer; the true protection happens behind them. Cut your cement backer board to fit your wall dimensions and fasten it to the studs using cement board screws spaced every 8 inches. Tape all seams with your alkali-resistant mesh tape and smooth a thin layer of thinset over the joints. Once the thinset cures, apply your liquid waterproofing membrane using a heavy-nap paint roller. Paint the entire enclosure, paying special attention to the corners and the bottom edge where the wall meets the tub or shower pan. Allow the first coat to dry, then apply a second coat perpendicular to the first. Wait until the membrane turns a solid, dark color, indicating it is completely dry.

Phase 2: Establishing the Layout

Never start tiling from the bottom corner without a plan. Walls are rarely perfectly plumb, and tubs are rarely perfectly level. Find the horizontal and vertical center of your main focal wall. Set up your laser level to cast a perfect crosshair on this center point. Dry-lay a row of tiles on the floor to see where your cuts will fall at the edges of the wall. If your layout leaves a sliver of tile less than two inches wide at the corners, shift your vertical center line slightly left or right to ensure you have substantial, aesthetically pleasing cuts on both ends. Screw a straight, level ledger board into the wall just above the tub lip to support your first row of tiles, ensuring a perfectly horizontal start.

Phase 3: Mixing and Troweling Thinset

Pour cool, clean water into a large bucket and gradually add your modified thinset powder. Mix the mortar using a heavy-duty drill and a mixing paddle on a low speed to avoid whipping air into the mud. Aim for the consistency of thick peanut butter. Let the mixture sit undisturbed for 10 minutes—a process called slaking—which allows the chemical polymers to activate. Remix briefly, and you are ready to spread. Scoop the thinset onto the wall using your margin trowel, then use the flat side of your 1/4-inch square-notch trowel to press it firmly into the waterproofing membrane. Flip the trowel to the notched side and hold it at a rigid 45-degree angle. Comb the thinset in straight, parallel lines. Do not swirl the thinset; swirling traps air behind the tile, creating hollow spots that easily crack under pressure.

Phase 4: Setting the Jewel-Toned Tiles

Press your emerald or midnight blue tiles into the combed thinset, applying firm pressure while slightly wiggling the tile perpendicular to the trowel ridges. This collapses the ridges and guarantees 100 percent mortar coverage on the back of the tile. Insert your 1/8-inch spacers between each tile to maintain consistent grout joints. Periodically run a damp sponge along the tile faces to remove accidental thinset smudges before they dry—dark, glossy tiles highlight dried mortar aggressively. Step back frequently to check your laser level lines and ensure your courses remain perfectly straight.

Phase 5: Grouting and Haze Removal

Allow the thinset to cure for at least 24 hours before removing your spacers. Mix your grout according to the manufacturer guidelines. Scoop the grout onto the wall and press it deep into the joints using your rubber grout float held at a 45-degree angle to the joint lines. Drag the float diagonally across the tiles to scrape off the excess without digging the grout out of the seams. Wait approximately 15 to 30 minutes for the grout to firm up slightly, then take a barely damp sponge and wipe the tiles in a gentle, circular motion. Rinse your sponge in clean water constantly. Deep emerald and midnight blue tiles are notorious for showing grout haze—a chalky residue left behind after washing. Buff the tiles with a dry microfiber cloth a few hours later to completely eliminate this haze.
Pages: 1 2 3 4 5 6 7

Share this article

Facebook Twitter Pinterest LinkedIn Email

Leave a Comment Cancel reply

You must be logged in to post a comment.

Search

Latest Posts

  • A close-up photograph of a gardener's gloved hands working in a lush summer garden with fresh mulch under soft morning light. 8 Summer Gardening Tasks Experts Never Skip
  • 6 Most Common Lawn-Watering Mistakes That Could Be Ruining Your Grass 6 Most Common Lawn-Watering Mistakes That Could Be Ruining Your Grass
  • A conceptual gouache and ink illustration of an open microwave on a kitchen counter, with stylized gold sparks radiating from its dark inter Never Use Your Microwave for These 6 Things
  • An ink and watercolor illustration of a house protected from crumbling stone legal documents by a giant county recorder seal. HOAs That Don’t File Properly Lose Their Right To Collect Attorney’s Fees or Interest on Delinquent Accounts
  • A modern living room with neutral walls and a dramatic forest green painted ceiling, captured in warm afternoon light. How to Use Color on Just the Ceiling to Completely Transform a Room Without Painting Walls
  • A warm gouache illustration of a serene, sunlit living room with a linen armchair, potted plant, and neat oak bookshelf. 9 Designer Secrets That Make a Home Feel Calm and Relaxing
  • A clear glass bottle of vinegar stands next to a stack of soft, folded cotton towels on a wooden shelf in a sunlit laundry room. 11 Surprising Ways Vinegar Makes Your Laundry Cleaner and Fresher
  • A stylized screenprint illustration of a cozy craftsman bungalow house nestled safely inside a giant pair of protective hands. The State-by-State Guide to Senior Property Tax Relief Programs Updated for 2026
  • A cozy living room corner featuring a rich sage green accent wall behind a cognac leather armchair and wooden side table. 10 Accent Colors That Will Still Look Right in a Decade
  • A sunlit living room corner featuring a dual-tone accent wall painted in sage green and terracotta peach behind a mid-century modern chair. 20 Color Combination That Works in North-Facing, East-Facing, and South-Facing Rooms

Newsletter

Get the latest posts delivered to your inbox.

Related Articles

bathroom

7 Best Bathroom Design Trends For 2023

With the turn of the calendar page, my thoughts have turned to the newest and…

Read More →

The Most Stunning Desert Homes You’ll Want to Live In

When we imagine desert landscapes, our minds seem to conjure images of vast and empty…

Read More →
gallery wall

9 Gallery Wall Ideas for Any Blank Wall in Your Home

2. Assemble your Abstract Art Creating a lovely design doesn’t mean that you need to…

Read More →
Low-angle shot of a living room with a pale blue-gray ceiling and low-profile furniture under bright natural light.

9 Ceiling Paint Colors That Make Rooms Feel Bigger

A man applies blue painter’s tape along the crown molding to prepare for a fresh…

Read More →
diy project

8 DIY Projects That Will Hurt the Value of Your House

3. Adding a sunroom We may think that a sunroom is a great idea, another…

Read More →
tiny house

12 Amazing Facts About Tiny Houses and Other Things You Need to Know

Did you hear about the latest estate trend? Well, it seems to be sweeping the…

Read More →
clean house

8 Things in Your House You Don’t Clean As Often As You Should

Cell phone As we all know, cell phones are just breeding grounds for bacteria and…

Read More →
A wide-angle shot of a freshly painted front door opening into a bright, clean foyer with light wood floors and brass hardware.

8 Home Features Buyers Instantly Notice During Showings

This infographic illustrates eight high-impact focal points that buyers notice when touring a potential home.…

Read More →
expensive home

16 Ways to Make Your House Feel More Expensive

Add moldings We can’t deny the fact that adding moldings to your home is probably…

Read More →
The American House

Inedit Agency S.R.L.
Bucharest, Romania

contact@theamericanhouse.com

Explore

  • Privacy Policy
  • Terms and Conditions
  • Do not sell my personal information
  • Subscribe
  • Unsubscribe
  • Contact
  • Request to Know
  • Request to Delete
  • CA Private Policy

Categories

  • DIY
  • Expert Tips
  • Garden
  • Home
  • Tips & Tricks

© 2026 The American House. All rights reserved.