
Step-by-Step Instructions
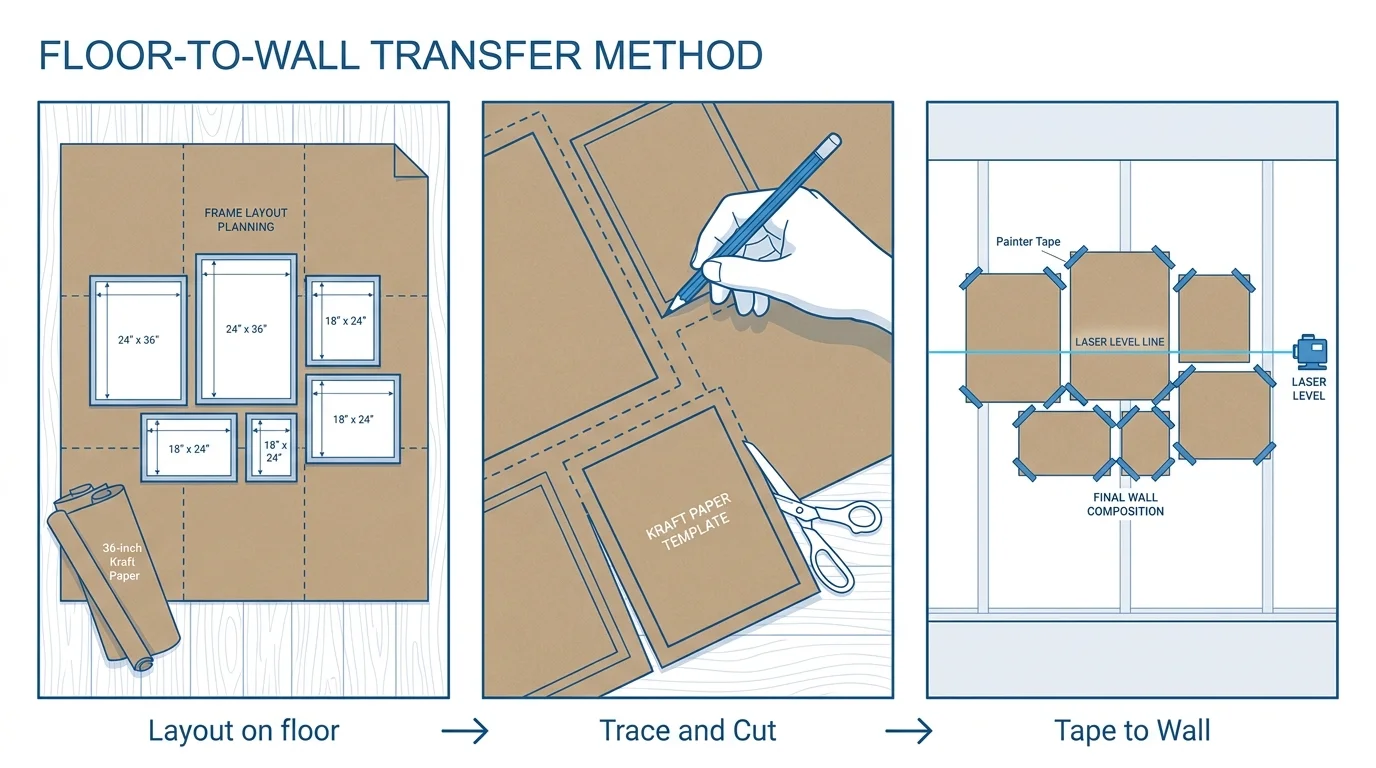
Executing a flawless display requires a methodical approach. You eliminate guesswork and protect your walls by transferring your layout from the floor to the wall using paper templates.
Phase 1: The Floor Layout
Clear a large area on your living room floor that closely matches the dimensions of your blank wall. Arrange your empty frames on the floor, shifting them around until you find a pleasing balance. Maintain a consistent spacing of two to three inches between each frame. Once you finalize the design, trace each frame onto your kraft paper and cut out the templates. Measure the back of your frames and mark the exact location of the hanging hardware on each corresponding paper cutout.
Phase 2: The Wall Mockup
Use your painter tape to affix the kraft paper templates directly to your wall. Stand back and evaluate the entire arrangement. You should align the center of your primary focal point frame at exactly 57 inches from the floor, which matches standard museum viewing height. Adjust the paper templates until the arrangement feels balanced against your furniture and ceiling lines. Power on your laser level to ensure the top edges of your paper templates align perfectly across your horizontal planes.
Phase 3: Drilling and Securing
Always prioritize safety before drilling. Check your stud finder one last time to avoid hidden electrical wires or plumbing pipes. For frames falling over a wooden stud, drive a standard two-inch wood screw directly through the marked hardware spot on your paper template. For frames falling on hollow drywall, drill a pilot hole through the paper mark, insert your heavy-duty anchor, and then drive your screw.
Phase 4: Hanging and Leveling
Tear the paper templates away from the wall, leaving the hardware securely in place. Hang your frames one by one. Place a small bubble level on the top edge of each frame to make final micro-adjustments. To prevent frames from shifting over time, adhere a small silicone bumper on the bottom back corners of each frame. These bumpers grip the wall, keep the frame perfectly plumb, and allow air to circulate behind the artwork.







Leave a Reply
You must be logged in to post a comment.