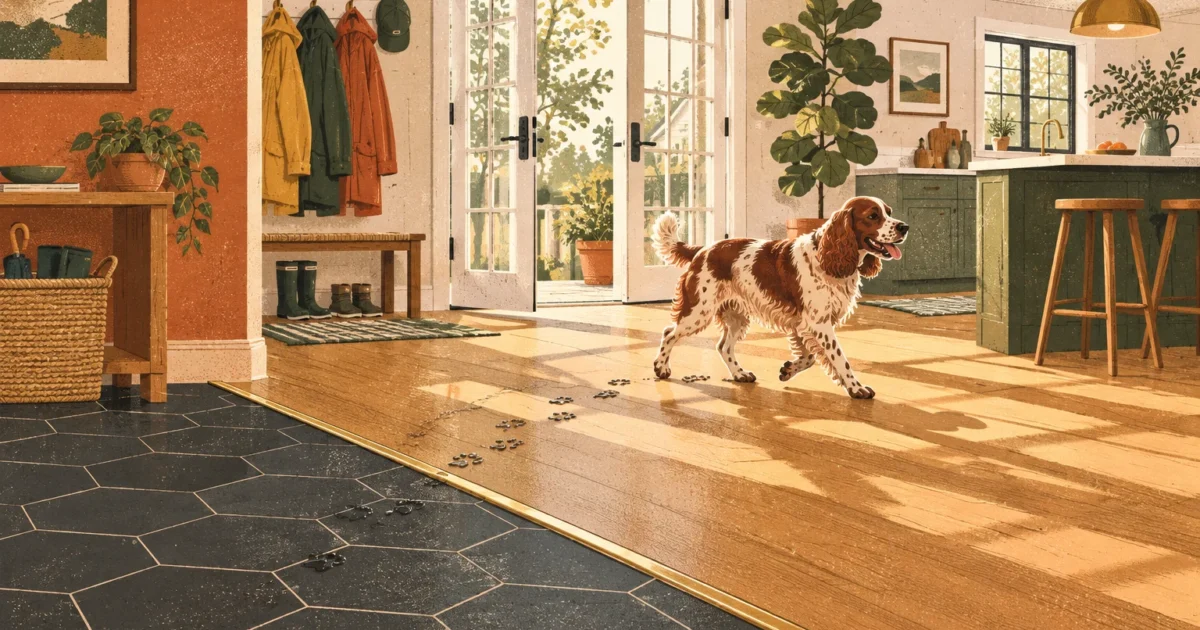
You can slash your weekly chore time and eliminate stubborn stains simply by choosing the right surface underfoot. Selecting resilient, easy clean flooring protects your home from muddy paws, food spills, and relentless daily foot traffic without forcing you to spend your weekends scrubbing.
The best low maintenance flooring combines durable wear layers with water-resistant cores to keep household messes right on the surface. We have evaluated the top flooring options to help you choose the ideal match for your home, lifestyle, and budget.
Project Overview & Why It Matters
Choosing easy clean flooring transforms your home maintenance routine and protects your property value. High-traffic living areas, busy kitchens, and entryways demand surfaces that resist liquid penetration and surface abrasions.
Low maintenance flooring prevents moisture, pet urine, and tracked-in road grime from settling deep into your subfloor. This protection keeps your living environment sanitary and structurally sound over decades of constant use.
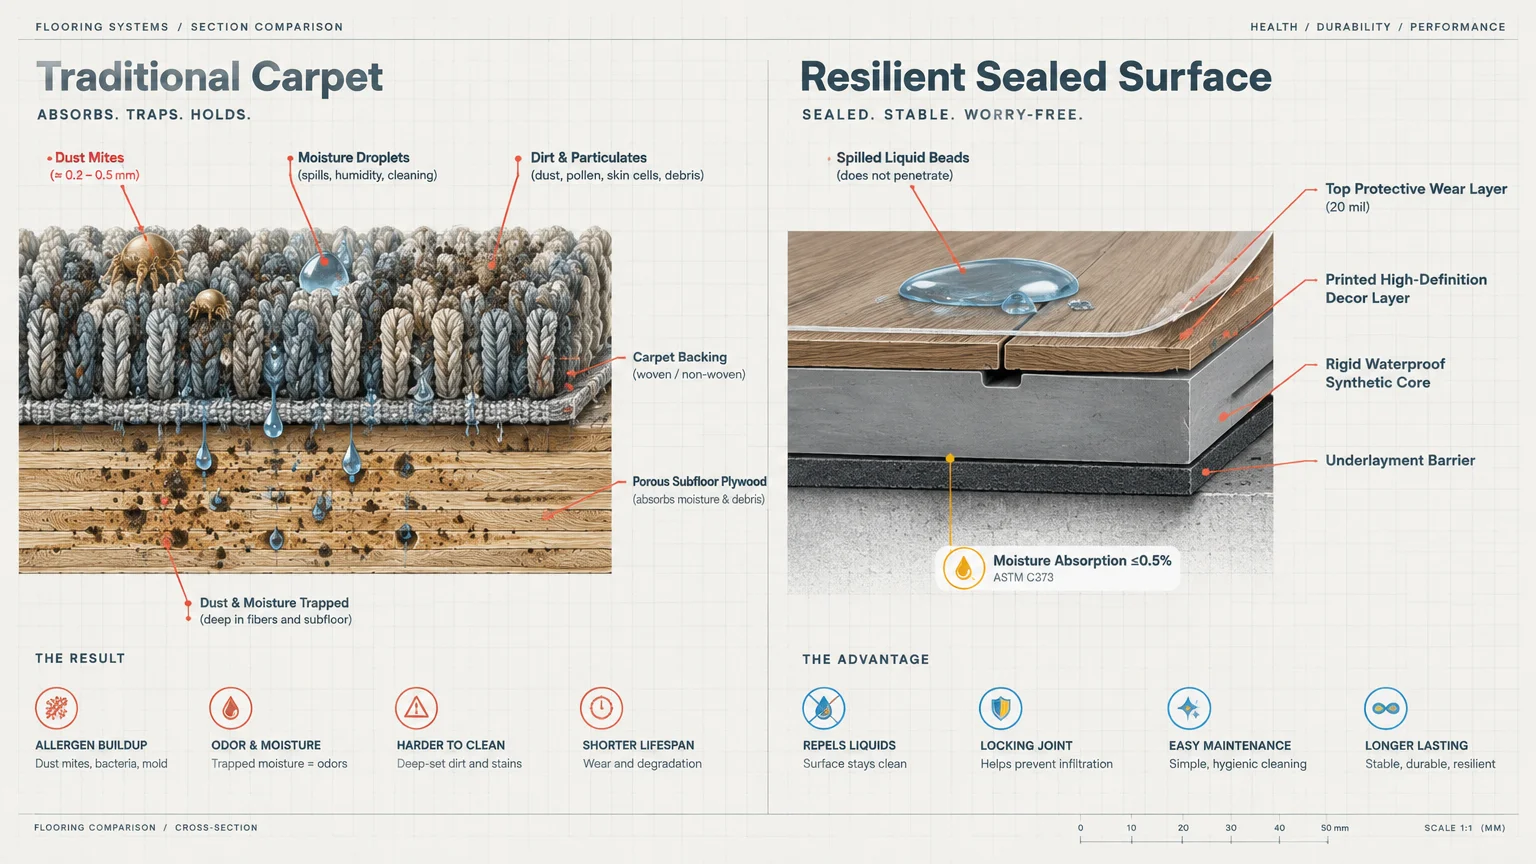
Traditional flooring materials like carpet trap dust mites, pet dander, and liquid spills deep within their fibers. Hard-surface flooring options create an impermeable barrier that allows you to sweep or wipe away contaminants in seconds.
1. Luxury Vinyl Plank (LVP)
Luxury vinyl plank delivers exceptional water resistance, realistic hardwood visuals, and remarkable resilience against impact. Planks feature a rigid synthetic core topped with a printed design layer and a clear protective wear layer.
Materials cost between $2 to $10 per square foot, while total installed costs run from $4 to $16 per square foot. Most homeowners pay between $5 and $10 per square foot for a complete professional installation.
For homes with pets or active children, choose planks with a protective wear layer of 20 mil or higher. Entry-level products offer wear layers between 6 mil and 12 mil, which scratch more easily under dog claws.
Because luxury vinyl plank locks together tightly, it creates a water-resistant seal that stops liquids from seeping beneath the surface. You can clean daily messes with a quick sweep and a damp microfiber mop.
2. Glazed Porcelain Tile
Glazed porcelain tile represents the most stain-resistant and moisture-impermeable hard surface available for modern homes. Manufacturers fire porcelain at extreme temperatures, producing an ultra-dense material that outperforms traditional ceramic tile.
According to the Tile Council of North America and ASTM C373 standards, certified porcelain tile absorbs 0.5% or less water. In contrast, standard ceramic tiles absorb anywhere from 0.5% to 10% or more moisture.
Glazed porcelain also boasts an exceptional scratch hardness rating of 7 or higher on the Mohs scale. This surface density easily deflects tracked-in grit, heavy furniture legs, and aggressive pet claws.
Tile materials cost between $2 to $30 per square foot, and installed costs range from $10 to $50 per square foot. Specialized tile installation requires skilled labor, which often reaches $20 per square foot.
3. High-Durability Laminate
Modern laminate flooring replicates authentic hardwood grain while offering superior defense against surface scratches and scuffs. High-density fiberboard forms the core, capped with photographic imaging and a heavy-duty resin wear layer.
Materials range from $1 to $6 per square foot, with professional installation running between $4 to $14 per square foot. This balance makes laminate an affordable choice for large living areas and bedrooms.
Check the Abrasion Criteria rating before buying your laminate flooring. For households with active pets and heavy foot traffic, select products with an AC4 or higher rating.
High-rated laminate repels surface scrapes that permanently scar traditional solid hardwood. You simply wipe spills immediately to protect the fiberboard joints from standing water.
4. Polished and Stained Concrete
Polished concrete turns your home’s structural slab into a seamless, modern, and indestructible finished floor. Mechanical grinders smooth the concrete surface before technicians apply densifiers, penetrating stains, and protective sealers.
Preparing and finishing existing concrete costs between $3 to $7 per square foot for basic materials and prep work. Complete professional installation ranges from $6 to $12 per square foot.
Polished concrete features no grout lines, seams, or textured crevices where dirt, pet hair, or spilled liquids can hide. The continuous non-porous finish allows you to sanitize entire rooms in a single sweeping motion.
You never have to worry about pet claw scratches, water warping, or deep gouges in concrete flooring. Periodic application of a neutral cleaner maintains the glossy protective sheen for years.
5. Sheet Vinyl
Modern sheet vinyl provides an unbroken, completely waterproof barrier that excels in moisture-heavy utility spaces and bathrooms. Manufacturers produce wide rolls that eliminate the interlocking seams found in plank or tile products.
Sheet vinyl materials cost between $1 to $4 per square foot, bringing installed costs to $2 to $7 per square foot. This low price point makes sheet vinyl an exceptional budget-friendly solution for busy families.
Because sheet vinyl lacks seams, spilled pet water bowls and plumbing leaks cannot seep beneath your subfloor. You can clean pet messes and sticky kitchen spills with a simple damp cloth and mild detergent.
Modern printing technology has elevated sheet vinyl patterns beyond outdated retro designs. You can now select realistic slate, marble, and hardwood textures without sacrificing seamless water protection.
6. Natural Linoleum
Natural linoleum provides an eco-friendly, biodegradable alternative constructed from natural linseed oil, wood flour, and jute backing. Unlike synthetic vinyl, linoleum features homogeneous color and material throughout its entire thickness.
Linoleum materials cost between $2 to $7 per square foot, with installed costs ranging from $3 to $11 per square foot. The material self-heals small gouges naturally as the linseed oil slowly oxidizes over time.
Linseed oil provides natural antimicrobial properties that suppress bacteria, mold, and dust mites across the floor. This natural resistance makes linoleum ideal for homeowners managing respiratory allergies or households with young children.
The non-static surface actively repels dust and pet hair, preventing debris from clinging to the floorboards. Routine maintenance requires only dry dust mopping and an occasional wash with a pH-neutral cleaner.
7. Strand-Woven Bamboo
Strand-woven bamboo weaves shredded bamboo fibers together under intense heat and pressure to create an exceptionally dense board. This manufacturing process produces a floor far harder than traditional oak or maple hardwood surfaces.
Materials cost between $3 to $8 per square foot, while installed costs range from $7 to $17 per square foot. In comparison, solid hardwood materials cost between $4 to $15 per square foot, running $11 to $25 installed.
High structural density gives strand-woven bamboo remarkable resistance against dropped cookware, heavy toys, and pet claws. Factory-applied aluminum oxide coatings keep daily surface grime from penetrating into the grain.
You maintain strand-woven bamboo much like engineered wood, which costs $2 to $9 for materials and $7 to $20 installed. Regular dry mopping keeps dust particles from dulling the factory finish.
Tools, Materials, and Prep Checklist
Proper subfloor preparation ensures your new flooring performs correctly and remains easy to clean over its entire service life. Uneven subfloors cause plank joints to flex, separate, and trap moisture or dirt.
Budget for essential surface preparation before ordering your decorative materials. Subfloor leveling costs between $2 to $4 per square foot to create a flat, rigid foundation.
If your project requires clearing out old surfaces, factor in floor removal costs of $1 to $4 per square foot. Proper demolition exposes the subfloor so you can inspect for hidden water damage or loose fasteners.
Acoustic and vapor underlayment costs between $0.30 to $3.50 per square foot depending on moisture barrier thickness. High-grade underlayment prevents subfloor dampness from migrating up into floating laminate or luxury vinyl plank.
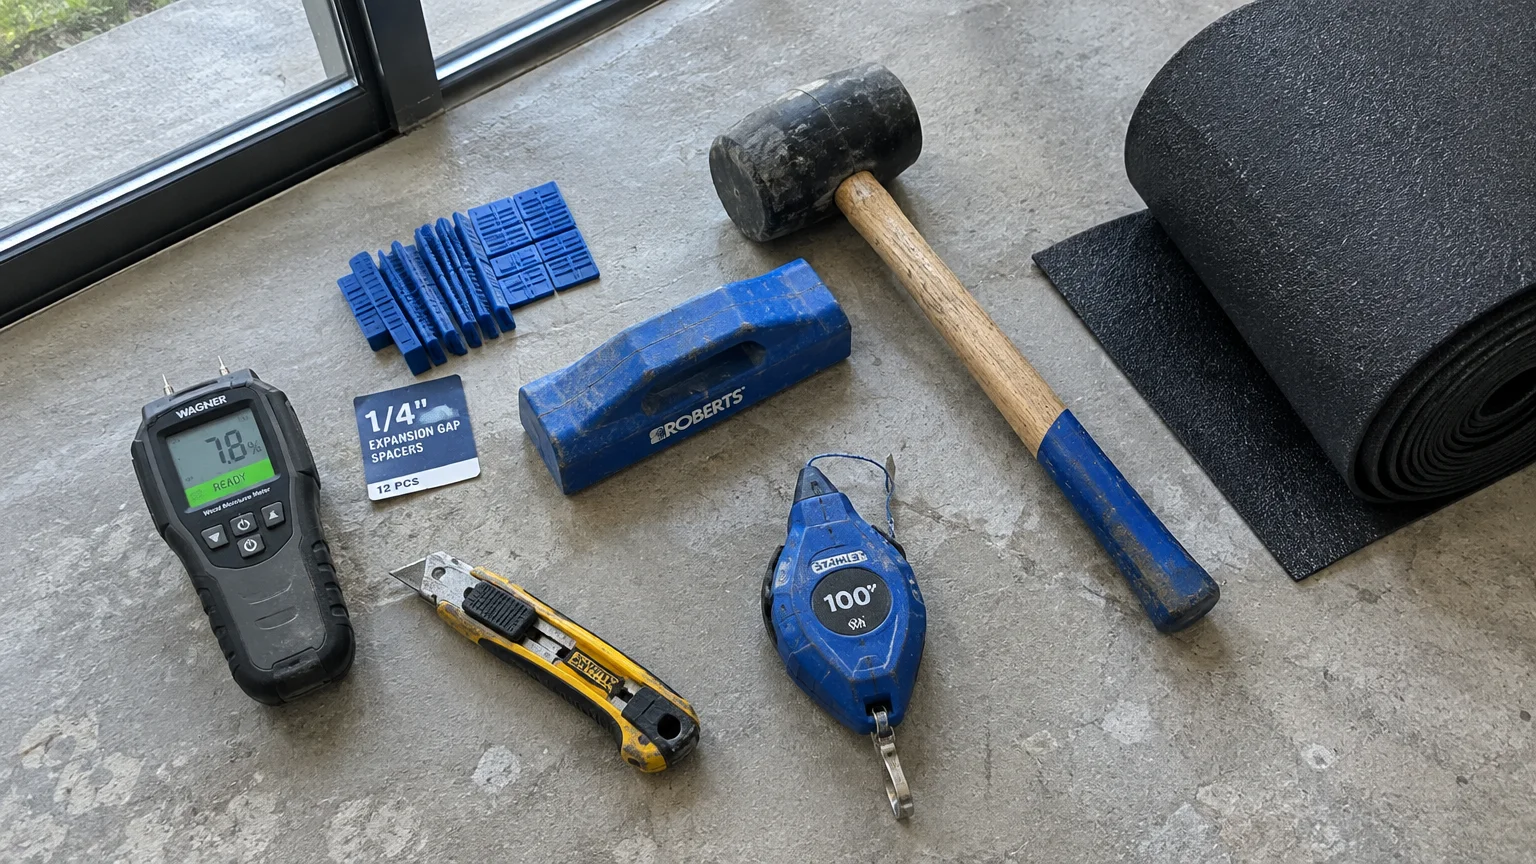
Assemble a clean-up and installation tool kit before you begin your remodeling project. You will need a six-foot level, a heavy-duty utility knife, a rubber mallet, and plastic spacers.
Secure a tapping block, pull bar, tape measure, and chalk line for precision alignment. For tile installations, procure a notched trowel, tile spacers, and a durable wet saw.
Safety equipment protects you from jobsite injuries and airborne particulate matter. Always wear safety glasses, heavy-duty knee pads, cut-resistant gloves, and an N95 dust mask when cutting boards.
Test moisture emissions on concrete slabs before placing moisture-sensitive underlayments or planks. Calcium chloride test kits verify that moisture vapor emissions remain within manufacturer tolerances.
Step-by-Step Instructions
Phase 1: Subfloor Inspection and Leveling
Strip away all existing flooring materials and inspect your plywood or concrete subfloor thoroughly. Check for loose subfloor boards, protruding drywall screws, structural cracks, and signs of past water intrusion.
Secure loose wood subfloor panels directly to your joists with coated subfloor screws. Use a six-foot level to detect any high humps or low dips across the entire surface.
Grind down high concrete ridges using a concrete masonry cup wheel attached to an angle grinder. Fill depressions and low spots using a polymer-modified self-leveling underlayment compound.
Ensure your subfloor deviates by no more than three-sixteenths of an inch over a ten-foot radius. A level substrate prevents locked plank joints from snapping under heavy foot traffic.
Phase 2: Moisture Testing and Acclimation
Check the moisture content of your subfloor using a calibrated pin or pinless moisture meter. Wood subfloors must register within two to four percent of your chosen flooring planks.
For concrete substrates, ensure relative humidity levels fall below manufacturer thresholds before proceeding. Installing vapor barriers prevents ground moisture from degrading plank adhesives and joints.
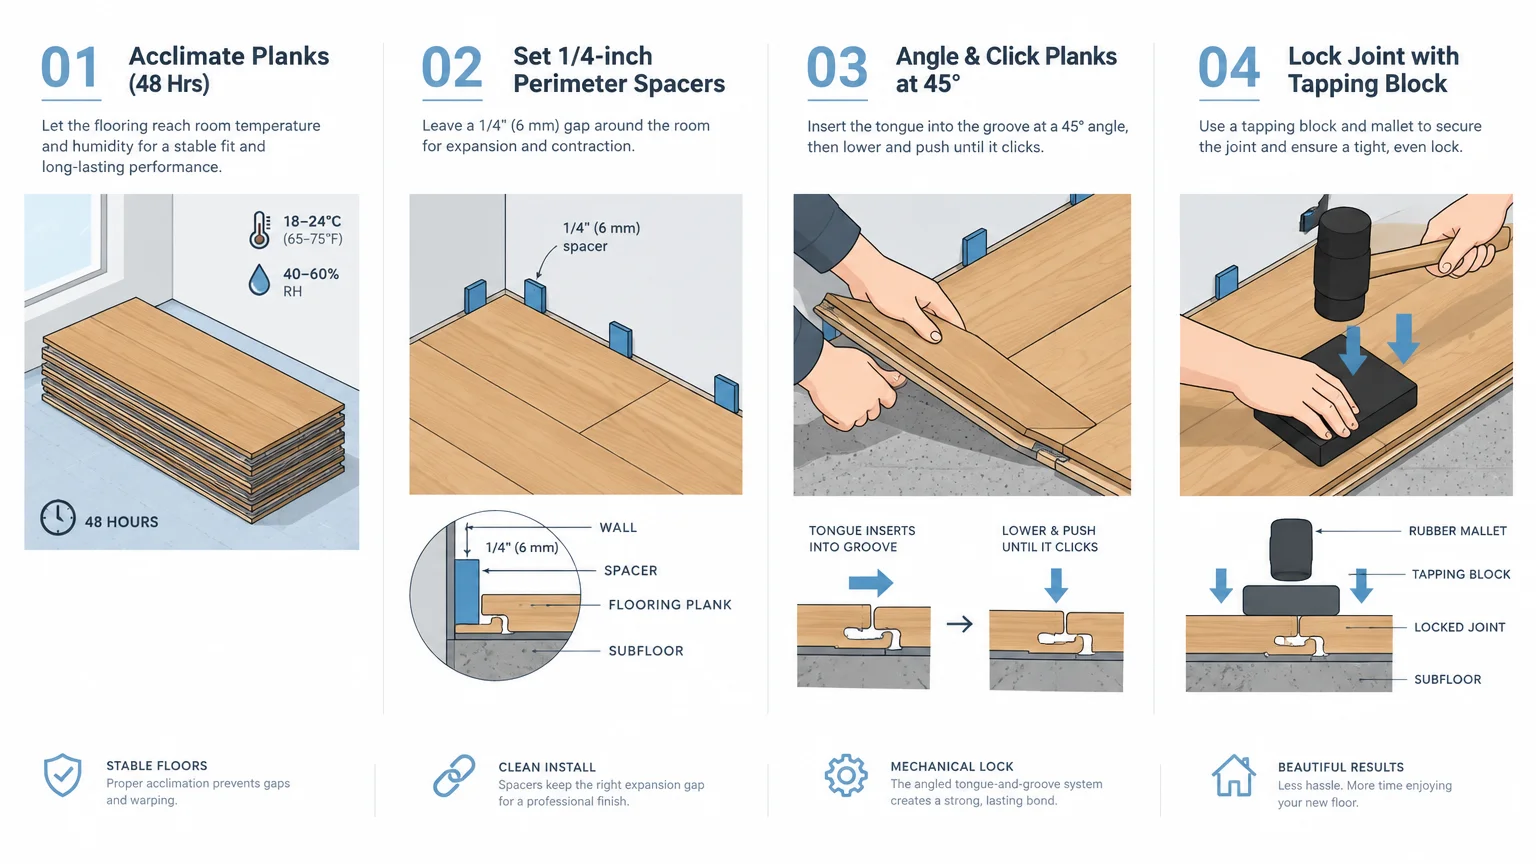
Bring your flooring boxes inside your climate-controlled home forty-eight hours before beginning work. Acclimation stabilizes plank dimensions, preventing post-installation expansion buckling or shrinkage gaps.
Maintain room temperatures between sixty-five and eighty degrees Fahrenheit during the entire installation window. Keep relative indoor humidity between thirty-five and fifty-five percent for optimal plank stability.
Phase 3: Layout Planning and Expansion Allowances
Measure the width of your room and calculate your plank row dimensions carefully. Trim your starting row width to avoid ending with narrow plank strips along the opposite wall.
Snap a chalk line parallel to your longest continuous starting wall to establish a straight installation guide. Account for wall irregularities by scribing the initial plank row to the wall profile.
Insert expansion spacers around the room perimeter, doorframes, and permanent vertical cabinetry. Maintain a consistent one-quarter-inch to three-eighths-inch perimeter expansion gap for floating floor systems.
Skipping perimeter expansion gaps forces planks upward into raised peaks when ambient seasonal humidity rises. These buckled ridges expose seam edges, allowing dirt and liquids to enter the core.
Phase 4: Cutting, Laying, and Joint Engagement
Start laying planks from the left corner of your designated starting wall with the tongue edge facing the wall. Stagger your end joints by at least eight inches between adjacent rows.
Score and snap luxury vinyl plank using a sharp utility knife and a metal straightedge. Cut high-pressure laminate or bamboo boards using a miter saw fitted with a fine-finish carbide blade.
Angle the tongue of the new plank into the existing groove at a twenty-degree angle. Press downward firmly until the locking mechanism clicks into a seamless, flush connection.
Use your tapping block and rubber mallet gently along plank edges to close stubborn end gaps. Never strike plank edges directly with a bare hammer, which crushes the precision locking profile.
Phase 5: Transitions, Baseboards, and Perimeter Sealing
Remove all perimeter plastic spacers once you complete the final row of flooring across the room. Reinstall your baseboards and shoe moulding, securing nails directly into wall studs rather than your floating flooring.
Fastening trim boards directly into your floating floor planks prevents natural seasonal movement and causes joint buckling. Leave a tiny hairline clearance between the floor surface and the bottom of your moulding.
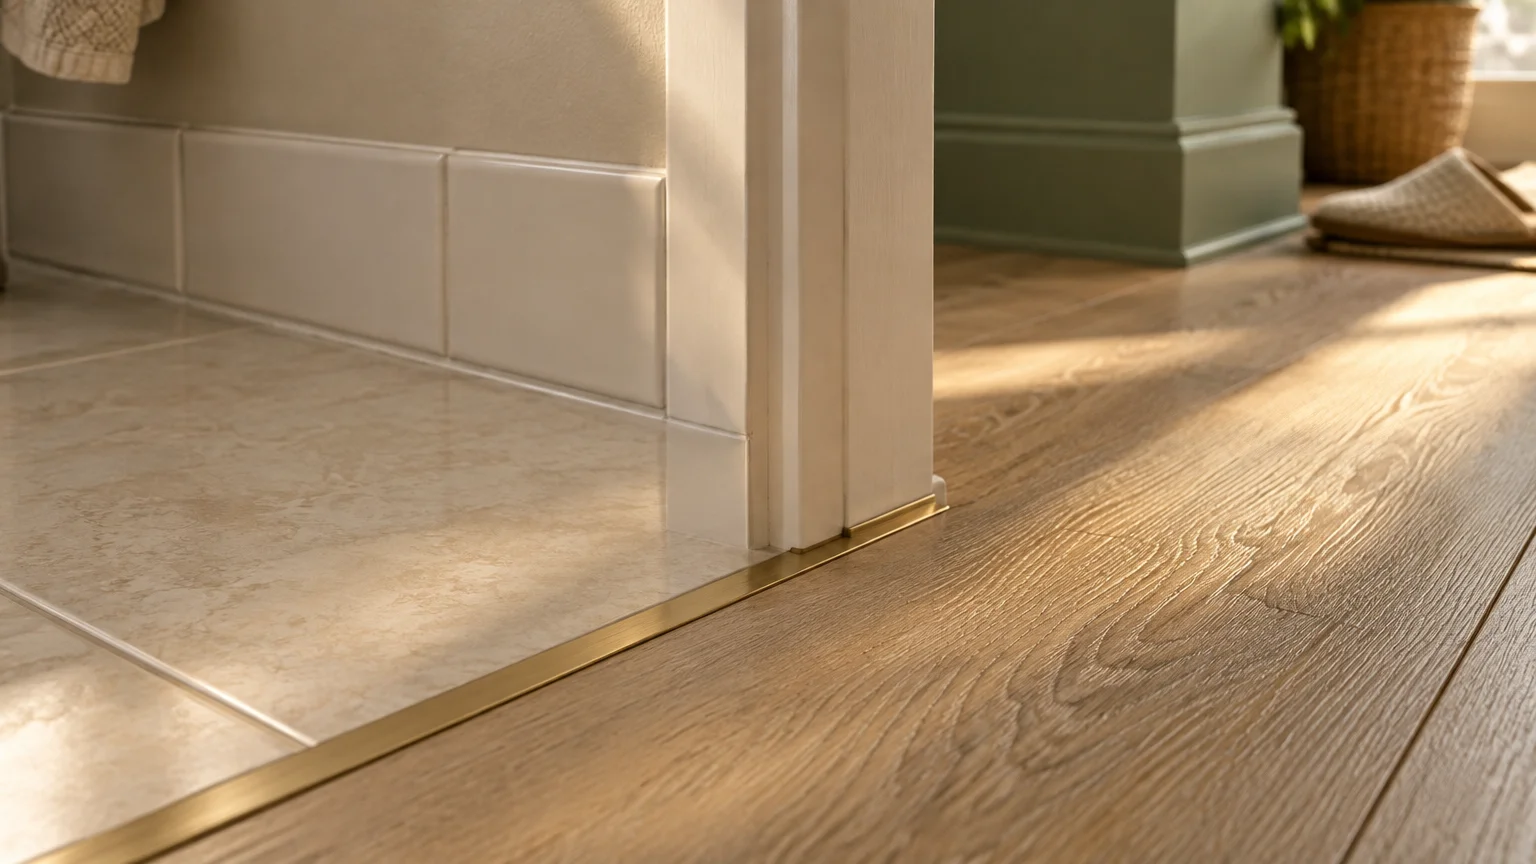
Install matching T-mouldings or reducer transitions across doorways and material change boundaries. These transitions bridge height differences smoothly while protecting raw plank edges from chipping.
Apply a bead of flexible silicone caulk along wet-area perimeters like bathtub skirts and exterior entry thresholds. This waterproof seal stops tracked-in puddles from migrating under your baseboards and subfloor.
Troubleshooting Common Obstacles
If you encounter an irregular door jamb, undercut the wooden casing using an oscillating multi-tool. Slide the plank underneath the trimmed jamb for a professional, flush fit that never collects debris.
When plank seams fail to lock tightly, vacuum the joint channel to clear dislodged packing debris. A tiny speck of sawdust inside the groove prevents the locking mechanism from engaging completely.
If your floor emits squeaking or crunching sounds underfoot, the subfloor likely possesses uneven hollows. Address minor voids under floating planks by injecting low-expansion subfloor adhesive through unobtrusive access points.
For hollow spots beneath ceramic or porcelain tiles, use specialized floor tile injection repair kits. These liquid adhesives refill mortar voids beneath loose tiles without requiring full floor demolition.
When to Hire a Professional
While confident DIYers can successfully install click-lock luxury vinyl plank, other materials demand professional mastery. Glazed porcelain tile installation requires advanced layout skills, specialized wet cutting equipment, and precise mortar mixing.
Hire a certified tile setter if your room features unlevel floors, complex drain slopes, or heated subfloor cables. A professional ensures full mortar coverage beneath each tile to prevent cracked surfaces.
Concrete grinding and polishing requires industrial planetary grinders, heavy dust extractors, and chemical densifying experience. Professional polishing contractors create a perfectly sealed, mirror-smooth finish without airborne silica hazards.
Consult local building departments regarding renovation permits when moving structural walls or relocating plumbing fixtures. Reputable licensed contractors carry liability insurance and handle necessary permits to ensure local building code compliance.
Style & Finishing Touches
Modern easy clean flooring delivers stunning visual appeal alongside superior practical performance. Advanced digital printing replicates authentic wire-brushed oak, weathered barn wood, and honed Italian marble flawlessly.
Select light to medium floor tones to brighten rooms and conceal daily dust tracking. Dark espresso flooring exposes every pet hair and footprint, while ultra-light whitewashed tones reveal tracked-in mud.
When installing porcelain tile, choose rectified edges with narrow grout lines measuring one-sixteenth of an inch. Narrower joints minimize grout surface area, dramatically reducing the time spent scrubbing porous joint cement.
Specify pre-sealed high-performance epoxy or urethane grout rather than standard cement-based mixtures. Non-porous epoxy grout repels stains, resists grease absorption, and eliminates the need for periodic chemical resealing.
Transition strips finish your room design and provide smooth passages between different living zones. Select metal or color-matched composite transition profiles that sit flush with the floor to prevent dirt traps.
Position low-profile, non-staining rubber-backed doormats at every exterior home entrance. Capturing exterior grit and rainwater at the threshold prevents abrasive particles from scratching your smooth floor finish.
Maintenance & Long-Term Care
Implement a regular dry-cleaning routine to keep your hard surfaces free of abrasive soil particles. Sweep daily with a microfiber dust mop or use a hard-floor-safe vacuum without an active beater bar.
Beater bars on conventional upright vacuums rotate aggressively, which can scratch delicate vinyl wear layers and laminate coatings. Select vacuum attachments with soft natural bristles to lift dirt safely.
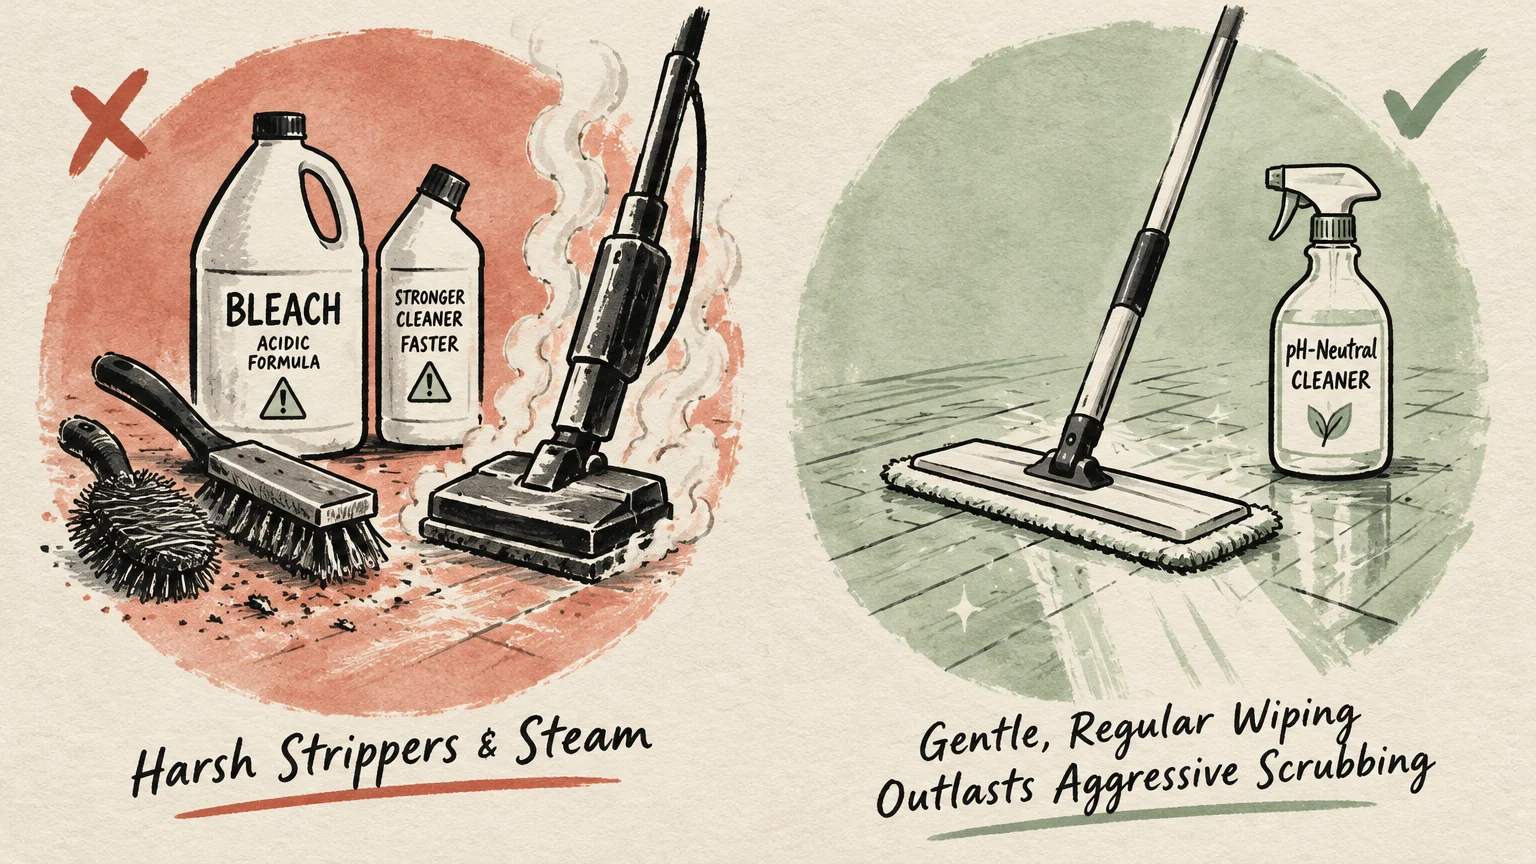
Wash your floors weekly using a microfiber flat mop dampened with clean water and pH-neutral cleaner. Avoid harsh ammonia, bleach, or acidic vinegar solutions, which slowly strip protective factory finishes.
Clean pet accidents immediately to prevent urine acids from degrading seams or staining light materials. Blot liquid spills using an absorbent cloth, then sanitize the surface using an enzymatic pet cleaner.
Never clean luxury vinyl plank, laminate, or hardwood floors using residential steam mops. Pressurized steam forces boiling moisture deep into tongue-and-groove joints, causing swelling, edge peeling, and adhesive failure.
Attach heavy-duty felt protective pads under all furniture legs, chairs, tables, and sofas. Replace these felt pads semi-annually to prevent trapped grit from scouring your floor finish during room rearrangements.
Maintain balanced indoor humidity levels through summer heat and winter heating cycles. Use humidifiers during dry winter months to protect wood-based materials from contracting and opening visible seam gaps.
FAQ
Which flooring stands up best to heavy pet traffic?
Glazed porcelain tile stands out as the ultimate pet-friendly floor for active multi-pet households. Its Mohs scratch hardness rating of 7 or higher stops pet claws from scratching the surface.
Certified porcelain absorbs 0.5% or less water, making it totally impervious to pet urine and water bowl overflows. Luxury vinyl plank with a 20 mil wear layer represents the best resilient alternative.
Is porcelain tile truly easier to clean than ceramic tile?
Yes, certified glazed porcelain tile cleans much faster and resists stains far better than standard ceramic tile. Porcelain fires at higher kiln temperatures, creating a dense, non-porous body that blocks moisture absorption.
Standard ceramic tile absorbs between 0.5% and 10% moisture, which allows unsealed spills to seep into the tile core. Porcelain prevents liquids from penetrating beneath the glaze, letting you wipe messes away effortlessly.
Can steam mops damage waterproof luxury vinyl plank?
Yes, steam mops can cause catastrophic and permanent structural damage to waterproof luxury vinyl plank. High steam heat softens the vinyl core, causing plank edges to warp, curl, and blister.
The extreme pressure from steam mops also drives moisture through interlocking tongue-and-groove seams into your subfloor. Use a microfiber spray mop with a dedicated neutral floor cleaner instead.
How does subfloor condition impact your maintenance routine?
An uneven or unlevel subfloor directly degrades your floor’s long-term cleanability and structural durability. Subfloor dips cause floating planks to bounce, which stresses the interlocking joints and creates visible gaps.
These opened seam gaps trap dust, pet dander, spilled liquids, and dirty wash water. Leveling your subfloor to within manufacturer standards ensures your seams stay tightly sealed against daily debris.
What hidden costs should you prepare for before installation?
Many homeowners overlook necessary substrate prep and demo costs when formulating their initial flooring budgets. Removing existing flooring materials adds $1 to $4 per square foot to your total project bill.
Leveling an uneven subfloor requires self-leveling compounds and labor, adding $2 to $4 per square foot. Acoustic and vapor underlayment costs an extra $0.30 to $3.50 per square foot.
Takeaway & Next Steps
Installing easy clean flooring reduces daily cleaning chores, protects your indoor air quality, and safeguards your home investment. Durable wear layers and non-porous surfaces handle pet accidents and spills with total ease.
Selecting the best flooring for pets and heavy foot traffic keeps your home looking pristine for decades. Modern surfaces allow you to enjoy premium wood and stone aesthetics without constant scrubbing or specialty sealers.
Measure your project area: Calculate the exact square footage of your space, adding ten percent extra for cuts and waste.
Inspect your subfloor flatness: Place a straightedge across your subfloor to identify high spots and low dips that need leveling.
Order manufacturer product samples: Test physical plank and tile samples inside your home under natural daylight and room lighting.
We love seeing your home transformations in action. Share photos of your finished flooring project with our community, or subscribe to our newsletter for weekly home renovation tips and expert project guides.