Step-by-Step Instructions
Approaching your kitchen makeover systematically prevents you from feeling overwhelmed. By breaking the workload into manageable weekend phases, you keep your kitchen functional throughout the process. Below are the eight most effective ways to transform your space.
1. Resurface and Paint Your Cabinets
Painting outdated wood or laminate cabinets instantly modernizes your kitchen. Begin by removing all doors, drawers, and existing hardware; label each piece with a piece of painter’s tape so you know exactly where it returns. Scrub every surface aggressively with a degreasing agent to remove years of accumulated cooking oils. Once dry, lightly sand the surfaces with 120-grit sandpaper to create a microscopic texture that helps the new finish adhere. Wipe away all dust with a tack cloth before applying an even coat of high-quality bonding primer. Finish by rolling on two coats of durable cabinet enamel, allowing proper drying time between each application. For a factory-like finish, use a foam roller on flat sections and a premium brush for detailed trim.
2. Install a Modern Backsplash
A fresh backsplash protects your walls from moisture while serving as a dynamic focal point. If you want a weekend-friendly option, modern peel-and-stick tiles offer incredible realism without the mess of mortar. For a more traditional route, install classic ceramic subway tiles. Start by thoroughly cleaning the drywall. Find your center point above the range and work outward to ensure your focal point looks symmetrical. Apply a premixed tile adhesive using a notched trowel, press your tiles firmly into place, and use plastic spacers to maintain consistent gaps. After the adhesive cures for twenty-four hours, apply a stain-resistant grout with a rubber float. Wipe the excess grout away with a damp sponge before it dries completely.
3. Upgrade Cabinet Hardware
Swapping out tarnished builder-grade knobs for sleek, modern pulls instantly elevates your cabinetry. If you are keeping your existing doors, measure the distance between the current drill holes—known as the center-to-center measurement—and purchase new hardware that matches perfectly. If you are installing hardware on freshly painted, un-drilled doors, use a cabinet hardware installation template. This adjustable plastic guide sits on the corner of your cabinet door and dictates exactly where to drill, guaranteeing that every handle aligns flawlessly across your entire kitchen. Drill straight through the wood, insert the provided machine screws from the back, and tighten the new hardware securely.
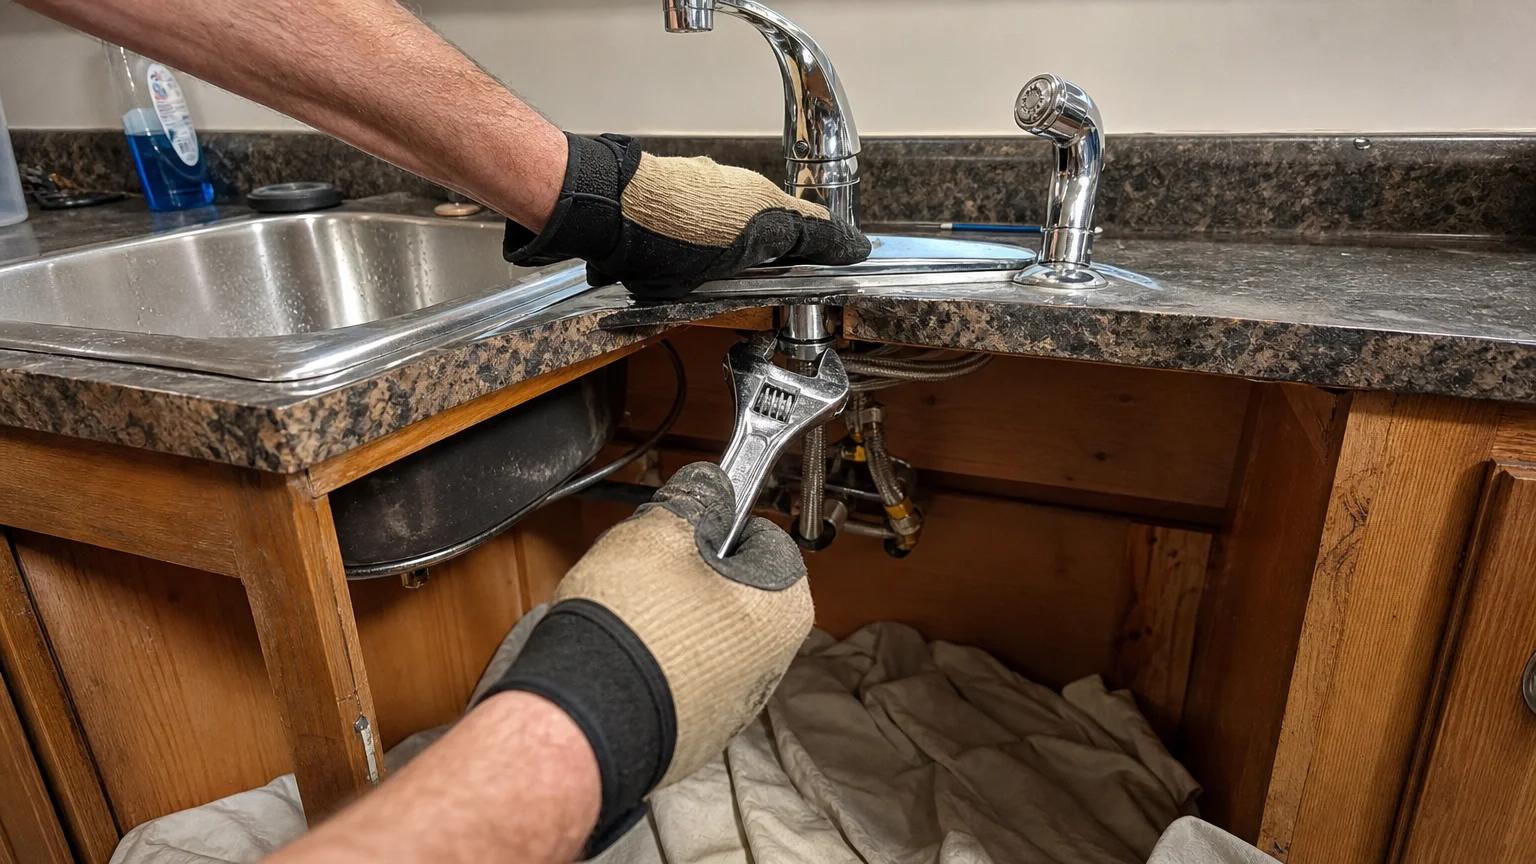
4. Swap Out the Kitchen Faucet
A towering, commercial-style faucet adds massive visual appeal and functional flexibility. Before beginning this project, you must shut off the hot and cold water supply valves located directly beneath your sink. Open the old faucet to relieve any lingering water pressure. Use an adjustable wrench to disconnect the supply lines, keeping a small bucket underneath to catch residual drips. Unscrew the mounting nuts holding the old faucet in place and pull the unit out from above. Clean the sink deck thoroughly before inserting the new faucet. Secure the new mounting hardware from underneath, connect your supply lines, and wrap the threaded connections with plumber’s tape to prevent leaks. Turn the water back on slowly and inspect the lines for moisture.
5. Enhance Overhead Lighting Fixtures
Replacing a dated fluorescent box or uninspired pendant lights dramatically shifts the mood of your kitchen. Safety is paramount here: shut off the main circuit breaker that powers your kitchen lighting. Verify that the power is completely disconnected using a reliable non-contact voltage tester before touching any wires. Unscrew the old fixture and disconnect the black, white, and copper ground wires. Support the weight of the new fixture while you connect the corresponding wires using wire nuts—black to black, white to white, and ground to the mounting bracket. Secure the decorative canopy against the ceiling. Please note: while swapping existing fixtures is simple, running new electrical lines always requires a permit and an inspection. You should hire a licensed electrician for any complex wiring changes.
6. Add Under-Cabinet Lighting
Illuminating your countertops removes frustrating shadows and gives your kitchen an upscale, custom ambiance. For the most affordable upgrades, purchase linkable LED strip lights that plug directly into an existing countertop outlet. Clean the underside of your upper cabinets to remove dust and grease, which prevents the adhesive backing from peeling later. Map out the layout of your strips, ensuring the connecting cables hide discreetly behind the cabinet lip. Peel away the protective backing, press the strips firmly against the wood, and secure the power cord neatly along the corner of the wall. This simple addition completely transforms the space at night, doubling as an elegant nightlight.
7. Install Roll-Out Pantry Shelves
Improving the functionality of your lower cabinets is just as important as upgrading your surface aesthetics. Deep base cabinets often become disorganized dark holes where pots and pans get lost. Purchasing aftermarket roll-out shelving systems solves this issue efficiently. Measure the exact width, depth, and height of your cabinet openings, paying careful attention to how far your cabinet doors swing open. The new pull-out tracks must clear the door hinges when fully extended. Simply align the metal gliding tracks along the floor of your cabinet, ensure they sit perfectly level, and screw them securely into the heavy base wood. Insert the wooden drawers onto the tracks to instantly multiply your accessible storage space.
8. Refresh the Wall Color
A fresh coat of paint remains the undisputed champion of budget renovation strategies. Kitchen walls endure constant exposure to steam, splattered grease, and heavy foot traffic. Choose a premium interior acrylic paint with an eggshell or satin finish; these sheens resist moisture and allow you to wipe away cooking stains without ruining the paint job. Use painter’s tape to protect your ceiling line, window trim, and baseboards. Cut in around the edges with an angled brush, then use a roller to apply paint to the broad wall sections in a continuous, overlapping W-pattern. A light, neutral wall color serves as the perfect backdrop to highlight your newly painted cabinets and brilliant hardware.


Leave a Reply
You must be logged in to post a comment.