The American House

  • Home
  • DIY
  • Garden
  • Tips & Tricks

10 Best Paint Colors for Hallways With No Windows

May 6, 2026 · Home
A three-step horizontal flowchart showing the phases: Prep, Priming, and Color.
Follow these three essential phases for prepping, priming, and applying color to brighten your windowless hallway.

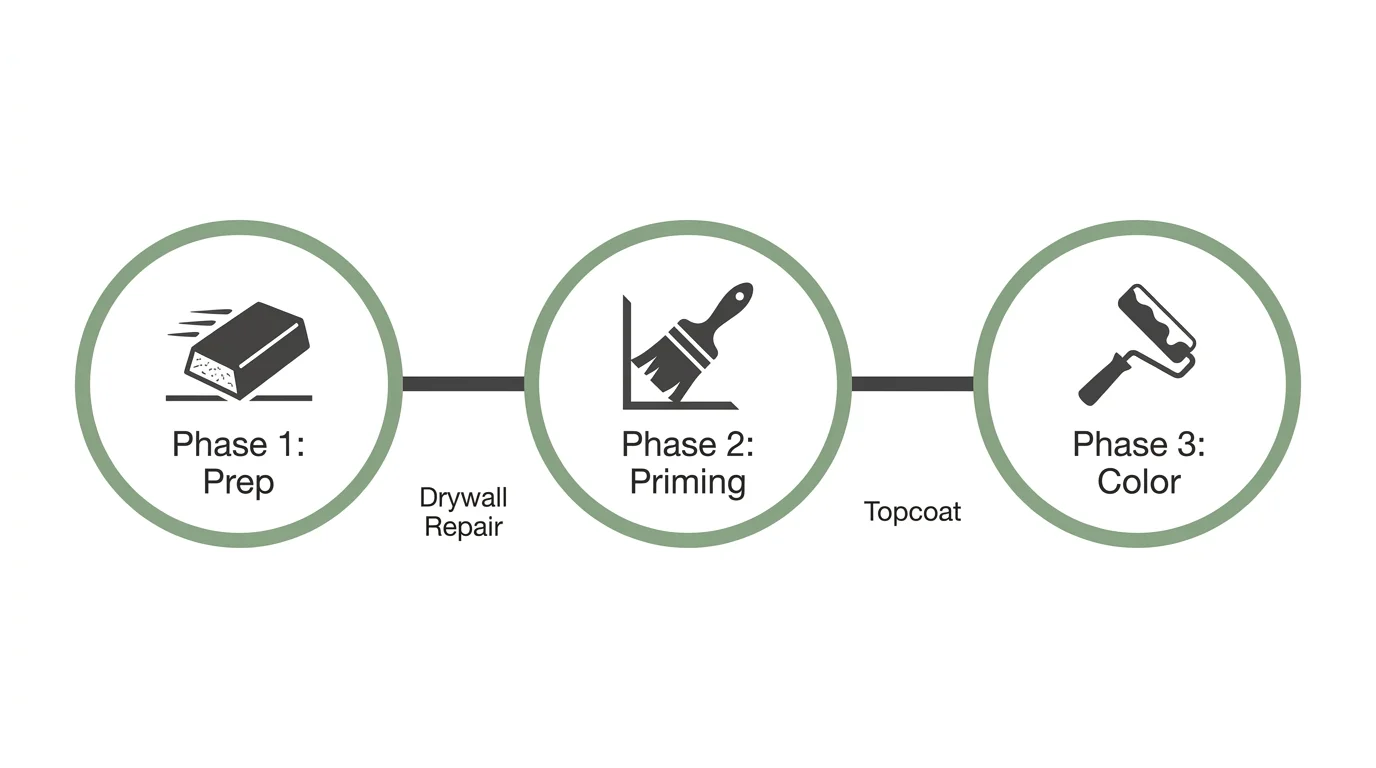
Step-by-Step Instructions

Close-up of a hand using a sanding sponge on a wall patch, with white dust visible on the surface.
Smooth out drywall repairs with a sanding block to prepare your windowless hallway for a fresh coat.

Phase 1: Deep Cleaning and Drywall Repair

Start by removing all artwork, mirrors, and outlet covers from the hallway. Lay your canvas drop cloths securely over the flooring, taping the edges to the baseboards to prevent tripping hazards. Once you protect the floor, mix a solution of warm water and mild degreaser. Wash the walls thoroughly from the ceiling down to the baseboards, focusing heavily on the areas around light switches where natural skin oils accumulate. Let the walls dry completely.

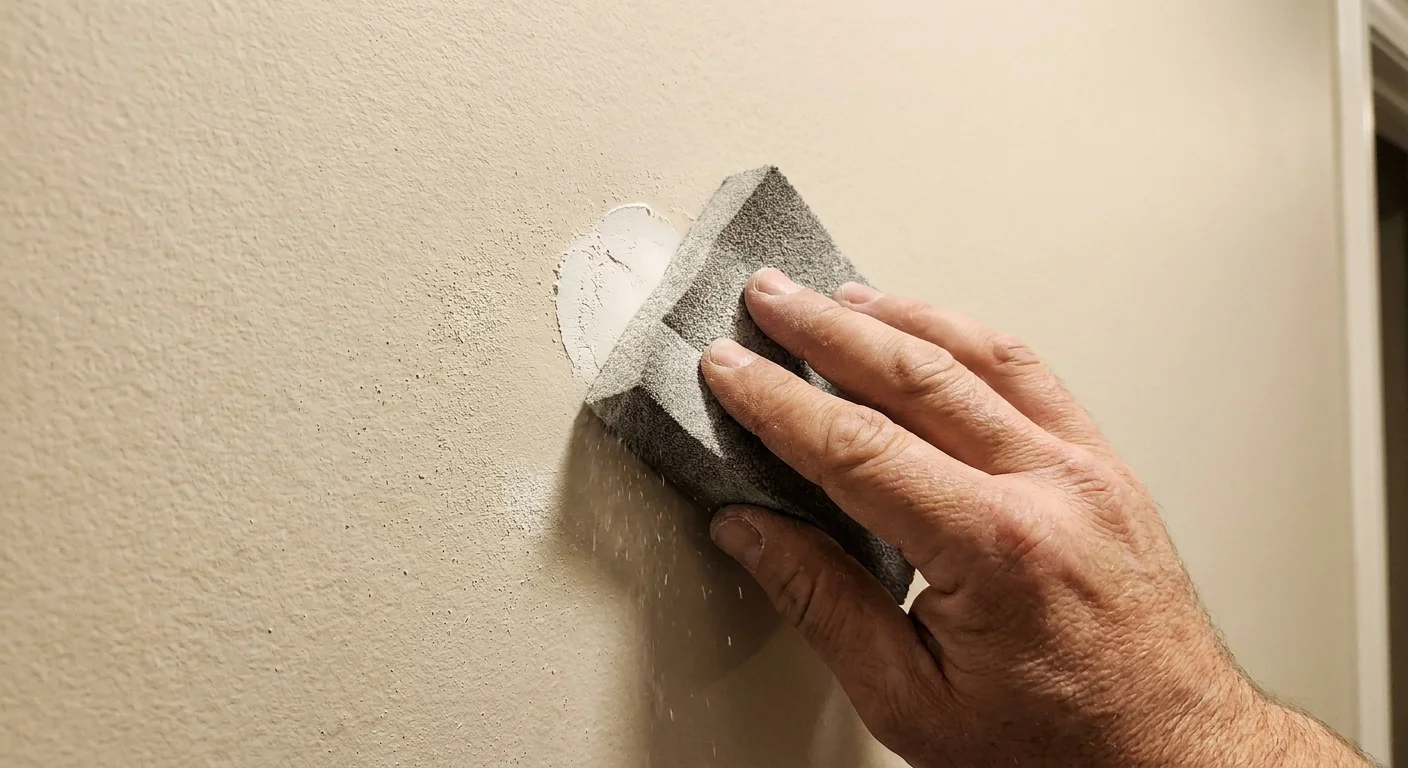
Next, inspect the drywall under a harsh utility light. Circle every dent, nail hole, or scratch with a pencil. Fill these imperfections with lightweight spackle using your flexible putty knife. Smooth the spackle as much as possible while it remains wet to minimize your sanding time later. Allow the spackle to dry according to the manufacturer’s instructions—usually around two hours. Put on your dust mask and use a 220-grit sanding sponge to feather the patched areas until they feel completely flush with the surrounding wall. Wipe the walls down with a barely damp microfiber cloth to remove all lingering drywall dust.

Macro shot of a paintbrush applying white primer precisely along a baseboard with blue tape.
Cutting in with white primer along the baseboard prepares your windowless hallway for a bright transformation.

Phase 2: Cutting In and Priming

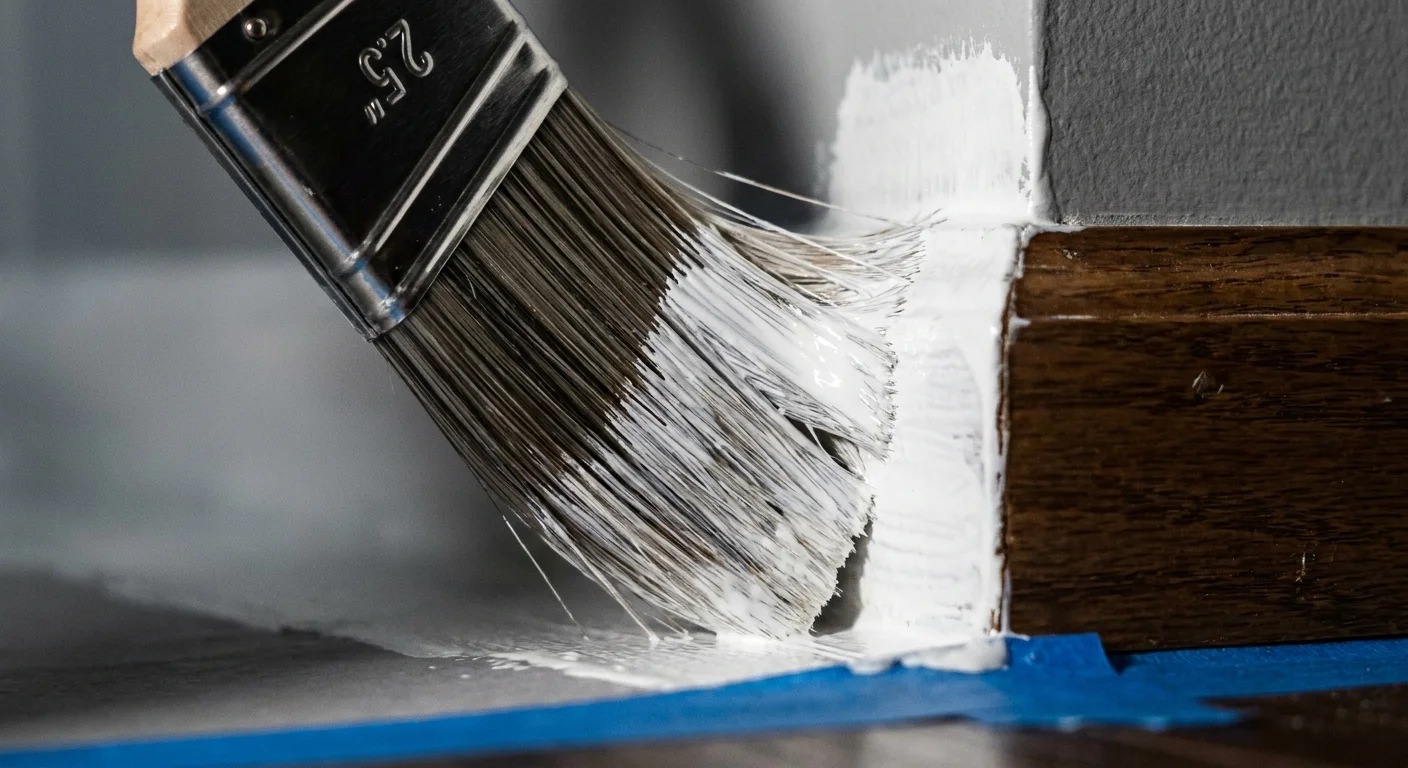
Apply your high-quality painter’s tape along the top edge of the baseboards, around door casings, and across the ceiling line if you do not plan to paint the ceiling. Press the tape down firmly with a putty knife to prevent paint bleed. Open your primer and pour a small amount into a handheld cut-in cup. Using your 2.5-inch angled brush, paint a two-inch border of primer along all taped edges and corners.

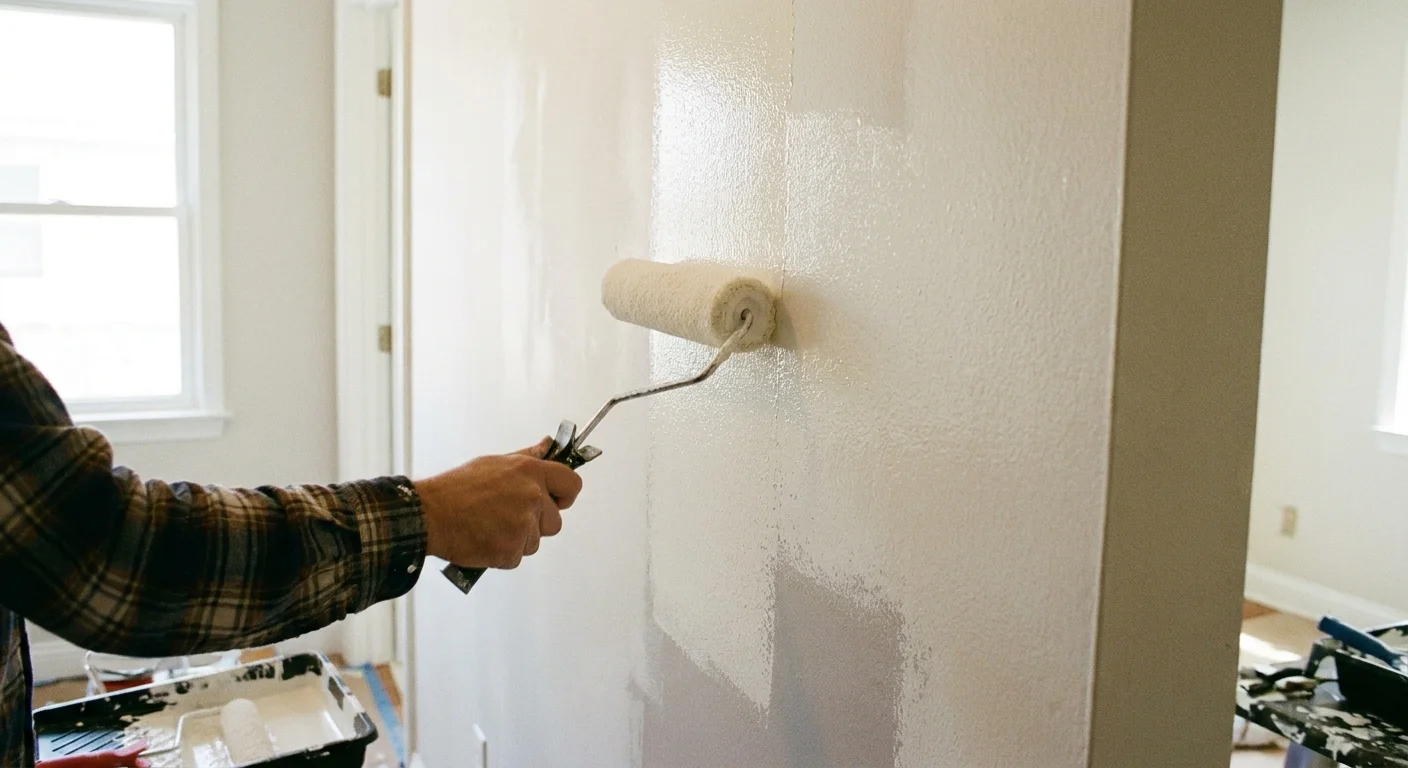
Once you finish cutting in, pour the remaining primer into a roller tray. Load your 3/8-inch nap roller evenly, ensuring it remains saturated but not dripping. Roll the primer onto the walls using overlapping “W” or “V” patterns, working in three-foot sections. This technique evenly distributes the primer and prevents roller marks. Allow the primer to dry for at least four hours, or as directed by the label. Proper ventilation speeds up drying, so set up a box fan at the end of the hallway to keep air moving.

A paint roller applying a fresh coat of white paint over a primed wall, showing the texture of the wet paint.
A hand rolls a fresh coat of bright paint onto the wall to transform a windowless hallway.

Phase 3: Applying the Color and Finishing

Stir your chosen paint color thoroughly to blend any settled pigments. Repeat the cutting-in process around the trim and ceiling using your fresh color. Work efficiently so the cut-in border remains wet when you begin rolling; maintaining a “wet edge” ensures a seamless blend between the brushed and rolled areas.

Switch to your roller and apply the first coat of paint using the same “W” pattern you used for the primer. Apply light, even pressure, letting the roller do the work. Wait for the first coat to dry completely—typically two to four hours. Apply a second coat to achieve maximum color depth and durability. Remove the painter’s tape while the second coat remains slightly damp to the touch; pulling tape over fully cured paint can peel your crisp new lines. Reinstall your outlet covers and hardware only after the walls dry completely.

Pages: 1 2 3 4 5 6 7

Share this article

Facebook Twitter Pinterest LinkedIn Email

Leave a Reply Cancel reply

You must be logged in to post a comment.

Latest Posts

  • A large, stylish gallery wall with mixed frames and art hanging above a tan leather sofa in a sunlit living room. 10 Frame Combinations That Transform Blank Walls
  • A modern living room blending a mid-century wood sideboard and leather chairs with contemporary furniture in natural afternoon light. 7 Furniture Styles Designers Are Loving Again
  • A modern black linear light fixture hangs above a wooden dining table, casting a warm glow in a stylish, dusk-lit room. 8 Light Fixtures That Instantly Elevate a Room
  • A sophisticated geometric walnut wood accent wall in a modern living room with dramatic sunlight and shadows. 9 Wall Features That Add Instant Character
  • A vibrant teal front door on a grey house at sunset, surrounded by potted plants and a welcome mat. 10 Front Door Paint Colors That Make Homes Stand Out
  • A modern living room with deep emerald green walls and dark walnut built-in shelving, showcasing a bold color contrast. 10 Unexpected Paint Colors That Look Beautiful with Natural Wood
  • A wide-angle editorial photo of a luxury open-concept kitchen with a large marble island and soft morning sunlight. 9 Luxury Home Features That Were Once Considered Weird
  • A close-up photograph of a hand replacing an old ornate bronze handle with a modern matte black pull on a honey oak kitchen cabinet. 9 Kitchen Features That Quietly Age Your Home
  • A person pulling back old beige carpeting to reveal natural oak wood flooring in a sunlit room. 9 Homes Features That Feel Outdated To Younger Buyers
  • A close-up of a hand turning a polished brass handle on a navy door in a sunlit, clean entryway. 9 Home Features Guests Secretly Notice First

Related Articles

sustainable home renovation projects

6 Sustainable Home Renovation Projects

When you want to renovate, there are a ton of things you need to consider.…

Read More →
plant-destroying habit

6 Plant-Destroying Habits You Should Stop Repeating

2. Underwatering Well, if you don’t give a lot of water to your plant, you…

Read More →
expensive home

5 Landscaping Ideas to Make Your Home Look More Expensive

Want to make everyone think you have an expensive house? Try these tricks! Most of…

Read More →
Small laundry room

9 Things That Damage Your Washing Machine

Use too much detergent at your peril You should expect to see some disappointing wash…

Read More →
A close-up photograph of a hand replacing an old ornate bronze handle with a modern matte black pull on a honey oak kitchen cabinet.

9 Kitchen Features That Quietly Age Your Home

Update your kitchen by testing electrical safety, sanding wooden cabinets, and applying a fresh coat…

Read More →
stress

These 7 Plants Will Remove Stress Instantly

2. Lavender Lavender is well-known for its relaxation and anxiety-reducing properties. This plant is usually…

Read More →
upgrade home

8 Ways to Reset Your Home for the New Year

Does Your Home Need an Upgrade in The New Year? Your home contributes a great…

Read More →
laundry room paint colors

These 10 Paint Colors Make Small Laundry Rooms Look Bigger

2. Warm white Warm white is also among those laundry room paint colors you may…

Read More →
A wide-angle shot of a freshly painted front door opening into a bright, clean foyer with light wood floors and brass hardware.

8 Home Features Buyers Instantly Notice During Showings

This infographic illustrates eight high-impact focal points that buyers notice when touring a potential home.…

Read More →

The American House

Inedit Agency S.R.L.
Bucharest, Romania

contact@theamericanhouse.com

Trust & Legal

  • Privacy Policy
  • Terms and Conditions
  • Do not sell my personal information
  • Subscribe
  • Unsubscribe
  • Contact
  • Request to Know
  • Request to Delete
  • CA Private Policy

Categories

  • DIY
  • Expert Tips
  • Garden
  • Tips & Tricks

© 2026 The American House. All rights reserved.