The American House

  • Home
  • DIY
  • Garden
  • Tips & Tricks

9 Kitchen Features That Quietly Age Your Home

May 13, 2026 · Home
A three-panel watercolor illustration showing a person testing electricity, sanding a cabinet, and painting over oak wood.
Update your kitchen by testing electrical safety, sanding wooden cabinets, and applying a fresh coat of paint.

Step-by-Step Instructions

Break your remodeling efforts into distinct phases. Focusing on one system at a time prevents the kitchen from feeling overwhelmingly chaotic.

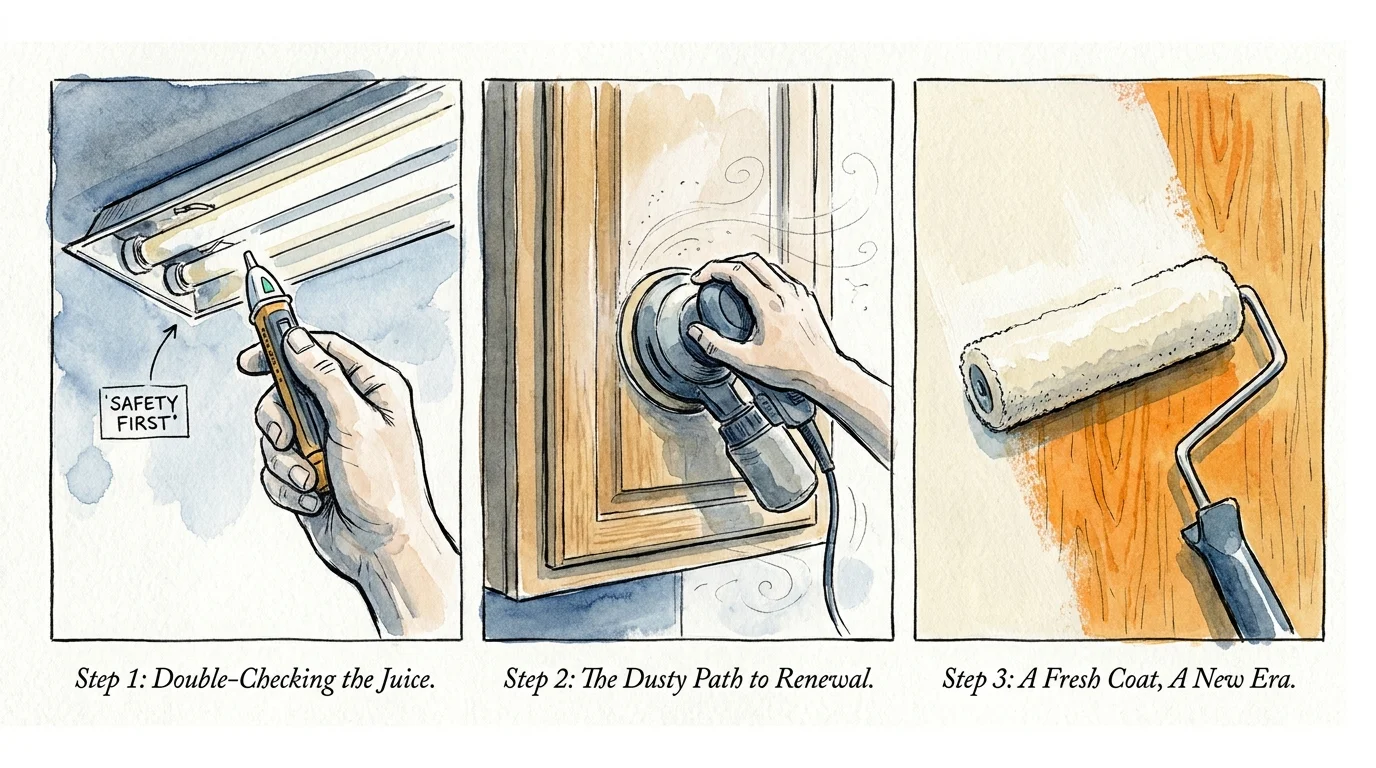
Phase 1: Safely Removing Outdated Lighting

Begin with the most impactful change—removing the fluorescent box. Safety First: Locate your main electrical panel and turn off the breaker supplying power to the kitchen ceiling lights. Use your non-contact voltage tester on the wiring inside the fixture to confirm the power is completely dead before touching any wires.

Unscrew the acrylic panels and remove the fluorescent tubes. Disconnect the wiring, cap the ceiling wires with wire nuts, and carefully unscrew the heavy metal housing from the ceiling joists. You will likely face drywall patching where the box used to sit. Apply drywall compound, feather the edges, sand it smooth, and paint the ceiling flat white. Install modern, low-profile LED flush mounts or a sleek track lighting system following the manufacturer guidelines and local National Electrical Code regulations.

Phase 2: Prepping and Painting Honey Oak Cabinets

Remove all cabinet doors, drawers, and hinges. Number each door and its corresponding cabinet box using a piece of tape—this ensures perfect realignment during reassembly. Remove all ornate, heavy hardware.

Scrub every wooden surface with TSP or a heavy-duty degreaser. Kitchen cabinets accumulate years of invisible grease; paint will not adhere to grease. Once dry, lightly scuff all surfaces using your random orbital sander and 120-grit paper. You do not need to strip the wood bare, but you must remove the glossy clear coat. Wipe away the dust with a damp microfiber cloth.

Apply one coat of high-adhesion bonding primer using a foam roller for flat surfaces and a synthetic brush for the recesses. Let it dry completely. Follow up with two thin coats of cabinet enamel, lightly sanding with 220-grit paper between coats. Thin coats prevent drips and cure to a factory-like finish.

Phase 3: Banishing the 4-Inch Backsplash

To modernize your counters without replacing the stone, remove the short 4-inch granite lip. Score the caulk line where the granite meets the wall and the counter using your utility knife. Gently tap a stiff putty knife behind the granite lip and pry it away from the drywall. Work slowly to minimize drywall damage.

Scrape away the old silicone on the flat counter surface. Patch any torn drywall with spackle. Now you have a clean slate to install a modern subway tile or a solid sheet backsplash that extends all the way from the counter to the bottom of your upper cabinets, visually elongating the room.

Phase 4: Installing Modern Hardware

If you are switching from a two-hole pull to a single-hole knob, fill the old holes with wood filler before priming and painting your cabinets. Once the final coat of enamel cures (wait at least 48 hours), use a cabinet hardware jig to drill precise, uniform holes for your new modern hardware. Install the new matte black or unlacquered brass pulls to complete the transformation.

Pages: 1 2 3 4 5 6 7

Share this article

Facebook Twitter Pinterest LinkedIn Email

Leave a Reply Cancel reply

You must be logged in to post a comment.

Latest Posts

  • A modern living room featuring a vintage Victorian carved wood cabinet and a mid-century green velvet sofa in warm afternoon light. 9 Vintage Furniture Trends Returning to Homes (You May Own These Pieces Too!)
  • A warm, sunlit kitchen featuring sage green cabinets, brass lighting, and matte black hardware, capturing a modern DIY aesthetic. 8 Affordable Ways to Upgrade Your Kitchen
  • A bright, clean kitchen with seamless quartz countertops and oak shelves, focusing on smooth surfaces that resist dust and grime. 9 Cleaner Home Design Choices
  • A large, stylish gallery wall with mixed frames and art hanging above a tan leather sofa in a sunlit living room. 10 Frame Combinations That Transform Blank Walls
  • A modern living room blending a mid-century wood sideboard and leather chairs with contemporary furniture in natural afternoon light. 7 Furniture Styles Designers Are Loving Again
  • A modern black linear light fixture hangs above a wooden dining table, casting a warm glow in a stylish, dusk-lit room. 8 Light Fixtures That Instantly Elevate a Room
  • A sophisticated geometric walnut wood accent wall in a modern living room with dramatic sunlight and shadows. 9 Wall Features That Add Instant Character
  • A vibrant teal front door on a grey house at sunset, surrounded by potted plants and a welcome mat. 10 Front Door Paint Colors That Make Homes Stand Out
  • A modern living room with deep emerald green walls and dark walnut built-in shelving, showcasing a bold color contrast. 10 Unexpected Paint Colors That Look Beautiful with Natural Wood
  • A wide-angle editorial photo of a luxury open-concept kitchen with a large marble island and soft morning sunlight. 9 Luxury Home Features That Were Once Considered Weird

Related Articles

worst Feng Shui plants

8 Worst Feng Shui Plants For Your Home

If you want good luck this year, you must avoid these worst Feng Shui plants…

Read More →
feng shui

9 Plants That Bring Prosperity and Good Fortune

White Bird of Paradise – Strelitzia Nicolai According to Mark from “Happy Houseplants”, “any healthy…

Read More →
A modern living room blending a mid-century wood sideboard and leather chairs with contemporary furniture in natural afternoon light.

7 Furniture Styles Designers Are Loving Again

Carefully strip away old finish to restore a vintage wooden chair to its former designer…

Read More →
overdone kitchen trends

6 Overdone Kitchen Trends According to Designers

Closed-off cabinetry Just try to have this image in your mind for a couple of…

Read More →
things designers would never buy

Interior Designers Would Never Buy These 7 Things!

When you start renovating your home, there are many things you should consider. Planning a…

Read More →
A person pulling back old beige carpeting to reveal natural oak wood flooring in a sunlit room.

9 Homes Features That Feel Outdated To Younger Buyers

An asbestos test kit and safety mask are essential tools for prepping an older home…

Read More →
mice

How To Stop Mice From Getting Indoors Naturally – 7 Simple Secrets To Success!

Who wants to share their house with mice? No one, I’m telling you. Besides making…

Read More →
expensive home

16 Ways to Make Your House Feel More Expensive

Add moldings We can’t deny the fact that adding moldings to your home is probably…

Read More →
attic

How to Make Your Attic a Livable Place: 10 Amazing Tips

2. Add flooring to your attic Adding an extra layer will keep the space warmer…

Read More →

The American House

Inedit Agency S.R.L.
Bucharest, Romania

contact@theamericanhouse.com

Trust & Legal

  • Privacy Policy
  • Terms and Conditions
  • Do not sell my personal information
  • Subscribe
  • Unsubscribe
  • Contact
  • Request to Know
  • Request to Delete
  • CA Private Policy

Categories

  • DIY
  • Expert Tips
  • Garden
  • Tips & Tricks

© 2026 The American House. All rights reserved.