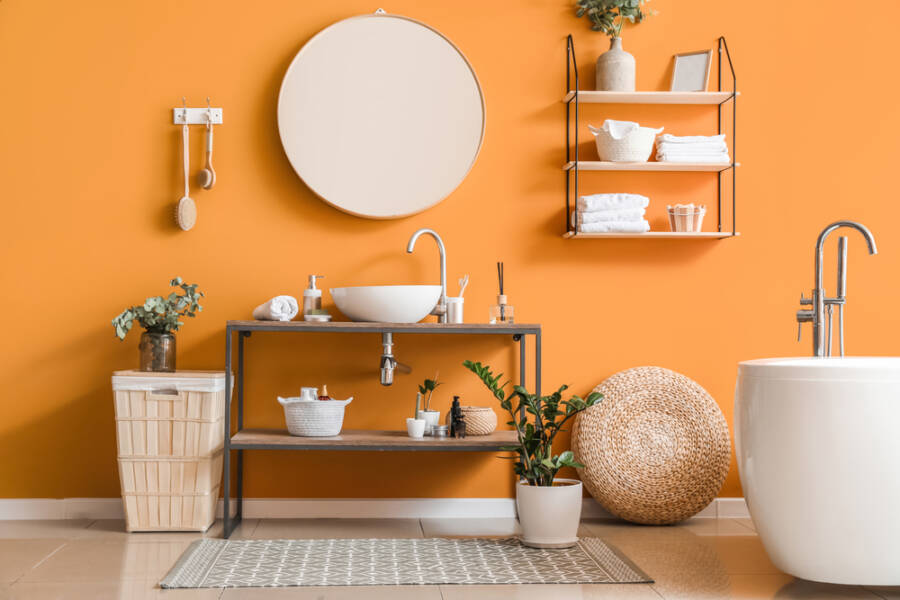
Search
Close this search box.
Search
Close this search box.
bedroom-1

Take These Things Out of Your Bedroom NOW!

With so much going on outside the house, it’s quite pleasant to have a space inside your house where you can forget about everything and just unwind. And what better place to do that than the bedroom. Unfortunately, many bedrooms are so cluttered that are anything but a would-be zen room. To make sure your bedroom sticks to its function as an oasis of peace, eliminate these 11 items that should be placed anywhere else, expect your bedroom. Get these things out of your bedroom! Electronics Surely, you’ve heard about the blue light that certain electronics, such as TVs, tablets, laptops and smartphones are emitting. According to scientists, blue light increases your alertness and boosts your mood during the day but this is exactly what you do not need during the night. At night, it can affect your sleep cycle and sleep quality. It is recommended to stop using blue-light devices two or even three hours before going to bed. If it seems too difficult, at least part ways with your smartphone before bed by keeping it out of your bedroom. Read also: Living Alone? Making These Mistakes Could Jeopardize Your Life Halogen lights Halogen lights will be banned from production and sale, as they represent a fire hazard. They are a thing of the past but if you still have halogen lights in your house, it’s better to replace them with LED bulbs. Do not keep halogen bulbs in the bedroom, and especially in a child’s room whose walls might be covered by wallpaper or fabric. Read also: Expecting Guests? Here’s What They Usually Notice in a Dirty Home Space heaters Cuddling in a comfortable bed, in a warm bedroom in winter is great. But if you’re using a space heater to make your bedroom toasty and warm, you might want to reconsider. Space heaters should always be turned off before going to bed and should never be left unsupervised, no matter what. If you don’t want an extra reason to worry, just take the space heater out of the bedroom and opt for warmer blankets. See also:11 Things That Make Your Home an Easy Target for Burglars  Clutter Clutter can have a serious impact on one’s mental health. Consequently, a cluttered and disorganized bedroom can severely disrupt your sleep cycle. After all, what quality can your sleep have if you are surrounded by piles of clothes, scattered papers and whatnot? Whether you want it or not, your mind will stay focused on the clutter instead of relaxing and preparing itself for sleep. So, listen to your mother’s advice for once and clean your room. Decluttering will bring serenity back to your bedroom.  Desks Some people read in bed, and that relaxes them before sleep. Others, on the other hand, work in the bedroom. That’s not exactly something that you should be doing prior to going to bed, as it can triggers feelings of anxiety, stress and other work-related issues. First thing’s first: get rid of your desk. Its place is not in the bedroom, which is a room that should promote sleep. Take it to a study or the living room, or another room that can be associated with work. According to various studies, working in the bedroom, particularly in bed, causes your brain to disassociate bedroom from sleep. You don’t want that! You want your brain to know for sure that the bedroom is where you go to relax and rest. Family photos Close, but no too close. This is a recommended rule when it comes to living close to your family. This is also valid for family photos. It’s nice seeing happy, familiar faces in the living room or entryway. However, feng-shui experts warn against having family photos in the bedroom. The reason is that such photos can induce feelings of obligation, anxiety and other family-related issues that will mess with your sleep and keep you awake. Food Breakfast in bed sounds like a wonderful idea. As long as you don’t turn it into an everyday habit. As pleasant as it might be to have a tasty breakfast while still lazily lounging in bed, think of all the crumbs and leftovers that will attract all sorts of pests. Sure, you’ll clean afterwards, but food has a way of hiding itself. Not to mention the smell. “From a digestive standpoint, lying down or eating when you’re not as erect does not promote peristalsis, and that could contribute to acid reflux, if you’re prone to that,” said clinical psychologist Dr. Michael Brustein. “In terms of conditioning, you want to have your bed trigger sleep and not multiple stimuli,” he added. “So, from a sleep-hygiene perspective, it’s best to keep your sleeping quarters just for sleeping.” For your sake and for sanitation purposes, eat your food in the kitchen and keep it out of the bedroom. Extra pillows For design purposes, pillows, shams and throws might look good on your bed. But when it comes to sleep, having to fight for space with all those pillows and bolsters is not exactly pleasant. To avoid having to remove all those extra decorative items every night, stick to a minimum number of decorative bedding items. You might have a king size bed, but more than 6 pillows will turn into a crowd. You’re going to throw those pillows on the floor anyway when it’s time for bed, why make an even greater and more-time consuming effort? Alcohol Some people say alcohol helps them sleep better. Researchers agree to disagree. According to various studies, drinking right before going to bed can actually affect your sleep cycle and quality by reducing the number of hours of deep sleep. The deep sleep is when your brain and body relax the most, allowing them to regenerate and replenish their energy, store memories and balance hormones. If you deep sleep is affected, you’ll feel tired the following day. It’s like you haven’t slept at all. So, no more alcohol in the bedroom, unless it’s for

brown furniture, deisgn

5 Colors That Go With Brown Furniture, According to Designers

Can we make brown furniture cool again? Do you want to decorate, or maybe redecorate, your home and take into consideration working with a designer? Is it hard to find someone who understands your wishes and needs? Or is it too expensive to work with a professional? The reason you’re here doesn’t matter anymore. You can do it all alone. We TRUST you! This article aims to share with you some precious tips and tricks. These are also some of the most used by professionals! Picking the right paint color can be really difficult because the last thing you want to do is destroy the aesthetically pleasing environment you wish for. So, it is essential to consider the model of furniture you have before taking any other steps. If you have pieces of brown furniture and you think brown is old-fashioned you’re completely WRONG! We’ll teach you how to elevate it and make it look fabulous! Is Paint Color That Important in Home Design? Brown furniture can be extraordinarily stylish if placed on the right side of the room, and a secret most people don’t know is the importance of paint colors, which contribute significantly to elevating brown pieces. Finding the perfect shade can be challenging if you haven’t worked with color palettes before. Don’t panic! You can find below 5 colors that go with brown furniture, according to professional designers. You’ll also find some tips about how you can organize your living room and make it look stylish. 1) White White walls make the room feel larger and can beautifully complement the warmth of brown furniture by creating a balanced and welcoming environment. If you choose to paint the walls white, we recommend you keep it simple. Try to focus on brown shades and play with different kinds of decorative items. White goes perfectly with a simple and clean look. 2) Green Green is a color found in nature and has magical powers. Pair green with brown and evoke a sense of harmony. It brings a natural feel to the room like no other color could. If you want to go for a more stylish, natural ambiance, you can add more plants. The green from the walls and the beautiful natural plants will combine with each other, creating a calming environment. 3) Black Black walls can create an unexpected contrast with brown furniture, adding a touch of sophistication and modernity to the room. The bold choice can highlight other details and textures in the room. You should definitely go for black if you’d like a sophisticated look. The black color has the power to make everything look elegant and chic. If you paint the walls black, you should add some decorative items in lighter shades to make sure that the final result is balanced and the room doesn’t get extremely dark. 4) Beige Beige is a neutral color that blends perfectly with brown furniture, creating a relaxing and aesthetic atmosphere. It enhances the natural warmth of brown tones. For adding more personality to the space, beige also goes well with natural green plants or some modern objects, such as lamps, stylish book shelves, or an interesting-shaped table. 5) Gray Gray is a versatile neutral that works great with a lot of colors, including brown. It can provide a balanced and sophisticated look, giving a contemporary feel to the space. You may feel that grey isn’t a great idea since it may seem difficult to combine! Don’t be scared to try new things; we guarantee you that with the right decorative items, gray-painted walls will look amazing, AND your friends will get inspired! Paint color impacts the mood and atmosphere of a room. Each color has the power to evoke emotions and gives owners the possibility to express themselves and make their spaces feel unique. Lighter colors can make a room feel larger, while darker colors can be the perfect choice for a cozy space. Colors you should AVOID: Red This color doesn’t make brown shades look great since they are similar! It will rather make the furniture look muddy and cheap, and, for sure, you don’t want that. Fuchsia Fuchsia is probably one of the hardest-matching colors, and it will be better if you avoid it in your entire decorating process. It is neither a versatile color nor a trendy one. Yellow Yellow is not a versatile color, making it very hard to match with other elements in a space. It is not a timeless color or a smart choice, limiting significantly the longevity of the design choices. Effective color schemes often rely on a balance between neutral and bold colors. Since the furniture is already a strong presence in the room, introducing stronger colors isn’t a great idea. Colors like red, fuchsia, or yellow can disrupt the balance and lead to a visually overwhelming space. Is it hard to find a good designer? Anyone can be called a good designer. The thing about this job is that the final result is really subjective. It is not that hard to find a professional; it is hard to find a professional you can trust and resonate with. Have you ever thought about getting your home designed by a professional but quit because you couldn’t trust anyone? Some of us, for sure, have. It is challenging to find someone who matches your style. Since we usually spend most of our free time at home, we should pay attention when we choose who we work with, especially when it comes to designing our property. It isn’t that simple to find someone who understands exactly what your goals and expectations are. The efforts designers make to understand exactly what our expectations are and help us achieve our goals are worth admiring. Are they superheroes? Or how the best ones in this industry get to know you more than you know yourself? Is home design overrated? Through social media platforms, everyone has the possibility of keeping up with the latest trends. Unfortunately, most of

Benefits Of Growing Lemongrass

Here’s When You Should Water Your Grass (Best Timeframes)

Have you ever noticed the neighbors’ sprinklers running all hours of the day? If that’s so, you’re probably wondering what’s the best time to water the grass, and how much water is seen as enough. When it comes to watering your lawn, it’s not a question of how to get the greenest, most pristine garden in the neighborhood anymore. Since many communities experienced drought in the most recent years, it’s definitely more important than ever to heed common-sense guidelines when you’re watering a lawn. If you know how to do that, it can save you plenty of resources, and also keep you out of hot water with your homeowners association and your city. In some areas where HOAs and municipalities enforce something we can definitely categorize as strict rules, wise watering can definitely save you from fines too. Here’s when it’s the best time to nurture your plants: Early in the morning is the best time to take care of the grass Watering grass throughout the day, preferably at sunrise when everything is much cooler will definitely ensure optimal water absorption. Watering the garden at night or even later in the day, especially if it’s bright, warm, and breezy, would mean that the wind and heat of the sun and soil will also rob your grass and any other plantings of the much-needed hydration. Water is less likely to evaporate in the morning’s lower light and temperature, so you might waste less. If you get the job done somewhere around dawn, you are also giving the water a much greater chance of reaching the roots and being completely utilized. So make sure you set those sprinklers accordingly. Water newly planted grass seed twice daily to help it take roots Grass seeds also need constant moisture. They generally tend to grow much better in temperatures that range between 59 to 69 degrees Fahrenheit. All these conditions ensure their germination. Depending on the variety of grass seeds planted, germination might take somewhere in between 5 to 30 days. The whole purpose of watering grass seeds is to keep the top 1.5 inches of soil moist. But make sure it’s not soggy all the time. The proper amount of water is definitely important for helping the sprouts take root. Moreover, not enough water will dry out and wash away the seed, making clumps or bare spots. As a general rule, you should water the seeds twice a day for 5 to 10 minutes: first in the morning and then in the afternoon, after the hottest part of the day has passed. The amount of water you use is important I know it might seem like a good idea to set your sprinkler or your irrigation system to the highest setting and simply drench the entire area as fast as you can, but if you water way too fast, you might experience runoff. This will rob the lawn of ample absorption and waste all the water in the meantime. So make sure you keep an eye on the edge of the lawn to make sure you’re not letting precious water run down the drain when it could be used to help your grass grow. Here’s a great device that will make your life easier! Cool-season and warm-season grasses have various watering needs Cool-season grasses are oftentimes found in much cooler, northern climates or even planted in the off-season of warmer ones. These grasses generally start growing when the soil temperature reaches between 40 and 60 degrees Fahrenheit, with the best growing seasons being spring and fall. When you water a lawn of cool-season grasses, you generally need around 1 inch of water every week. This might be achieved by watering three times every week at constant and well-distanced intervals. Warm-season grasses generally make their home in warm, southern climates. Usually, these types of grasses start growing when the soil temperature hits somewhere in between 60 and 65 degrees Fahrenheit, reaching peak potential in the summertime. As a result of their heat tolerance, warm-season grasses develop quite deep roots. For example, when you water a lawn of warm weather grasses, make sure you only give them 1/2 to 1 inch of water per week. All these types of grasses need to be watered only once, maybe twice every week. Follow the general rule of one inch of water every week Over an inch of water a week might drown your grass, depleting it of oxygen and causing it to die, so try to measure your output and wait around 3 days between each watering session to give it the opportunity to breathe. To make sure you’re hitting the mark, make sure you place a couple of coffee mugs around your yard test the sprinkler system, and see how long it takes to fill every cup to the 1/3- or 1/2-inch mark. Water your mature lawn one to three times per week Your lawn-watering schedule mainly depends on whether you decided upon a warm-season grass or cool-season grass. The extensive root systems of warm-season grasses grow way deep into the soil, and also require less frequent watering. What you want is to water these grasses as infrequently as you can. Cool-season grasses, however, have a shallow root system, and therefore require constant moisture. Watering up to three times every week might help the roots keep the nutrients they would need to flourish. Keep an eye out for dryness Grass that has lost its color or curled over the top is probably suffering from a lack of moisture. The same goes for a lawn that still shows your footprints after you’ve already trod a path across it, with the grass blades refusing to bounce back up. If you happen to notice these sings of dryness, make sure you adjust your lawn watering schedule to start as soon as possible in the day and allow for slightly longer sessions, or even fine-tune your watering days to occur a bit more often. Watch out for overwatering If the

chaos garden

What You Need to Know About Chaos Gardening

If you’ve never heard of it, it’s not something we call a garden that seems to have been forgotten. And no, chaos gardening is not a new concept. It has been around for quite some time now, and it brings a free-spirited approach to gardening. In fact, it encompasses various elements of spontaneity and natural growth patterns. This style generally implies using old seeds, encouraging self-seeding plants, and also embracing a more relaxed and organic gardening method. It also fosters a deep connection with nature, which is simply beautiful. It’s a very fun way to express yourself by embracing the beauty of randomness and the joy of seeing the unexpected simply unfold. Chaos gardening also involves scattering a wide blend of seeds across your outdoor space and observing the natural selection process of plants competing for sunlight, space, and nutrients. That’s the main idea around chaos gardening. Instead of organizing your plants neatly in rows, you embrace random colors and shapes and allow them to form organically and have a natural wildflower-like appearance. This beautiful gardening movement gained a lot of popularity as a viral trend in the last year, especially on social media platforms. The benefits of chaotic gardening Chaos gardening goes way beyond a gardening technique. We would dare to say it’s a philosophy. First, it promotes embracing unpredictability and also allowing nature to take its course in your garden. This type of approach could lead to a resilient ecosystem, due to diverse plant species that arise and could better withstand pests, diseases, and changing climate conditions. Besides, chaos planting attracts a wide range of pollinators, which also enhances local biodiversity. Adding a series of native plants will also benefit biodiversity in the future. Native plants are quite adapting to your local soil type. They also require less maintenance and fewer fertilizers. By choosing native species, gardeners can easily support local wildlife, such as insects, and birds, which would further contribute to the health of local ecosystems. What types of environments are the best suited when it comes to chaos gardening? The most exciting part about chaos gardening is knowing how to adapt your seeds to thrive in almost any planting environment. Chaos gardening really flourishes in diverse conditions, especially those that value natural diversity and require minimal intervention. The ideal settings also include native landscapes that are rich in biodiversity, low-maintenance areas like wildflower meadows, pollinator gardens, and also suburban lots where a blend of order and wildness fosters a harmonious balance. All these environments make room for the spontaneous growth of different plant species, promote ecological resilience, and create a more vibrant, thriving ecosystem without needing strict control or excessive maintenance. You need to make sure to check the updated USDA Plant Hardiness Zone and decide on plants that are well-suited for your own region. Selecting the right plants for full sun or shade is also advised, especially if you want your chaos planting to fully thrive. The biggest challenges when you start a chaos garden One of the first challenges is letting go of control and simply surrendering to the unpredictability of the garden’s development. Starting a chaos garden also entails a series of challenges like balancing diverse plants with different needs, which can be quite daunting. Seed and plant selection are definitely fun but also require a bit of homework because you need to learn about the growth habits of the plants. It’s also important to understand that some plants are extremely prolific and can easily take over an entire area, which would make them a poor choice for random planting. Letting your plants grow freely is an essential aspect of chaos gardening, and it also increases the risk of weeds, which would require proactive control measures. Effectively using the space without overcrowding or neglecting your plants is essential for success. Besides, transitioning from traditional gardening methods all the way to embracing chaos gardening could involve a learning curve for gardeners. Some of the biggest misconceptions about chaos gardening There are plenty of misconceptions about chaos gardening, like the belief that it won’t require any maintenance. While this can be quite a low-maintenance approach, some care, like soil health management, thinning after planting, and even occasional weeding, is needed. The next big misconception is that chaos gardening doesn’t require any type of planning. Unlike guerilla gardening, which sometimes involves spontaneous and unauthorized cultivation in public spaces, chaos gardening needs a more thoughtful approach. If you’re passionate about soils and chaos gardening, you need to check out this book! While it also embraces a more organic and spontaneous planting method, chaos gardening still needs strategic decision-making, especially when it comes to plant selection, spacing, and environmental considerations. Another big misconception is that chaotic gardens are quite messy. Well, this isn’t always the case. Taylor explained that when it’s managed well, these gardens can be extremely beautiful and vibrant. Moreover, with the acquired thoughtfulness in design and some genuine care, chaos gardens can easily transform into captivating landscapes that would easily capture the essence of wild beauty while also maintaining a sense of order and allure. What you might need to get started with a chaos flower garden One of the best things about starting a chaotic garden is not needing too many garden tools. In fact, it doesn’t cost much to get started. As with any garden, the best results come when you start from the ground up. One of the most important factors in the success of any garden is learning how to enhance your soil’s organic matter. Adding some compost and humate will enrich the soil, building active and stable forms of organic matter that improve soil structure. This step is mandatory for supporting the diverse plant life in a chaotic garden. As soon as the soil is ready, you can select a diverse chaos garden seed mix with seeds for flowers, vegetables, and of course, herbs, including new and older seeds from previous seasons. You can plant according to seed pack

stainless steel

8 Cleaning Products You Shouldn’t Use on Stainless Steel

We’ve got sinks, stoves, refrigerators, and dishwashers. All of these have two things in common: you will find them in the kitchen, and they’re made out of stainless steel. When you think about it, they look quite sharp and modern, especially when they’re squeaky clean. And they have to be squeaky clean, especially since they show off droplets, dust, and smudges of all sorts much faster than any other surfaces around your home. This is a wonderful reminder to tidy up those high-touch surfaces as often as you can, but it’s still quite a hassle in terms of upkeep. Luckily, it’s a rapid task to swipe stainless steel and make it shine in seconds, especially if you have the right products on hand. However, you can potentially shine away your steel’s finish if, by any chance, you decide to use the wrong products, so it’s vital to know the difference. If you want to learn more about what to use with caution on your stainless steel and what you can use to clean instead, such as DIY cleaning solutions that you can make with what you already have on hand, this is the place to learn. A list of cleaning products you shouldn’t use on stainless steel Before you rush to apply anything to your stainless steel appliances, it can prove to be quite helpful to get a refresher on your exact model through the product manual or website. There are high chances for the manufacturer to mention which cleaning products are good but also which ones will damage the finish. As a general rule, you should try to avoid these tools and cleaners on stainless steel because they may scratch the surface, stain, or even dull the finish. harsh abrasives scouring powders steel wool bleach and other chlorine products glass cleaners that have ammonia, like Windex tap water, especially if you have hard water (you can use clean, distilled, or even filtered water instead). oven cleaners Alternatives: DIY stainless steel cleaners Often, a soft cloth (such as Casabella Infuse All-Purpose Microfiber Cloths) is already damp with a bit of warm, clean, filtered water. This might do the trick and wipe off the light grime. Then, towel dry after to avoid spotting and streaks. For dirtier jobs, you might want to consider one of these homemade cleaning solutions. Before you apply it to your whole appliance, spot-test the cleaner on a small patch that’s as inconspicuous as possible, just to make sure it’s compatible. White vinegar and olive oil Take some distilled white vinegar in a spray bottle (like the Grove Reusable Glass Spray Bottle). Then, spray the stainless steel appliance with vinegar, then wipe it away with a soft, clean cloth in the direction of the “grain” in the metal. With a second soft, clean cloth, rub on a light coating of olive oil in the opposite direction. Club soda Place some plain club soda in a spray bottle. Then, spray the stainless steel appliance, then wipe it away with a soft, clean cloth in the direction of the grain. Dish soap and baby oil In a bucket or large bowl, mix 1 teaspoon mid-liquid dish soap (such as Dawn Free & Clear Dishwashing Liquid Dish Soap) with 1 quart of warm water. Dampen a soft, clean cloth with this solution and swipe it in the direction of the stainless steel grain. With a second soft, clean cloth dampened with clean, warm water, wipe off the residue. After it dries, use a third soft, clean cloth to rub on a light coating of baby oil that goes with the grain. How to spot and treat grime and buildup When it comes to stainless steel, not all messes are quite the same. This means that not all cleaning methods will be the same either. Smudges and hard-water stains, for instance, could come off pretty easily with a simple wipe down, whereas caked-on food and other, more intense buildups could require a more serious product. Also, more elbow grease on your part. So you need to make sure you know what you’re up against before you start getting all those supplies. As tempting as it might sound to reach for steel wool to tackle a super stubborn spot, resist the urge. While stainless steel could look like it has a natural grain to it, steel wool can also scratch it, leaving behind all sorts of annoying marks, especially if you only start to focus on one spot in a circular motion. Instead, try to use some warm water and a bar of dish soap, such as Dawn Powerwash spray, and gently wipe away the grime with a paper towel and a microfiber cloth. For a stubborn drip stain such as BBQ sauce, just let the dish soap and water cleaning solution sit for a couple of minutes. Then, carefully wipe it away. Explore various methods for residue removal. Sprinkle a bit of baking soda on the surface, then apply some white vinegar (it can either be in a spray bottle or a small amount dabbed on a clean kitchen towel). Gently wipe away the spot with a soft cloth or even a paper towel, and rinse with some warm water. Another effective insider secret for banishing buildup is to use club soda. All you need to do is pour the club soda into a spray bottle, spritz, and then wipe. Find the ideal cleaning solution for stainless steel. It goes without saying that you might need some cleansing products to clean stainless-steel appliances. But not all cleaners will do the work on this material. As a matter of fact, a regular all-purpose cleaner might actually leave stainless steel quite streaky. The secret is to look for ingredients with essential oils. It could seem counterintuitive to fight greasy fingerprints with grease. However, oils actually buff away the smudges. You can test Therapy Clean Stainless Steel Cleaner & Polish on the fridge, especially if you open it a dozen times a day.

pet-friendly products, keep mice at bay

These 9 Helpful Pet-Friendly Products that Keep Mice at Bay

Are you afraid of mice, but do you have a pet? These pet-friendly products keep mice at bay:  Mice may look cute, but nobody likes them in their living space, munching on or climbing on their belongings. And when it’s just one or two, you can get rid of them easily, but when there is a hoard of mice dancing around, you definitely need a long-term solution. If you have pets or kids, this issue can become even more challenging, so you’re probably looking for pet-friendly products to help you get rid of mice. When faced with a mouse infestation, people frequently grab spring traps and rodent poisons, but pet owners may find it more complicated than that. Curiosity-seeking pets may be seriously endangered by rodenticides and spring traps. Therefore, how can mice be removed without endangering your pets? Continue reading to see what pet-friendly products will keep mice at bay: Live traps One of the best pet-friendly products that will help you remove rats from your home is live traps. Live traps are available in a variety of sizes and forms, but they are often composed of metal or clear plastic with an opening top that allows you to release the live animal. The good thing about these live traps is that a lot of models are custom to prevent your pet from being trapped and hurt inside them. To keep mice from coming back, you must release them at least a mile from your home. Electronic rat traps An innovative and compassionate method of getting rid of rats without hurting pets is to use electronic rat traps. These traps are safe for pets, keeping them out and ensuring they don’t get harmed. They give rats a swift and deadly electric shock. You won’t have to handle the dead animal because these traps contain a no-touch disposal mechanism, which is a plus! The trap is perfect since it is simple to put up, automatically turns off, and guards against unintentional zapping. Although this choice is a little more expensive than the others, its efficiency makes it well worth the money. Mighty Mint peppermint spray This is one of my favorite pet-friendly products, available in many stores but also on Amazon. After trying every alternative except hiring a pricey exterminator, I settled on a 16-ounce peppermint spray bottle that I could get for $19 on Amazon. I sprayed it as it is advised on the label, getting it in the crack behind my wall oven, on the counter behind my toaster oven, and close to my kitchen baseboards. I gave the spray another coat every few days. You may also use this spray in places where you might not want rats to congregate, such as attics, basements, and automobile engines. During the first few hours, I could smell the peppermint, which was nice and the good thing about this product is that the wood floors and marble counters where I sprayed weren’t affected by it. Snap traps The best method for putting an end to the horde of greedy rats was to use snap traps. These mousetraps indeed kill mice, unlike trapdoor traps, but they do it with humane efficiency. I captured more mice than I can count thanks to the snap traps, but more kept coming. The only place these gadgets could actually be utilized securely was up high on the counter, as they presented a risk to my nosy pet. So that might be a drawback for a lot of people. Ultrasonic devices There are alternative secure solutions to handle your mouse problem if you’re still really hesitant to utilize traps that can help with it for fear of hurting your pets. The beeping sound that ultrasonic devices will severely agitates rats. They will thus move away from the noise, making it possible for a residence to be mouse-free. However, mice may become accustomed to the noise, so this is not a very long-term solution, especially if your problem is seasonal. Always put traps in the cardboard boxes Even though all of these traps are pet-friendly products, some may still be harmful to your pets. Try placing the traps inside a cardboard box if you’re concerned that your pets could set off the traps or damage themselves. A hole barely large enough for a rodent to fit through may be sliced through the box. Non-toxic traps, like glue traps Mice can still get in, even if you take every precaution to keep them out. If so, there are secure, pet-friendly methods of getting rid of them. Another pet-friendly option is to use non-toxic glue traps, especially the ones that catch the mouse within a tiny box or building. Multiple-capture live traps and bait traps are also viable options. Even so, it will decrease the possibility of them hurting themselves, so you should still place these traps in places where your pet is less likely to find them. Try the “starvation” way A different strategy was to starve the mice to death by making every effort to seal food and thoroughly cleaning the kitchen after each trip. While it isn’t really convenient it helped a lot and I did notice fewer mice, but in my case, the kitchen also serves as a busy test kitchen for meal kits, so no matter how hard I try, I can’t completely prevent food particles and aromas from sticking around for longer than a few minutes. If everything else fails, call an expert Even when you try your hardest to keep rats out of your house, they may still decide to make it their home. At that time, your best option is to contact the professionals who can treat your rat problem and solve your worries regarding pet safety. In addition to offering assistance in removing mice without endangering your pets, they may also provide insight into the reasons for mouse infestations despite your best attempts to keep them out. Takeaway: Rats are way worse than creepy crawlers; in fact, they are the

living-alone-1

Living Alone? Making These Mistakes Could Jeopardize Your Life

Living alone is not always safe! Living alone can be both a blessing and a curse. You get to do whatever you want but it might get lonely at time; you don’t have to give explanations to anyone about your purchases but you sometimes, having someone else to help you with your finances could be useful. Not to mention all the housework and repairs that you have to do all on your own. But one of the most important aspects about living alone is safety. Unintentionally, people put themselves in bad situations, that could even put their lives in danger. Not sure what we mean? Then read on to find out some of the most common mistakes that people make that jeopardize their safety and lives. Learn how to fix these mistakes before learning about their effects the hard way! Sharing your living arrangements on social media To avoid any unwanted situations, such as a break-in, you might want to refrain from talking about your living arrangements on social media. No one needs to know you are all alone at home; not the people that matter anyway. Also, avoid sharing any holiday photos when you’re actually there, wait until you get back home. Telling the online world that you’re not at home can work like an open invitation to intruders. As a general rule, do not share posts that include your address (no photos in front of your building) or location, if you are away on holiday. Not knowing your neighbors Knowing who your neighbors are is very important. You don’t have to be best buddies but getting to know the people who live in the same building or community as you do is a win-win. You can ask for their help in supervising your place when you are away and do the same for them should the occasion arise. In addition, knowing the people in your building prevent you from allowing strangers inside. See also: 8 Hosting Mistakes That Might Make Your Guests Uncomfortable Not having any home security system Every homeowner should have security systems installed, especially ones living alone. Security systems monitor your home, detecting intruders and warning you when someone is trying to unlock a window or door from the outside. For extra protection, you can install motion-detection lighting around your house or yard. Also, security cameras can scare away potential burglars or be used to identify intruders, in less pleasant situations. Whatever the case, making the mistake of not having a security system might cost you more than the system itself. Not considering smart home devices You don’t need a smart home that revolves around the sun in order to have some smart home devices installed on your property. Consider smart doorbells, door locks and garage door openers, smart speakers etc. All these and more can offer extra protection, especially if you are living on your own. Not to mention smart home devices can be extra useful when you are not home e.g automatic lights turn on from time to time to give the impression that someone is inside etc. Not checking doors and windows Even if you do have smart home devices and a high-tech security system, checking the doors and windows every time you get ready for bed or going away on holiday wouldn’t hurt. In fact, make it a habit just like brushing your teeth before going to bed or taking your shoes off when you enter your home. Living alone doesn’t need to be scary and turn you into a paranoid person, but it always helps to be careful and vigilant. Better safe than sorry, right? Forgetting smoke or carbon monoxide detectors Putting yourself in danger doesn’t always have to be about leaving the door open or not having a security system. Sometimes, you might have all the necessary devices but not use them properly. Like the smoke and carbon monoxide detectors. These are extremely important, because we all know what can happen in case of carbon monoxide leaks, right? You could die. Therefore, do not neglect such devices and makes sure you test and replace them regularly, as instructed by their manufacturers. No one else is going to do it if you don’t. Forgetting about the blinds One of the perks of having a room with a view is that you get to enjoy the sunrays every spring or admire the snowflakes falling on the ground every winter. The biggest disadvantage is that other people get to “admire” you in all your God-given splendor unless you do something about it. Like use blinds. Apart from others seeing you, they can also see what’s inside your home, which might tempt them to sneak in and steal it. Using blinds is a necessity far more than a design requirement. Blinds keep you and your home hidden from prying eyes and bad intentions. Not securing your WiFi In case you didn’t know, all security and communication devices in a home are connected to the home WiFi. This means that someone with certain tech skills can access various devices in your home, such as a baby monitor, a security camera, laptop camera and spy on you, with you having absolutely no clue about the privacy breach. In addition, cybercriminals can infiltrate your network and gather all sorts of information about, ones that could even put your life in danger. The solution recommended by security experts is to change your passwords constantly and include VPN protection. Keeping an extra key near the front door Having a spare key somewhere at hand can prove useful in certain situations. But it can also prove to be quite dangerous, as your safe spot might be found by someone with less than honorable intentions. If you live alone and want to make sure you don’t end up on the wrong side of the door, leave a spare key with a trusted neighbor or friend and forget about the classic and predictable hiding spots like the plant pot or

rodent problem

9 Plants that Keep Rodents Away from Your Home

These Plants Will Scare Away the Rodents: It’s always extremely worrisome when you have mice in your home, or even worse when you spot a rat in the backyard. That’s why it’s so important to tackle pest issues as soon as possible. Learning how to get rid of mice and rats is definitely a challenging, frustrating, and even expensive task. That’s why we’d advise you to try other alternatives, too. Who knows, you might get lucky and eliminate the pest “the old-fashioned, natural” way! There is one hassle-free solution: get more plants. Believe it or not, there are specific plants that keep rats and mice away from your home. These plants are known for their fragrant properties, and they are actually offensive to rodents, especially since they have such a strong sense of smell, which is much stronger than what humans have. Ultimately, natural repellents are completely non-toxic, inexpensive, and very safe to use, which makes them ideal for use around children or pets. You should bear in mind that rodents are not only a huge nuisance, as they cause damage to your property and garden, but they also carry a host of diseases that could put your family’s health at risk. That’s why it’s so crucial to pest-proof your home and backyard. Are you looking for other alternatives? Cool, check these natural repellents, and test if any of these 9 plants will help you keep mice and rats away from your home: Garlic and onions Most of us have garlic and onions in our homes because, at the end of the day, they’re one of the healthiest vegetables! Moreover, their smell is quite repulsive to mice and rats. In fact, garlic has a number of sulfur compounds that release a pungent scent, which rats really hate. On a similar note, a cut, raw onion releases a powerful smell that can easily irritate the eyes of mice and rats and send them far away. If you ingest it, this might cause instant anemic symptoms in rats. They basically become deprived of oxygen. Try placing a couple of onion slices around the house to keep them away from you. Moreover, you can learn how to grow garlic from cloves in your backyard or pots. If you don’t have a backyard or enough time on hand to grow them, you can easily make a garlic repellent. Just take four or five cloves to make a puree, and add that to a pint of water in a spray bottle. Then, spray that solution around any areas where mice and rats are spotted and in all potential entryways. It could make your home smell like garlic, but it’s still a small price to pay for preventing pests. Lavender This beautiful purple plant is also known for its fresh scent that fills the air. But even though this lingering scent is quite pleasant for us, it’s just as repulsive and obnoxious for mice and rats. Because of this, you should try growing lavender in your backyard or even sprinkle a couple of stalks around the base of other existing plants. As an alternative, you could also fill little sachets with dried lavender and carefully place them in spots or crevices where rodents might try to get into your home. Or, you could also opt for spraying lavender essential oils around the house. The powerful, aromatic smell will keep the mice and rats away. Daffodils Even if these popular spring blooms have a very pleasant, floral scent, they are still repugnant to mice and rats. Daffodil bulbs can be easily planted around outdoor plants that attract rodents, or even place fragrant flowers around the house. Even more, the whole plant is poisonous if you ingest it because it contains lycorine and other alkaloids, especially the bulb. This might result in diarrhea, vomiting, and even death for small animals. If you have pets indoors, make sure you keep them away. Chrysanthemums On a similar note, chrysanthemums are yet another colorful plant that holds “magical powers” against rodents. The blooms possess a very special combination of insecticidal compounds that are quite toxic but also effective repellents. As you probably already know, chrysanthemums are popular flowers, which you can easily find in your local gardening store and either place outdoors or inside the house. Again, they are known to be quite toxic to both cats and dogs. Nibbling on any of these might cause serious harm to these animals, like diarrhea, vomiting, excessive drooling, and even more, so you better keep them away! Sage This beautiful, fragrant herb that’s commonly used in pasta dishes also makes an incredible pest repellent. Rats, especially, hate the smells of both green and white sage varieties. Just sprinkle some herbs onto the soil, around outdoor plants, entryway crevices, and any other cracks around your home. The pungent smell is more than enough to repel mice and rats from entering. You can either grow fresh sage in your own backyard or simply buy it from your local supermarket to leave outdoors. Whichever way you want to go, you will have a constant supply of tasty meals. Other effective herbs with a very strong smell include oregano, basil, thyme, black pepper, and cayenne, which can all be found in your kitchen cupboards. Mint On a similar note, rodents hate anything fresh, which also includes the scent of mint. To be more specific, anything related to peppermint or spearmint, because these two tend to be the strongest. Consider growing your own aromatic herbs in the backyard, or simply place them in pots to deter mice and rats. As an alternative, you can soak cotton balls in peppermint essential oils before placing them around trouble spots or even areas around the house. Just remember to remove and replace them as soon as the scent has faded. Or, you can mix a solution of two teaspoons of peppermint oil with a cup of water in a spray bottle. Then, just use the homemade solution and target the

climbing plants

10 Climbing Plants to Elevate Your Home’s Look

Climbing plants can enhance the beauty of your home. Discover how to use them effectively. Climbing plants have a big impact, whether you’re trying to sell your house soon or you just want to improve the aesthetic of your house for personal delight. These cute plants are a cheap and simple method to add charm, color, and vitality. You might be surprised to hear that many climbing plants are low maintenance and easy to cultivate, despite the belief that they are difficult to grow and care for. These five climbing plants will improve the curb appeal of your house. Climbing roses Roses are loved by everybody because of their delicate look and their immense power to elevate the look of a house in the blink of an eye. Does your entrance seem dull? Climbing roses quickly spruce up a wall or trellis with their lovely scent turning any building into one similar to those from vintage cottages. Note that these flowers need full sun to flourish, so avoid planting them in places with little sunshine! There are many alternatives, ranging from Eden roses to May Queen roses. Just pick the ones suitable for your house and the area you’re living in. Japanese quince One of the earliest shrubs to bloom each year, Japanese quince may be easily taught to grow up against a wall or fence by tying the branches in a fan form on horizontal wires. Before the foliage emerges, little clusters of red, pink, or white blossoms can be seen along the bare branches. It can grow in about any kind of soil, in either full sun or light shade. Star Jasmine Star Jasmine is yet another excellent option. It has glossy, deep green leaves that occasionally turn red in the winter, and fragrant white blooms in the summer. It will look fantastic on your porch, patio, or any other area where you like to have tea. The exquisite aroma of star jasmine is one of its greatest qualities; it gives the ambiance a hint of enchantment. Oh, and don’t forget to add a good book to this perfect environment! Though it prefers a sunny, protected area, it may grow to a height of around 9 meters and can withstand most types of soil and environments. Ivy One of my favorite climbing plants is for sure the ivy. Elegant, not hard to maintain healthy, and happy, ivy is the best option for homeowners who desire full shade during summer time. Depending on where you live, ivy persists throughout the year, even in the winter when practically everything withers away. Numerous colors of green are found in hundreds of different types of ivy, such as variegated Algerian white and green ivy and luxuriant hunter-green English ivy. One of ivy’s greatest qualities is how quickly it establishes and begins to grow. Like a lot of climbing plants from the list, it can be trained on a trellis or almost any structure to guide the ivy to grow however you want it to. Mine also reaches the roof! The only drawback of ivy is that it might attract a few more mosquitoes during the summer, but this can be avoided by applying insect repellent or lighting some incense sticks. If you’re a busy person who doesn’t have the necessary time to water their plants every day, you will be happy to know that ivy doesn’t need too much maintenance. It requires very little care over many years as long as it is planted in rich, permeable soil that is not clay-like. Potato vines One of the best climbing plants to help you elevate your home’s look is solanum crispun also known as potato vines. Blooming from midsummer to late autumn, with numerous small purplish flowers, this plant can grow up to 6 meters when planted in a warm area. Climbing Hydrangea In addition to growing quickly, it is deciduous, which means that it may help save energy by blocking out the sun in the winter and providing shade on hot summer days. The best part is that it can withstand a wide range of climates, including the humid conditions of the South and the frigid winters of the Midwest. Seeing these adorable climbing plants made your inner gardener happy? Then you’re going to need some handy tools. And as usual, I got your back with a set I bought myself last month and what can I say? I am completely satisfied with it. This kit is perfect for both beginners and advanced people. Buy yours for $32.99.  Chocolate vine This plant blooms usually in April and its adorable flowers smell so spicy would bring everyone near your fence to just smell them. What I love about these flowers is that when they fade the foliage of the vine is still nice-looking. In well-drained and moist soil, this plant can reach up to 50 feet! It loves both sun and shade so don’t worry about that. However, because of its rapid growth rate, it has been classified as an invasive species in some locations. Do your research before planting. Creeping Thyme Are you trying to find a bright plant to bring a splash of color into your yard? Consider planting creeping thyme. These multicolored perennial herbs bloom in clusters of white, purple, or pink blooms in the summer. This is a wonderful plant for culinary enthusiasts since, in addition to having an amazing smell, it’s also edible and can be used as a spice. Just remember that bees are drawn to creeping thyme. Thus, it’s advisable to choose a different solution if one of your family members has an allergy. Frequently employed as a low-growing ground cover, creeping thyme may also descend from the top of low container walls or rock ledges. Trumpet vine Hummingbirds and butterflies adore the summer blooms of the natural Trumpet vine, which grows across the Southeast of the United States. Similar to the chocolate vine, it is regarded as invasive in certain places, so do some

6 Kitchen Plants That Add Life and Color to Your Space

Do you have any kitchen plants? If not, this is your chance to learn more about them and choose the ones that fit the best in your kitchen! Did you know that adding plants to your space can have a lot of benefits, one of which is purifying the air? This is why kitchen plants can be an amazing addition to your home that will infuse some color into your space, and depending on the plant, you can even have fresh produce all year round. But not every plant is one of the kitchen plants, and this is why you should be informed about this and choose the most suitable houseplants. It all depends on a lot of factors, such as humidity, temperature, and light. Enhance your culinary space and add a few kitchen plants! Just imagine how cool it can be to have fresh cherry tomatoes in your kitchen or pluck some basil for your pasta. 1. Herbs We’ll start with the most obvious choice, and that is herbs. As we said earlier, having fresh herbs right in your kitchen can be a true mood booster and can make you enjoy cooking more. Who doesn’t like to cook with fresh, home-grown, organic herbs whenever they want? Also, these kitchen plants are not pretentious at all. They need light, and this is most likely the only requirement for most herbs. This means you should check if your kitchen has bright natural light for the majority of the day, and you should be good. In case you don’t meet this criterion, you can use a grow light, and your pants will be okay with it. A few of the herbs you can grow as kitchen plants are: oregano, chives, mint, basil, thyme, parsley, cilantro, mint, and rosemary. In terms of soil, these plants prefer a simple, high-quality organic potting mix, and we know we said that they need light, but you should keep them in indirect light and not in front of the window, as this can be too much. 2. African violet If you love beautiful and colorful flowers, then this is one of the best kitchen plants for you. The African violet will add that splash of color you are looking for and will completely change the vibe of your space. What is great about these flowers is that they come in more colors, so you can find them in blue, purple, pink, or white varieties, and they are also not pretentious. Bright indirect light and lots of water should do the trick. They are chic, they are easy to take care of, and they are compact. Even if you have a small, crowded space, you can still find a place to put these small kitchen plants. When choosing the type of soil, look for one that drains easily. Or you can try a soilless mix, which you can even prepare yourself. Always keep the African violet in a bright indirect light. 3. Snake plant This is one of the most popular houseplants, and we can totally understand why. The snake plant, also known as “mother-in-law’s tongue,” is a versatile plant that can adapt to most conditions. It comes in many colors and shapes, so you have diversity even if you buy more of the same plant. The best thing about the snake plant is that it is incredibly low-maintenance, and you can put it in most spaces around the home. This is why it is one of the best kitchen plants. The snake plant has thick leaves that can hold water, so you don’t have to worry because you don’t have to water it too often. It also needs a dim light that is not too powerful, which means you can keep it in spaces that don’t have direct sunlight. The modern aesthetic it offers to your space is what leads most people to buy this one of the so-called kitchen plants, but keep in mind that, as low-maintenance and trendy as it is, the snake plant is toxic for pets. When you want to take care of this plant, you should know what the right potting mix is, and in this case, the best one is a well-drained, sandy mix. Ready to make your kitchen look the best it ever did? 4. Pothos If you are looking for kitchen plants that look stylish and are also easy to take care of, you can try to buy this plant. It also takes care of itself alone, and all you have to do is water it from time to time. What makes it so suitable for your kitchen is that it adapts incredibly easily to a variety of conditions, so it will not be bothered by the humidity or temperature that takes over your kitchen when you cook. What makes it look so cool and also makes it practical is that this houseplant is a beautiful hanging plant that will naturally not occupy too much space on your counter. It will try to stick itself to everything that goes up, and this makes it easy for you to place it around your kitchen. And it might be a great idea to keep them somewhere because they are toxic to both animals and humans. So, keeping them above ground level will also make them safer and less tempting for small kids and pets. For soil, you can choose any basic potting mix, but keep in mind that it should be rich in peat moss. Also, you can keep Pothos in partial shade or even bright light. 5. Succulents People just love succulents, and if you have an empty window in your kitchen, this is the perfect occasion to help it become more aesthetic and add some life to your space. The reason these plants are called succulents is because they have the ability to store water in their stems or leaves, which makes them resistant to drought. This ability is also what makes them so low-maintenance. What is amazing

7 Signs Your Home Might Have a Rodent Problem

Depending on where you live, you might have to deal with a rodent problem. Actually, 80% of the houses in the US had been affected by mice, regardless of how elegant or clean they were. But since mice come out at night, it can take a while until you identify if you have a rodent problem. Hopefully, there are signs you can notice, and this can help you find out what is happening around your home. Read on and discover the unmistakable signs that your home is the playground of mice. It is finally time to take swift action and reclaim your space! 1. Scratching noises Do you ever stay in bed at night after a long day, trying to get a good night’s sleep, and out of a sudden you start to hear various odd noises? Maybe you think that your imagination is to blame, but if this keeps happening, then you should know that you might have a rodent problem. Mice and rats are very well known for being active during the night, and one simple way to figure out this is to be quiet at night and listen to the sounds around your house. If they are lurking within your home’s walls, you will surely hear the scratching noises. Sometimes you might even hear some muffled squeaks. We know that these sounds can be terrifying at night, but the good part is that they can help you identify if you have a rodent problem. So, if you can hear any of them, you probably should start investigating. 2. Strange pet behavior If your pet, be it a cat, dog, or even a mouse, starts to exhibit unusual behaviors, this might be more than just a quirk. Unwelcome visitors can be the cause of this, and the odd behavior is just how your pet reacts and tries to alert you that something is not right. What you can do is keep an eye on your pet and notice if they scratch at areas they’d previously never even known existed or if they suddenly become interested in random spots of the home and spend most of their time there. If you see your pet doing any of these, it might be a sign that you have a rodent problem. So you better grab a flashlight and carefully start to investigate and check if there are any other signs of a rodent problem. 3. Allergic reactions You generally have no allergies or so, but lately, every time you spend a longer time inside your home, you start to feel a little bit strange. Maybe you have a runny nose; maybe you sneeze; or maybe your throat feels weird. These are all signs of an allergic reaction, and a rodent problem might be the cause of all of them. Also, the same goes for asthma. If you suffer from asthma and your symptoms aggravate seemingly out of nowhere, this is a sign that there are more than seasonal irritants inside your house. You might have a rodent problem and not be aware of it. If any of this happens, it can be a good idea to start checking the places where rodents like to hide: crawl spaces, attics, basements, and so on. 4. Gnaw marks If there is one thing rodents like to do, it is gnaw. This is something we all know, but did you know that this trait of theirs can also be one of the signs that you might have a rodent problem at home? The favorite spots of rodents where you can usually find the gnaw marks are walls and food packaging. Now, one thing you can pay attention to when you find these gnaw marks is their color, as this can give you valuable information about the timeline of the infestation. At first, the marks will be of a lighter color, but as time passes, they will get darker and darker. Also, the size of the marks can help you identify the pest. If the marks are small, you can know for sure that you have to deal with mice. On the other hand, if they are larger, you might have a rat infestation. 5. Urine pools Rats and mice tend to leave urine everywhere in the home, and this can help you identify if you have a rodent problem. Mice, in particular, have the habit of urinating in the same spots generally around food sources, and as a result, you can find accumulations of dirt, grease, and urine. When you start inspecting, you can make the process easier by using black or fluorescent light. This will make the urine more visible, and you can be sure you found all the places mice leave these traces. Identifying these key areas is essential because it will help you find the best strategy to combat the rodent problem as promptly as possible. 6. Nests Rodents like that cozy lifestyle, and this can lead them to build nests. Even when they are inside your home, they want that extra shield and will make themselves nests out of fabric, shredded paper, or dried plant matter. Usually, the nests can be found in strategic areas that are close to food and water sources. They are hidden because the mice don’t want you to know that they are here, but they are still placed in such a way that the rodents have easy access to resources. Keep an eye open and try to observe if there are any gnaw marks or droppings in your house. If you find these signs, you can be sure that there is a nest nearby. As soon as you find a nest, the best thing you can do is destroy it. This is one of the most effective ways to prevent future aggravation of the rodent problem. 7. Ammonia odor Another sign of a rodent problem can be a persistent ammonia smell inside your house. It might resemble a baby’s diaper, and it generally indicates a

buying new furniture

Think Twice Before Doing These 9 Things When Buying New Furniture

Buying new furniture? You may want to avoid doing certain things so you don’t end up regretting your purchase! Much to the dismay of our wallets (and our better judgment), a little impulse shopping isn’t the end of the world. Of course, this is true unless you’ve made a major, spontaneous purchase. In that case, you just might find yourself dealing with the buyer’s regret and an over-extended budget. Furniture is one thing that should never be purchased on a whim. This is one impulsive purchase that is far too heavy, burdensome, and expensive to replace if you decide to return it as soon as you buy it. Instead, experts recommend taking your time when buying new furniture and putting some serious planning and thought into it before making any decision. For instance, interior designer Caroline Agee advises furniture shoppers to consider durability, style, cohesiveness, and functionality before taking anything home with them. To make the smartest furniture buying decisions possible, we’ve rounded up some mistakes to avoid. Interior designers explain that ignoring these oversights may result in disappointing furniture that’s low quality, improperly scaled, or not meant for the long haul. Let’s get started! 1. Overlooking function Considering function before buying new furniture is a top priority, experts say. With some foresight, you’ll definitely save yourself lots of time shopping around and ultimately finding a more fitting piece of furniture. Interior designers recommend thinking about the functionality of space. For example, you may have room for a cabinet with doors, a chest with drawers, or a console table. Having an idea of what will work best helps you spend less time looking for the right piece. This rule applies to both deciding on what type of furniture you’re searching for and critical details. Experts also say that one common mistake people make when buying new furniture is not putting enough thought into what type of fabric will best match their functional needs for an upholstered piece. Also, consider your durability needs and whether or not you wish to choose a performance fabric. 2. Buying first, planning later Before you even start browsing, a planning stage is essential, as interior experts point out. Shopping unprepared might just be the biggest furniture mistake yet. Buying new furniture isn’t like purchasing artwork. With art, you can almost always find a place for it in your house. Artwork doesn’t necessarily need to work with other elements in the space. With furniture, it needs to be the right style, size, and color scheme to fit in with your space. To bypass this miscalculation, experts suggest determining what dimensions would function best before you begin searching for a piece of furniture. It’s best to have a furniture layout for a room so you have a long-term plan. Not only does having a plan help determine what dimensions will work best, but it will also help to coordinate the fabric, style, and finishes of multiple pieces. Plus, it helps to avoid ending up with pieces of furniture that don’t end up working. 3. Buying to fill a gap Buying new furniture isn’t that easy. You have to do a bit of research (a lot if you really want to ensure you’ll settle for the right piece), check out multiple websites, read reviews, visit stores, and so on. While doing these things, you’ll probably stumble upon other pieces that aren’t exactly what you need. We know; the temptation is there, especially if you’re someone who is always looking for ways to spruce things up indoors. Like decor, furniture shouldn’t be bought only for the sake of closing a gap. Just because you’re looking for a new coffee table doesn’t mean that you should purchase the first one you see. Financially, it’s not the smartest thing to purchase furniture simply because you have a hole to fill. In other words, buying new furniture should be done when something catches your eye compared to all of the other options. 4. Living solely in the moment When buying new furniture, think long-term. Experts agree that considering longevity is essential—both from a design and quality perspective. Interior designers recommend avoiding short-lived trends and asking yourself whether or not you will love a piece of furniture in five or ten years. Sometimes, thinking long-term might even imply making sacrifices in the short term. Nowadays, furniture can take what feels like ages to arrive, but experts reassure that timeless, quality furniture will be worth the wait. Most people often want what is available the soonest, or they want to save money by purchasing a less expensive piece of furniture. The best way to be happy for a long time with the furniture you buy is by carefully weighing the options, being okay with waiting slightly longer for it to arrive, and spending a little bit more on it. Of course, if you find a one-of-a-kind piece that you adore, you should go for it! Keep reading to discover other mistakes to avoid when buying new furniture! 5. Bony upholstery According to interior designers, there’s a sure-fire method to tell if a piece of upholstery is qualitative enough to consider purchasing. When buying new furniture and upholstery, it’s important to have the piece in front of your eyes before spending your money on it. If you push on the back or arm of upholstery and can feel the wood through the fabric, that’s a sign the piece isn’t going to be the best purchase. In this case, if you’re looking for quality, you should look for thicker upholstery with plenty of cushion. Keep in mind that, when viewing furniture in a showroom or store, you’re looking at how a piece of furniture is going to look, so it’s important to feel it’s of good quality. When buying new furniture and sampling different showroom pieces, pay attention to these details. When it comes to upholstery, everything that comes with a little cushion is immediately out of the running. 6. Taking furniture at face value

Your Outdoor eBook Is Here!

Your neighbors will be “green” with envy!